So after setting up new PC I’ve been going through some things that might help some others.
I needed to transfer my Outlook profile to my new machine. AND I didn’t want to have to create all my connection settings over again. Yes I know I could just copy over my .pst file over to the new machine and then re-create all my accounts and point them to that .pst file. But I have a lot of accounts with unusual configurations (on the advanced connections tab) and I didn’t want to hassle with that for each and everyone of my accounts. [ I have 5 POP3 Gmail accounts I keep separated for various reasons and another 6 personal domain accounts]
So to move my Outlook file and settings I did the ‘usual’.
First, obviously, I installed MS Office (2010) on the new PC. [BUT do not launch the program yet!] I then copied over my Current Outlook folder Located here:
Win 7 and Win Vista (drive):\Users\user\AppData\Local\Microsoft\Outlook
Windows XP (drive):\Documents and Settings\user\Local Settings\Application Data\Microsoft\Outlook
to a ‘temporary’ folder on the new PC.
I will then copy that folder to the new proper location after I import the Profile settings, as described below. First I exported the old settings and them copied them over to the new machine and imported them.
To export the profile settings (registry) from my original machine:
In Microsoft Outlook you can easily export some types of information to a file. However, there is no option to export your profile e.g. when you want to have the same settings on another computer and you do not want to manually put all of them together with the account details again. In order to do so, you can use the Windows Registry Editor that gives access to all the information.
- Click Start
- In the search field type Regedit and hit Enter
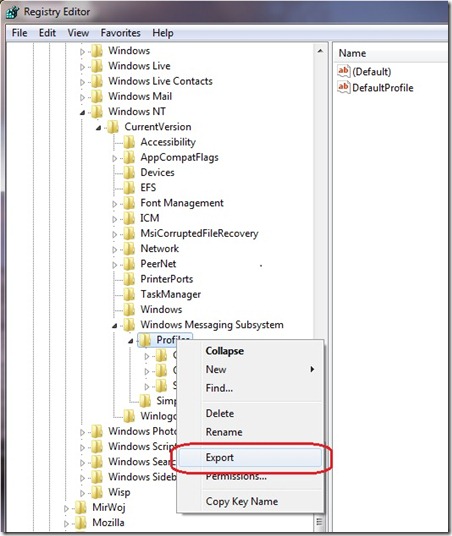
- Expand the following registry entry: HKEY_CURRENT_USER\Software\Microsoft\Windows NT\CurrentVersion\Windows Messaging Subsystem\Profiles.
- You will see a list of your profiles.
- Right click on the profile that you want to copy and click Export
- Then, you can specify the name of the registry file and the location to save it e.g. Desktop.
- Now, you need to copy the file to another computer and double click it there and choose to ‘add the information to registry’
- Confirm that you want to make changes to the registry.
- Now launch Outlook on the new machine and you will most likely get an error saying the .pst file was not found. NO big deal yet. OK/Close your way through the next few windows to EXIT the application. Here we’re only trying to create the default folder/location.
- Now copy the contents of the old Outlook folder from where every you had it temporarily to the new Outlook location. (path should be close to the same as above.)
- Now run your Outlook, the new profile will be opened (if you have only one) or you will be prompted to choose one of profiles (if you have more than one). And it ‘should’ work. At the minimum you should see all of your old mail, folders, contacts and calendars.
However I had some errors. Specifically:
Receiving reported error (0x8004010F) : ‘Outlook data file cannot be accessed.’
Sending reported error (0x8004010F) : ‘Outlook data file cannot be accessed.’
Arghh. So here is the fix that worked for me. Seems that the ‘Folder Location’ for the deliver of email was not properly ‘pathed’. Here is how to fix that.
Changing the folder to specify inbox fixed the issue. Apparently the inbox did not get set and the higher level file name was selected.
1. From Outlook 2010 click File>Account Settings>Account Settings (if you have more that one account you will have to do this for each one – just highlight/select them)
2. Click Change Folder (Down on the lower left corner)
3. Click the + to the left of the folder name to expand the subfolders. Click on ‘New Folder’ and create a new ‘temp’ folder; call it 01 or what ever, and select it. Click OK then you should now see a Folder location in the ‘Change Folder button on the lower left.
4. Now let’s go back Click on Change Folder and now Select the ‘Inbox’ instead of that ‘01’ folder and click OK. The change should now ‘stick’ for you. Click Inbox.
Click OK.
5. Close Account Settings and click send/receive. And you should be good to go.
It’s an obvious bug that the settings won’t ‘stick’. But this works!
Hope that helps some. I’m sure I’ll be referring back to it.


