OS X Virtual Machines Two Methods

I recently had the need to test some ‘fixes’ for a co-workers iMac. Since I don’t like to make system changes on ‘live’ machines I went to my Virtual Machines (VM) and was able to easily test what I needed. I mentioned that to a colleague and they asked me to explain how I was able to create VMs of OS X.  So I thought I would put together some of my older tutorials I’ve created and update and add loads of information for those that want it.

I have three Virtual Machine solutions I use. One is based on the industry leader – VM Ware, another the open source (and much improving) Virtual box and finally Microsoft’s Virtual Server (now HyperVisor). I will not discuss Microsoft’s VM solution here because I have not used it to create OS X VMs.

There is lots of information on how do create an OS X VM on both of these VM platforms but I hope I can give some of you some direction. There are now some greatly improved and easier to use ‘boot loaders’ and patches (kexts) for getting OS X to run in a VM or as a Hackintosh as mentioned in some of my previous posts. For some information on that check out these sites.

Hackintosh.com

OSx86 Project

myHack

Chameleon OSx86

Here is my workhorse server System configuration and specs:
Windows 2003 Server SP2
QuadCore Intel Core 2 Quad Q6600
Abit IP35 Pro
8GB RAM
1.5TB SATA HDD (7200RPM)
GeForce 9600 GT (512 MB)
2 Realtek RTL8169/8110 Gigabit Ethernet NIC
Using VMwave Server Console:
Version 1.0.0 build 28343

First up the solution I have been using the longest – VM Ware. I have included as many screen captures where necessary to show some of the configuration changes I made. The VirtualBox solution is actually really easy now so I will explain that one last.

To get it up and running I followed the steps here:

I followed that fairly closely with some exceptions which are in the screen captures below and I will note later*. These guys are great and should be recognized.

Some other sites that were of great help:

http://wiki.osx86project.org/wiki/index.php/Main_Page

I run an older version of VMware Server and so did not use the freely available VMware Player or the new VMware Server version2.x. Since my version is older, I suspect the newer free version would have worked as well. [After writing this and doing a lot of reading on the new – version 2.x of VMware Server- I now don’t think I would recommend it. Stick with the new free VMplayer/workstation version or VMWare server 1.5x or lower.]

I may try the new VMWare server versions on my other server eventually.  But if it’s not broke don’t futz with it.

VMware products are available here:

http://www.vmware.com/

http://www.vmware.com/download/player/

I own Virtual CD v9, Alcohol 120, and a few other CD emulators but I am sure you can find free ones. Here are a few:

DAEMON Tools lite

MS Virtual CD

MagicDisc

I have a few copies of Mac OS’s around from 9 on up to 10.5 (Legal for my Mac’s – some alive and some put to rest), But I decided to try a version that had already been prepped/patched for running on x86 – it is named the “Mac OS X 10.4.8 [JaS AMD-Intel-SSE2-SSE3 with PPF1 & PPF2].iso distro”. I some others I’m going to try too – “Kalyway_10.5.2_DVD_Intel_Amd.iso” and “JaS.OSx86.10.5.4.Client.Server.Intel.SSE2.SSE3.iso”

If you want those you will have to ‘hunt’ for them (there is a torrent of information available to you hunters our there…). There are continuing updates to some of these builds to include the latest loaders built in.

Also did an ‘upgrade’ with a new Snow Leopard disk I have.

And just so you know;

“Even though Apple suggests Mac users without Leopard buy the $169 Mac box set to get Snow Leopard, anyone can purchase the $29 Snow Leopard disc and install Snow Leopard in its entirety without having already installed Leopard. This means the $29 Snow Leopard DVD isn’t an "upgrade" at all; it’s the full-on Mac OS X operating system for 30 bucks.”

I bought a few upgrade disks here, since I will be upgrading my physical a well as virtual/Hackintosh ones.

Below is a capture of my ‘vmx’ file with the changes I made:

clip_image002

OS X ON VM Ware: Follow these instructions in the link I posted above. Just take note where I changed some options.

Here are some captures of one of my OSX ‘Virtual Machines’ running on my pc.

clip_image002[4]

clip_image004

clip_image006

clip_image008

clip_image010

clip_image012

I have reduced the plethora of VMWare VMs I was running to two for now (OSX and an Ubuntu desktop/client).

But I did have a couple of Vista’s instances, an Ubuntu Desktop, an Ubuntu Server, 2 WinXP, and Windows Server 2008 with Exchange 2007 and SQL2005(time limited) all running and talking to each other!

I use some of my images of existing (real world/live business servers – PDC, Exchange, SQL and other application servers) virtualized to experiment with upgrade/optimization strategies.

I just convert my recent images – (Acronis and Ghost type)together and converted to Virtual Machines [http://www.vmware.com/products/converter/get.html]. Big time and space issue now.

OS X on Virtual Box

First you will need the newest Virtual Box application, get it here. You will also need a ‘patched’ ISO version of OS X Snow Leopard such as one of the latest as mentioned above. Or  The group Hazard has put out a good patched Snow Leopard installer that should do fine (just search for it on Google). Of course, if you feel bad about downloading the ISO of Snow Leopard, you could always go buy a copy to feel a bit better, karmically.

Install VirtualBox.

Then click on New at the top left. At the Create New Virtual Machine window, click Next.

clip_image001

At this window type OSX as the name and it will automatically change the system and version. The next window will let you choose your RAM amount:

clip_image001[4]

If you can spare it, crank it up as far as you can go, but 1024MB should be sufficient.

clip_image001[6]

This is where you’ll make your hard disk. 30GB should be enough so what it comes down to is dynamic or static. Dynamic will expand on use and Static will be a fixed 30GB no matter how much data is actually in it. Dynamic is better for not taking up your hard drive but static will give you better performance. I normally use dynamic. Click next unless you want to change it from dynamic or if you want to increase the disk size or file location.

clip_image001[8]

It will show a summary of your settings. Click Finish, then click Settings at the top.  Make sure you choose only one ‘core’ for processor too.

At this window click on System in the left pane and uncheck Enable EFI

image

image

Now click on the Storage button on the left. From there click on Empty under the OSX.vdi, then click the folder with the green arrow on the right (next to "CD/DVD Device").

clip_image001[12]

clip_image001[14]

At this window click the Add button at the top. Then find and add the OSX86 ISO (Hazard or other) you downloaded earlier. Then highlight it and click Select at the bottom.

image

image

Then click OK, and hit the Start button on the left side of the main VirtualBox window.

image

As it starts up, click inside the window and hit F8. Then at the boot: prompt type –v so you can see what exactly went wrong if something does go wrong. All the services will run and eventually you should come to the language screen. Choose your language then click next.

If you are unable to move your mouse around then hit Right-Ctrl + I.  To ‘free your mouse to move outside of the VM window hit the right ‘Alt’ key.

Click Continue and Agree. Next, start up Disk Utility by going to Utilities in the menu bar.

clip_image001[16]

At this screen highlight 20GB VBOX HARDDISK. Then click the Erase tab, name it what you want in the name box and click the Erase button on the bottom right of the window. It shouldn’t take long. Then click Disk Utility in your menu bar and quit it.

Now you’re back at the installer. Highlight the drive that is now showing up and click Continue.

clip_image001[18]

The next window is important!

Don’t click ANYTHING YET!

Click the Customize button on the bottom left. Expand the options (arrows) and check the necessary boxes for your processor.

AMD Users check:
Any Updates included at the top.
Drop down Kernels and choose Legacy kernel.
AMD option below System support.

Intel Users check:
Any Updates included at the top.
Drop down bootloaders and check the newest Chameleon.
Drop down Kernels and choose Legacy kernel.

Then click Done and hit the Install button. To speed up the process you can click Skip when the disc check pops up.

clip_image001[20]

As soon as it says "installation finished" and starts counting down to restart, press the right Ctrl key. Click on Devices at the top of the VirtualBox window, hit CD/DVD Devices and click Unmount CD/DVD Device.  Remember you will probably have  to hit the right ‘Alt’ key to ‘free’ your mouse! Do that before you get to the end of the install.

Then go to Machine > Reset and click Reset at the prompt. Next you’ll see the Chameleon loader , click inside the VM and hit and hit enter and then OS X will begin to boot.

clip_image001[22]

After it boots you will see the setup screens for OS X! You’re good to go.

On a side note if you use NAT for networking you can control your Virtual Machines from any computer on your network or even remotely using a multitude of remote access solutions.

WordPress 500 internal Server Error xmlrpc.php fix part 2

I had this issue previously and it appeared resolved. But it has returned after upgrading my WordPress installation to 3.x.

So I tried the simple thing of just disabling all my plug-ins but that didn’t do it this time.

I had to do that (disable my plug-ins as described here) and all this too!

I hope this helps some of you. Please make sure you have a complete backup of our MYSQL dbase AND your blog in case you hose something! I am a nut about backups and you should be too.

OK so..

Do this:
1. Using either FTP or CPanel, navigate to your WordPress root directory.
2. You should find the file “xmlrpc.php” there. Make a back up copy of it, just in case. Download it and then.
3. Open xmlrpc.php in an editor
4. Go to the end of the file.
5. Put your cursor after the final ?>
6. Delete anything there, including spaces, or blank lines.
7. Save the edited xmlrpc.php back to your WordPress root directory. [I also changed the permissions on this file to allow the Owner to ‘Execute’ too!]

image

Then:

If you don’t have one (php.ini) then create a text file and name it “php.ini” (without the quotes 😉 ) and with a single line of code in it:

memory=20MB

[If you have one just add that line.]
This file has to be placed into the root directory OR /wp-admin/ within your WordPress installation.
It caused me problems being in the /wp-admin/ directory so I deleted it from there and place it in the root of my blog /mysite/blog/
So keep that in mind!
Also if you are creating the file locally and then uploading it make sure you change the file to a .ini and it does not still have the .txt extension on it.

Then you might want to find your .htaccess file
[It is a hidden file! So if you are using an FTP client make sure you set your ‘filter’ with the ‘-a’ option to ‘see hidden files’ and directories.]
Add this line to the beginning of the file:

AddType x-mapp-php5 .php
AddHandler x-mapp-php5 .php
<Files xmlrpc.php>
SecFilterInheritance Off
</Files>

And lastly I did this

Run the following database query to change the data type on the post_parent column:

ALTER TABLE wp_posts CHANGE post_parent post_parent BIGINT;

So after a few hours of aggravation I can now publish posts with loads of content from Window Live Writer again!

UPDATE: This guy here has a new solution for 1&1 users that works well!

Windows Live Writer WordPress 500 Internal Server Error

This problem cropped up and recently and really got me pissed.

I absolutely LOVE Windows Live Writer. If you post often to sites or blogs this is probably the best tool I’ve found for easy posting, short of a full fledged website/content management application or system [Dreamweaver, SharePoint or the like]. I will post much more in the future on all you can do with this application or you can just ‘Google’ your time away and look for tips.

But.
Basically what happed when I used Windows Live Writer to upload my blog post to one of my websites that has a WordPress installation I then got the error message with the xmlrpc.php:

image

So I set out to find the solution with the best support tool around – Google

I tried this:
http://affiliate-minder.com/wordpresstutorials/livewriter-500-server-error-xmlrpc/
and this:
http://www.codedifferent.com/2009/01/12/solution-for-500-internal-server-error-after-upgrading-to-wordpress-27-at-1and1-server/
and this:
http://www.mindtweaks.com/wordpress/?p=233
and this:
http://ardentdev.com/fix-for-wordpress-xmlrpc-500-internal-server-error/
and this:
http://wordpress.org/tags/500-internal-server-error/page/2
and this:
http://www.43things.com/things/view/425695/find-out-why-xmlrpcphp-isnt-working-on-my-wordpress-blog
and a whole bunch of others.

I messed with php files, ini’s, mysql tables, and on and on.

NONE WORKED!

Then I found a site that suggested something silly:

“disable/deactivate all your plug-ins, try uploading and see what happens.”

Well dang if that didn’t work!!

I then just re-activated my plug-ins and all was good.

Maybe some of you might use this info one day.

Creating Bookmarklets and Smart Bookmarks

Bookmarklets are small pieces of JavaScript code that can be bookmarked to perform the intended action later on any web page. The are a way of making your browsing and web searching much more productive.
With the advent of more applications being ‘cloud based’ the browser is becoming the ‘operating system or portal’ to most information and applications. Using bookmarklets to better perform repeated and common tasks makes lots of sense.
Bookmarklets and Smart bookmarks can be made and used in Firefox, IE and Chrome.
I primarily use Firefox so I will demonstrate how to create them there. The process is nearly identical in Chrome, and Internet Explorer.

Here is one way to create some custom ones.
Open up the Bookmarks Organizer by going to the Bookmarks Menu, and click the Organize Bookmarks option.
image
In the ‘Library’ windows that pops up select the ‘Bookmarks Menu’
image
Click the Organize Menu and choose the New Bookmark option:
image
Now you need to type in whatever name you would like for the Smart Bookmark. In the location field, however, is where you will insert the specialized “URL” which we’ll cover in the next section. This screenshot shows an example location that will return the top 10 bookmarks you visit the most:

The Smart Bookmark that you just created should now be visible in the Bookmark Organizer, and you can place it wherever you would like. The content will dynamically change based on the criteria that you specified in the previous step.

The beauty is that you can create all kinds of specialized queries and actions.

As an example someone asked me about searching for films that certain actors or actresses have been in. Since IMDB is pretty much the place to start looking why not do a Google search OF the IMDB.COM site?

So just follow the steps above and call your bookmark ‘IMDBfinder’ or something and copy in this java code into the ‘Location’:

javascript:var searchterms = escape(prompt(‘Actor or Actress’));var query = searchterms + ‘ site:imdb.com’;window.location=’http://www.google.com/search?q=’ + query;

to make a Google search of that site.
image
In action – when I click on that new bookmark I am prompted to enter a name
image
and the results are then presented. Google searches only that specific site and returns all results from it.
image
This can be really valuable for limiting searches to specific sites you may frequent.  I have some for Lifehacker, HowToGeek, Drudgereport, Mediafire and many others.

The really cool thing is that bookmarklets can run all kinds of code to do things like resize images, browser windows, do translations and much more! The limit is up to you and your creativity and willingness to learn.
Mozilla has some pretty good ones here:
http://mozillalinks.org/wp/resources/bookmarklets-collection/
Simply right-click and choose ‘Bookmark this site’ (in Firefox) or ‘Add to Favorites’ (in Internet Explorer).

Windows 7 Demo and Trials

If you haven’t yet tried or missed the initial public beta of Windows 7 you can still try this fantastic new Operating System in two distinct ways. One is an ‘online demo’ the other is and actual installation of a time limited trial.

I you are still using XP I highly recommend getting familiar with Windows 7 – your next computer WILL have it [or maybe OS X ;)] installed. If you have been using XP for the nearly entire decade that it has been out there are some adjustments to make; though most things are still very easy to find. If you are already using Vista you will see a lot of similarities and a great deal of improvements.

The online demo route:
Microsoft has Virtual Labs that are great for tech students, or those of you who want to get a first-hand trial of the new features with out having to actually install the OS. Also, if you’re not sure on how to deploy something and want to practice in a virtual environment, these labs are quite valuable.While these labs are geared toward IT professionals, it’s a good way for anyone to try out Windows 7 features from the comfort of your current computer.
[Please note that the online version is not nearly as responsive as a full standard install of Windows 7. It also does not run the full Aero interface or desktop effects, and may refresh slowly depending on your Internet connection. So don’t judge Windows 7’s performance based on this virtual lab, but use it as a way to learn more about Windows 7 without installing it.]

Visit this page and click on the TestDrive to ‘Try It Now’.
Microsoft has some very good tutorials there on getting accuainted with the function and features of the operating system.
The folks over at the How To Geek site have a superb walkthrough too.

Install route:
If you wish to actually install a full working 90 day trial/evaluation copy of Windows 7 Enterprise you can.
Visit the MS Technet site here.
From here you can choose the version 64 or 32 bit and download the ISO. Then burn it to a DVD for installation.

Alternatively you could ‘mount’ the ISO and do an install that way but that is not recommended.
See my posts on freeware that I use to mount and/or burn ISO images.

If you are going to use the trial version (installing to hard drive) I would HIGHLY suggest you back up your current system completely – see my posts on imaging.
http://mycraniumdrain.blogspot.com/2009/11/back-ups-and-system-restores.html

http://mycraniumdrain.blogspot.com/2009/05/device-driversmanager-and-disk-tools.html

If things don’t work out it is always nice to have a complete system image to return to!
Also make sure that your hardware meets the minium requirements (preferable much more) for an optimum experience.
I hope this helps some take the proverbial ‘look’ before the leap.

Windows 7 Media Center HTPC

I have been using some of my home PC’s as Media Centers for a long time. Watching recording, scheduling and converting live TV for some time.[since 1998 actually].
To this end I have, for the most part, relied on third party software to do this.

You do need to have a TV Tuner Card to watch live TV.  There are many available but I am partial to Hauppauge and ATI. Both seem to have no issues if the correct Operating System drivers are used. And you will need a Video card with an output that can connect to your TV [HDMI is preferable] if you wish to watch your shows on your television and not just your PC. There are plenty reasonable priced options available.
I have used ATI’s Media Center(included with the ALL-In-Wonder and TV Cards), Hauppauge’s WinTV(included with their TV cards), Beyond TV (a great software solution), GBPVR, and I’ve tried many others.
However with the advent of Microsoft’s Vista Media Center Microsoft really improved the ability to do this ‘natively’ within Windows.
With Windows 7, Microsoft has really hit it out of the park for anyone wishing to create an HTPC (Home Theater PC). The integration, ease of use, available plug-ins and native functionality are amazing! Nearly anyone can install a TV card and be recording and watching TV through their PC very quickly and just as easily using their PC as a PVR for the TV shows, watching them on their TV. There is so much that can be done with  the media center including; streaming movies and music to other machines on your local network (or even the internet!), copying or moving your recorded movies or music to other devices and more.

I have sent out a number of Windows Media Center how to’s in the past and helped many others to build their system. Many of the tips and instructions including information I put together from various sites and my own experiences and insights. Trouble is most people will not take the time to do any research and to learn something new and will instead contact someone else to ‘set it up for them’. Granted I have and sometimes still do earn some decent money from these people but usually it is family and close friends who insist on not learning for themselves. If you take the time and learn you will be far ahead of the game and have a great deal more enjoyment from your technology.

What I am going to do here is try and put together one of the most complete set of links to information on how to setup, configure and tweak a Windows 7 Media Center.

The 1st place to start is Microsoft’s site. Microsoft has what I believe to be some of the best tutorials and how to’s available anywhere! There loads of videos on how to do just about everything.
Start with the ‘Do I have it?’ video
http://www.microsoft.com/windows/windows-media-center/get-started/default.aspx
and work your way through the whole batch of videos. VERY well done.

In my very long history in supporting Microsoft Products I have watched as their training/tutorials for end users has become nothing less than spectacular.

Next stop would be the folks at the How To Geek site. They have put together some very good tutorials and walkthroughs. Many much like the ones I have sent out myself in the past only some of theirs are a little more thorough.

From the HowToGeek site:
Stream Music and Video Over the Internet with Windows Media Player 12
Share and Stream Digital Media Between Windows 7 Machines On Your Home Network
Learning Windows 7: Setup Live TV in Windows Media Center.
Automatically Start Windows 7 Media Center in Live TV Mode.
How To Skip Commercials in Windows 7 Media Center.
Increase Live TV Pause Buffer in Windows 7 Media Center.
Increase Skip and Replay Intervals in Windows 7 Media Center.
Learning Windows 7: Manage Your Music with Windows Media Player.
Share Digital Media With Other Computers on a Home Network with Windows 7.
View Weather Conditions in Windows 7 Media Center.

Some other plug-ins:
Media Center Plug-Ins you should get.
http://www.hack7mc.com/2009/04/5-plug-ins-every-windows-7-media-center-install-should-be-using.html
Copy TV to iPod or other Media player:
http://lifehacker.com/software/ipod/alpha-geek-copy-tv-shows-to-your-ipod-241398.php
You will need:
DVRMSToolbox
http://babgvant.com/files/folders/8659/download.aspx
and
iPodifier
http://ipodifier.com/
My Movies
http://www.mymovies.dk/products/windows-media-center.aspx

Windows Mobile ROM upgrade

Recent phone OS adventure:
I have had and or used just about every smart phone and been with virtually every US carrier there is since they came out in the late 90’s. Yes I have used custom carrier OS’s, Symbian, Blackberry, iPhone and Palm. But have always come back to Window Mobile. I have even demoed an Android for a few days and was NOT happy with it. I think the newer versions coming this year may prove better, but I still doubt I will have all my Windows applications available.
My reasons for choosing the Windows Mobile platform have primarily to do with my position as a network administrator. I require applications and functionalities only available in a Windows operating systems.
I have also learned how absolutely amazingly configurable the Windows Mobile platform is. Much like the Windows Operating system on the Desktop. And nearly all of the worthwhile applications and tweaks are free for the taking and searching or at very low cost. And the ability to ‘tweak’ and adjust the OS is unmatched. [Don’t bring Linux into the equation as it does not have the user, application or development base of the Windows platform as of yet and for most users is WAY to difficult to administer. And yes I do have a few Linux servers and desktops I use, but as I said I am a network admin and have been working with all kinds of OS’s for over two decades.]
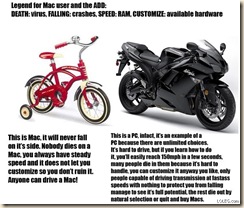
   mac-vs-pc Chuckle, chuckle.

With my previous HTC Touch Pro (ver. 1) I flashed my ROM to give me access to features that were ‘disabled’ by my carrier. Most important to me was the ‘tethering/internet sharing’ abilities.
I found a ROM (OS upgrade) on the PPC Geeks and XDA sites and had no issues updating the phone and was very happy until my phone died and had to be replaced. I can’t stress enough the assistance and knoweldge I have gained through these two sites! I wish to thank them and their users for all the support.
That was nearly a year and a half ago and I have since moved to the latest version of the Touch Pro2 from Sprint.
I was more that a little disappointed upon learning that my new phone would not contain Windows Mobile 6.5 and would NOT be able to be upgraded!

So I set about searching for an upgrade.
The ROM (Operating system for Phone) I chose was created by the folks at MightROM (with Windows Mobile 6.5).
Good video showing it’s use:
http://www.youtube.com/watch?v=fplCcb4zU-4
From extensive reading over the last year this ROM appears to be the most stable and quickest of the bunch while at the same time containing loads more functionality that the stock carrier(s) WinMo 6.1 version. Also being Windows Mobile 6.5 it allows access to the Windows Mobile Marketplace. http://marketplace.windowsphone.com/Default.aspx
So on to how.
I started Here:
http://ppcgeeks.com/
and
http://www.xda-developers.com/

Most importantly, it was the forums section of each where I gained an unbelievable amount of information over the past few years. From simple applications and tweaks to more complex configurations and ROM updates.
Though often hard to sift through so many posts doing prodigious searching and more importantly – actually reading each and every post COMPLETELY, I was able to find the proper techniques and tools needed for my ROM upgrades.
Registration is free for both forums and is often required for access to ‘downloads’ (.cabs) posted in threads.
XDA forum:
http://forum.xda-developers.com/
PPC Geeks Forum:
http://forum.ppcgeeks.com/
Here is the actual ROM information.
http://www.mightyrom.com/
The forum concerning most things about this ROM is here:
http://forum.ppcgeeks.com/showthread.php?t=79579
AND
I recommend reading as many posts as possible! I can’t stress that enough. The people at the forums are incredibly helpful but will NOT tolerate someone who asks questions that have been answered already numerous times. Spend a great deal of time reading posts, links and searching for question and answers you may have as you contemplate/plan an update. Asking questions that have already been asked will quickly get you flamed and not provide you any answers.

The actual download is here:
http://www.mightyrom.com/mightyrom/touch-pro-2/?did=6
The process involves first ‘unlocking’ the phone 1st and then ‘flashing the ROM’.
There are two ways to do that.
One is the ‘free’ way and use the ‘Hard-SSPLunlocker’ method. This should enable you to then flash your ROM.
http://rhodiumw.htc-unlocks.com/hard-spl.php
and
http://forum.xda-developers.com/archive/index.php/t-578660.html
and more info
http://forum.xda-developers.com/showthread.php?p=5731732&posted;=1#post5731732
[note the disable antivirus warnings!]

The second is the ‘Full’ way to unlock your CID (enable you to flash) AND it also unlocks your SIM (allowing you to unlock the CID AND unlock your ‘Radio’ – Carrier if you wish.)
For those that wish to use a phone from another carrier on a different network (complete unlock) you need to unlock the SIM too.  This is NOT required to flash the ROM if you are staying with your current carrier.
I did not wish to change carriers so I really only needed the hard-spl unlocker.

However I was having troubles getting the unlocker to actually ‘unlock’ my phone. You cannot update/flash your ROM until your phone is ‘unlocked’.
So I sprung for the ‘Full CID/SIM unlocker from the Rhodium-htcunlock guys. Made a small ‘donation’ and received the complete unlocker tailored to my phone. Well worth it for me. It actually worked and unlocked my phone and also allows me to switch the carrier should I desire to later (if I sell the phone).

The ‘Full unlocker’ which lets you unlock your phone and also the SIM and to update your ROM is here:
http://rhodium.htc-unlocks.com/
The actual download is here:
http://www.mightyrom.com/mightyrom/touch-pro-2/?did=6

After unlocking my phone I ran the MightROM upgrade with out a hitch.
I then did the ‘carrier provisioning’ on the phone (provided by MightROM in the ‘Systems’ folder.) then installed the ‘carrier cabs’ from Sprint (my provider).  And was good to go! It literally only took 15 minutes to be able to use my phone again!!
My phone has never been faster and more functional!!

There are many other applications that I installed after the upgrade and all went without a hitch.
If your phone is any type of Windows Mobile phone (not just a Touch Pro/Tilt) there are loads of ROMs and upgrade available.

I have loaded a crap load of productivity and media applications(there is NO media format I can’t watch or listen to!). I may list them later or you can post and request them if you
like.

Remember when doing upgrades to your phone you risk the chance of ‘bricking’ it. So proceed with caution and great deals of due diligence. [see picture above :)]. One ‘skin/theme’ I downloaded and installed ‘torqued’ my new system. So I had to ‘re-flash’. No big deal after already having done it. But just a warning.
Here are some good links to applications:
Frequently asked questions:
http://forum.ppcgeeks.com/showthread.php?t=91619
User recommended softwares:
http://forum.xda-developers.com/showthread.php?t=550973
and
http://forum.ppcgeeks.com/showthread.php?t=111190
Just thought I’d pass on some information some of you may use.

I know many of you have iPhones too. I have written previously on how to do upgrades on those too so I won’t go into great detail here. But I will provide the links to two of the top places for information on ‘Jailbreaking’ your phone. If you have one and would like to be free of the ‘lockdown’s’ imposed by AT&T; and Apple I would look at these:
http://wikee.iphwn.org/howto:rs9

http://www.quickpwn.com/category/phones/iphone/jailbreak

Windows XP Mode for Windows 7

Ok so here is the reason for this post.
After nearly a year of trying to get a legacy application to work in Windows 7 I had just about given up.
The application in question may be a purpose built company application (proprietary) that is absolutely necessary for your business or simply something you would rather not do without. I am sure many enterprise and even home users have applications they need to, or would like to, continue using but that simply will not work in Windows 7 (or even Vista for most).
I have such an application. It was built with an old version of Visual Studio. The application utilizes Microsoft IIS (6) web services, MS SQL 2000 databases, and an old version of Crystal Reports for report generation.
It is our business application! I have no option to not run it.
It is in the process of being prepared to be upgraded, but that will take a considerable amount of time and capitol.
To attempt to get this application to run natively under Windows 7 I have done the following and probably more.
I have spent nearly a year trying to get our application to work on Windows 7. I have read hundreds if not thousands of pages on blogs, support sites, news groups and other reference sites and materials.
I have adjusted permissions on dozens of directories to allow for certain machine service accounts, users and read/write access.
I have edited config and ini files.
I have applied patches and fixes to the underlying applications, operating system and services.
I have tried installing other legacy applications in the hope they might contain components needed to run this application (access runtimes, older .Net versions, old Crystal Reports apps, etc.)
I have registered and unregistered dlls.
I have changed permissions on Component services.
I have gone so far as to fire up one of my old machines (with Visual Studio) and do some dll work (mergemodule type stuff) on my local dll files. [note here: I suck at programming and have not done any in a long long time!].
After all this I still could not get this application to work right – Crystal Reporting would not work.
As some of you know I absolutely hate to give up on a problem. I may put stuff on the ‘back burner’ for a while to let my mind work on it. But I just don’t give up. Character flaw maybe.
So what is one to do?
One solution that sometimes works on ‘simple’ applications is to you the ‘compatibility mode’ to run said application.
Compatibility mode has been available since the release of Windows Vista and Windows 2003 Server
To use the ‘compatibility mode’. simply right click on the executable of that application and go to the ‘Compatibility Tab’
Click on the Compatibility mode check box and choose the operating system you wish to run that application in then click apply and try and running the application.
clip_image002
I do use this on many applications that ‘say’ they won’t run on a particular version of Windows fairly often. And many times it works.
However there are applications that are ‘built’ around many other applications and components. Many of which will simply not run this way.
But what happens when just about everything else fails? How can you get that application to run fully and correctly?

The solution is Windows XP Mode for Windows 7. I have written on creating Virtual Machines before and I have been using them for years; as test beds and to run wholly cloned machines that had since died. But I didn’t think there would be such a seamless VM solution that nearly anyone could implement to just run a few applications!

I was wrong. Windows XP Mode for Windows 7 is freaking awesome!! The process is dead simple and fast! I am surprised this has not gotten much more attention and that the articles are scarce and outdated. Had it got more press I would certainly have tried it long ago and saved a few white hairs. The only caveat is that running XP Mode requires Windows 7 Professional or higher (Ultimate or Enterprise).

Following is a simple explanation and how to I cobbled together from various sources. Most of which were very incomplete or out of date so I had to add/edit the information.

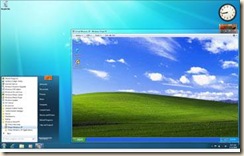
Windows XP Mode for Windows 7 makes it easy to install and run many Windows XP productivity applications directly from your Windows 7-based PC. It utilizes virtualization technology, such as Windows Virtual PC, to provide a virtual Windows XP environment for Windows 7.
Users can access USB devices attached to the host directly from virtual Windows XP.
These devices include printers and scanners, flash memory/sticks and external hard disks, digital cameras, and more.
Once you installed applications in the virtual XP you can ‘Publish it’ and launch applications installed on virtual Windows XP directly from the Windows 7 desktop, as if they were installed on the Windows 7 host itself.
You can access your Windows 7 Known Folders: My Documents, Pictures, Desktop, Music, and Video, from inside the virtual Windows environment, such as Windows XP Mode.
You can cut and paste between your Windows 7 host and any virtual machine.
You can print directly to your attached printer from your seamless application or virtual machine.
OK, let’s get started.
1st. Check that your PC hardware works with Windows XP Mode by downloading and running this tool 1st:
http://go.microsoft.com/fwlink/?LinkId=163321

Then go to:
http://www.microsoft.com/windows/virtual-pc/download.aspx
Under Download and install Windows XP Mode, click Windows XP Mode.
Select the Operating System you have and download BOTH files – Windows XP Mode AND Windows Virtual PC.
I recommend clicking Save and keeping the file on your computer in case you ever need to reinstall Windows XP Mode. Note: Name each individual file so you will know which is which XP Mode and VirtualPC (the Virtual PC app will be named something like ‘Windows6.1-KB958559-x…)
Install XP Mode 1st
Then install Windows Virtual PC.
After installation is complete, click Restart Now to restart your computer.
Windows Virtual PC and Windows XP will now be in the list of programs.
clip_image004

To set up Windows XP Mode for first use.
Click the Start button Picture of the Start button, click All Programs, click Windows Virtual PC, and then click Windows XP Mode to start/run the Virtual XP.
Accept the license terms, and then click Next.
Accept the default location where Windows XP Mode files will be stored.
Type a password, type it again to confirm it,
AND make sure to choose to remember the credentials if you want the integration features to work smoothly and then click Next.
clip_image006
Protect your computer by turning on automatic updates, and then click Next.
Click Start Setup.
clip_image008
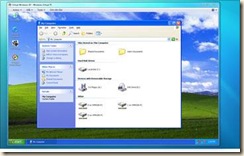
After setup is complete, Windows XP Mode opens in a separate window.
clip_image010
At this point you will need to install your applications in Windows XP.
You can install applications in Windows XP Mode just as you normally would on a physical PC. For example, you can install applications via web, from storage devices, or from physical media such as CD/DVD.
Inside Windows XP Mode, insert the program’s installation disc into your computer’s CD/DVD drive; or browse to the program’s installation file, open the file, and follow the instructions to install the program.
clip_image012
Make sure to choose “All Users” anytime you are asked who to install the software for—the integration features won’t work with software that installs just for your user account.
If you can’t install for everybody, you can simply choose “Open All Users” on the start menu, and copy a shortcut to the application into the start menu’s programs folder.
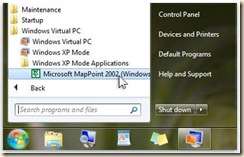
Once your applications are installed and shortcuts are in the All Users start menu, they will magically show up in the Windows 7 start menu under the Windows Virtual PC andWindows XP Applications folder!

Windows XP Mode works in two ways—both as a virtual operating system and as a way to open programs within Windows 7. Windows XP Mode runs in a separate window on the Windows 7 desktop, much like a program, except it’s a fully functional version of Windows XP. In Windows XP Mode, you can access your physical computer’s CD/DVD drive, install programs, save files, and perform other tasks as if you were using a computer running Windows XP.
When you install a program in Windows XP Mode, the program appears in both the Windows XP Mode list of programs and in the Windows 7 list of programs, so you can open the program directly from Windows 7.
Programs installed in Windows XP in the Windows 7 Start menu
clip_image014
You can now launch these applications from Windows 7!
Simply launch the application you need and you are good to go.
If you go here you can find some very good videos on the installation and configuration toward the bottom left hand of the page. I highly recommend checking them out.
Well that’s it. A years worth of aggrevation solved in about an hour!

Create an Ad Hoc Wireless Network With Windows 7

Have you ever been traveling and needed to share your internet connection with other or devices that don’t have a connection? Such as at a hotel or conference room that has only one  wired LAN  jack. Or maybe you have only one Wireless Phone/Modem Card and you simply needed to connect your other wireless devices (phone, media player etc.) to the same network as your laptop?
Or just had guests over with wireless devices (laptops or phones) that needed or want internet connectivity and you don’t want to or cant provide them direct access to your wired (or even wireless) network for security reasons?
Well there is a solution.
If you have Window 7 there is a REALLY simple way to do this that most people are unaware of. You can share any connection that is already connected to your Windows 7 machine; wired LAN (Ethernet), 3G or 4G modem card, or even Wireless LAN (although if you already have a connection your other devices should too. But it is still possible).
Now to the details.
Open the Control Panel then open the Network and Sharing Center:
image
Then simply type in “Ad Hoc” up in the ‘Search Control Panel’ dialog and follow the steps. [Real simple.]
image
Click on the Set up an ad hoc (computer-to-computer) network and walk through the wizard.
image
Next you will choose a Network name, Security type and Key.
The Security types you can use will be dictated by the wireless card (or usb device) you are using. Here I am using WEP for demonstration purposes ONLY. DO NOT USE WEP for your security type as this is very unsecure. I recommend WPA2.
image
image
Then click on “Turn on Internet Sharing” if requested to do so.
image
Go back to the Network and Sharing Center and click on the ‘Manage wireless networks’ link and you will see the new network you just created:
image
image
You should now be able to find this network from any wireless devices you have. Just enter the security key and you are ready to go!! You may be prompted by the Windows Firewall to allow the ‘incoming connections’, if so allow them.
That it, very simple.
There are other third party tools available to do the same thing (such as Connectify)  but with this built in ‘hidden’ feature and ease in Windows 7, I don’t see the need. I will leave it up to you to investigate.

This method is used to share a connection from your Laptop (or desktop) to other devices, usually mobile, NOT the other way around.
If you wish to share your mobile internet connection from your phone to your laptop or desktop you will need to ‘tether’ your device to your system. There many many articles on tethering all kinds of devices for internet connections and I won’t list them all or go through any tutorials. You can search for ‘tethering your phone’ yourself.
I’ll list a few.
The iPhone is a tricky one and usually requires ‘jailbreaking’ your phone – not for the meek. Couple iPhone links here, and here.
For the Blackberry you can check this article out, this program or search Google.
Same for WinMobile just search Google and you will find loads of methods.

There is one application that I have used for tethering to all devices and it has worked very well for me in the past. I still use it on my WinMobile phone now. It is available as a try and buy,  is very easy to use and I think well worth the price.
It is called PDANet and it is available here. [although for the iPhone you will still need to ‘jailbrake’ it -see notes above.]
A note on tethering, tethering works OK in a pinch but can be slow. AND if you do not have an unlimited data plan or use it extensively your carrier will NOT like it!
I hope this helps some of you who asked about these two methods.

Use Media Center To Watch TV

With the improvements in Windows Media Center, starting with Vista and fully realized with Windows 7, it is easier than ever to watch ‘live’ TV (from antennae, cable or satellite) and also watch ‘on demand’ Internet TV.

You can also very easily use Media Center as a PVR (personal video recorder) much like TiVo or your cable company’s PVR. If you already have a PVR or cable on your main television you can always use Media Center to add another viewing room. Or you can go all the way and create a complete Media Center PC to replace your PVR, output to your high def TV and to an audio receiver for a full home entertainment system.

I have been using ‘TV Cards’ in my systems since 1997 to watch and record live TV from my PCs. I actually still do. I utilize dual monitors for increased productivity and when I am able, I’ll watch TV up in one corner of one monitor while working. Sort of like a ‘white noise’ or radio while I work. Or, since I have my systems in my bedroom I can watch TV full screen on my larger monitor from my bed.

With Windows 7 it is now SO EASY to set up, watch, and record if you desire, television that it seems silly not to.

To watch ‘live’ television you have to have some sort of TV tuner card. I recommend the Hauppauge line of tuners. Or the ATI TV Cards or their All-In-Wonder Combo cards. I have at least two versions of each card in 4 different machines and I can tell you they are great. If you system is new and has a high powered graphics card already you may want to go with a TV card only. Most new TV cards also come with remote controls! If your system is older, you may wish to use a ‘combo’ card (like the ATI). For Internet TV you do not have to have a TV card.

I was going to put up some detailed walkthroughs but there are already so many great ones available I thought I’d just post up the links. All of them have great simple explanations, some have good video tutorials and other very good screen captures and descriptions.
Everyone is excellent and worth fully investigating if you have even the slightest desire to use Media Center to it’s full potential. I like to help people utilize technology to be more productive, have more enjoyment and use it to it’s full potential. I hope this helps some who are always asking me about this.

So here are some great links, take them for what they’re worth:
http://www.microsoft.com/windows/windows-media-center/what-is-it/default.aspx

http://www.microsoft.com/windows/windows-media-center/learn-more/internet-tv/default.aspx

The HowToGeek site has some great ones too!:
http://www.howtogeek.com/howto/9166/learning-windows-7-setup-live-tv-in-windows-media-center/

http://www.howtogeek.com/howto/9376/learning-windows-7-watch-tv-programming-without-a-tv-tuner/