Re-Installing Windows 7 if you don’t have original installation media.

Many people who purchased a computer with Windows 7 installed have found that nearly every manufacturer no longer provides you with the Operating System Media (DVDs). You will only be provided with a ‘restore to factory settings option’. Which will only work if the system ‘restore’ partition has not also been corrupted. And if like a recent case I had (you can read that here)you have ‘dual booted’ or otherwise changed your partitions configurations you may not be able to get to the ‘Factory Restore’ option. And if, when you purchased your system you didn’t immediately create the ‘restore media/DVD’s disc(s) you may be hosed if you have to re-install your your Windows 7 Operating system because it died, became corrupted or was otherwise compromised.
Well fear not!
As long as you have your installation Key – contained on your COA (Certificate of Authenticity) you can download and re-install your system! COA is that sicker put on by the manufacturer somewhere on your system

If you cant read it or it has been rubbed off, you can also use one of these tools to find out your installation Keys. [You must use your legally obtained key on the same hardware by the way, or you are breaking the law!]

LicenseCrawler (Excellent tool by Martin Klinzmann!)
Download here

More information

Or you can try Aporah KeyFinder:

Or Majic JellyBean (I’ve used this one many times too)

[note – these applications will be flagged by 90+% of all virus scanners as a ‘key finder/logger’ IT IS A KEY FINDER OBVIOUSLY. So often you must disable you AV protection for the brief moment you download and use this. Get your key information. then Copy the information to paper and TURN YOUR AV SOFTWARE BACK ON!]

Windows 7 comes in various editions like Ultimate, Professional, Home Premium, Home Basic and Starter. Now there might be many cases when you would like to choose the edition during setup. But in reality they are pretty much the same except for one configuration file!

Here are the individual downloads:

Windows 7 Home Premium x86 SP1 (bootable) download

Windows 7 Home Premium x64 SP1 (bootable) download

Windows 7 Professional x86 SP1 (bootable) download

Windows 7 Professional x64 SP1 (bootable) download

Windows 7 Ultimate x86 SP1 (bootable) download

Windows 7 Ultimate X64 SP1 (bootable) download

BUT I recommend downloading the ‘Ultimate version’ (either 64bit or x86) and then deleting the configuration file that ‘tells’ the installation program which version it is. This way you will have ALL options available and then should be able to use YOUR LEGITIMATE installation Key.
I also recommend that you make a bootable USB installation. It will make things much quicker and easier in the long run. If you have multiple Windows 7 Systems (netbooks especially, as most don’t have DVD drives etc.) you can use the single USB with your valid installation keys on every one. [Again you must have valid/legal keys for each installation.]

Simplest way to make you installation ‘version free’ is to delete the file ‘ei.cfg’ from the sources directory of the installation media. Doing this step is what makes the USB memory stick allow you to install any version of Windows 7 as it no longer has a default version configured.

I wrote about the simplest way(s) to do that (create Bootable USB) using Microsoft’s USB tool here. You can run “del F:\sources\ei.cfg” (replace ‘F’ with whatever drive you’re USB is) from the command prompt and you Windows 7 Bootable USB memory stick is ready to go.

You can now either boot from the USB memory stick or just run setup.exe from the drive to start the install process. Either way you will now prompted for the version of Windows 7 you want to install!

If you are going to burn the ISO directly to DVD then you can can also use a free tool "ei.cfg Removal Utility" to delete "ei.cfg" file so that you can choose the desired version at the time of installation.

OR you can use another free tool "Windows 7 ISO Image Edition Switcher" to modify "ei.cfg" file so that you can convert a specific Windows 7 edition setup ISO file (e.g. Windows 7 Ultimate) to another one (e.g. Windows 7 Professional).

I hope this helps for those who asked.
Fix broken Dual boot machine–Linux and Vista/Windows 7

I you have a Windows machine and you’ve installed Linux (Ubuntu, Puppy or the like) and all of a sudden you can’t get into your Windows 7 or Vista Operating system you are not alone.

Many updates to both Linux and Windows seem to ‘bork’ the bootloaders of each. I just got done with a repair on a family members machine so I thought I put down what I did to fix the issue.

First and foremost I won’t say this anymore than once – HAVE YOUR SH$T BACKED UP REGULARLY! I have written so many articles on backups if, by now, you don’t have a back up and recovery solution you deserve to get f&^ked.

OK so let’s start. The system I was recovering was a Windows Vista installation that had recently had Ubuntu 11.04 installed ‘on top of/along side of’ the existing Windows installation – making for a ‘Dual Boot’ system.

After Ubuntu updated the Vista installation became un usable – the system would only boot into Ubuntu and would crash if trying to get into Vista.

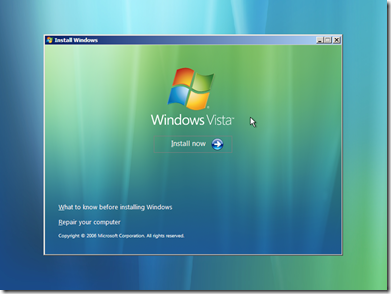
You will need to boot with your Vista/Windows 7 installation disk. A repair disk will do. If you don’t have a Vista installation or repair disk you can check out here for information on how to create on. If you don’t have a Windows 7 installation or repair disk you can go here the process is simple.

Put you repair/installation disk in the drive and start your computer off of the DVD/CD. This often entails holding or hitting the ‘F12’ key and selecting the option to boot from the optical/dvd drive.

Hit Enter at the language selection prompt

WelcomeToVistaSetup

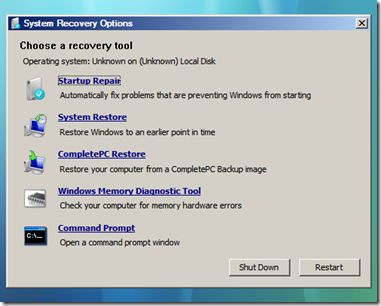
then hit "R" to get to the repair section. You can then select the automatic boot repair tool, but it often will not do any good. Try that at least once. If it doesn’t work then select the command prompt (console)

SystemRecoveryOptions

and type in the following commands:

On Vista:
bootrec.exe /fixmbr
then hit enter
Then type in:
x:\boot\bootsect.exe /nt60 all /force
then hit enter (you may get error, just ignore for now)

On Windows 7:
bootrec.exe /fixmbr
Then hit enter
bootsect.exe /nt60 all /force
Then hit enter (again you may get error – just ignore)

Then type in:
BootRec.exe /FixBoot

DON”T EXIT THE COMMAND PROMPT YET!

Next type in:
attrib bcd -s -h -r C:\boot\BCD
Then hit enter

Next type in:
ren c:\boot\bcd bcd.old
Then hit enter

Then type in:
BootRec.exe /ScanOs
and Enter

Then type in:
bootrec.exe /rebuildbcd
And enter again

Type in:

Exit. and reboot your system.

HOPEFULLY you will be able to get back in.

If not be prepared to spend a few hours or more searching the web for solutions. Or better yet just restoring your system from a backup image Smile

Backups, system failures and peace of mind

Another week in the trenches. I had a primary server at our organization have a major failure. The SAS controller (which provides access to SAS type HDDs) died OR the motherboard to the server itself has an issue. Either way without another ‘like’ system that I can put the SAS card into to see if the issues is just the card or the motherboard I cannot access my drives – and they too may be very corrupted. The only machine I have capable of putting the card into is in production. And the cost of a replacement Dell Perc5i SAS card is nearly $200.00 US and could take days to get here. Plus I needed to have this system back up and running very quickly – the server in question runs all or our company financial, shipping and reporting software applications!

Since I have all my ‘data’ backed up to a server drive every night I was secure in the knowledge that we at least had the financial databases and ‘files’ available. But how to get a system back into production? Disk Imaging to the rescue!! I had a fairly recent full system image, created with my favorite backup software – Acronis, available. Yay! Just need a place to restore it to.

Since my organization now has a VMware ESXi/vSphere SAN and cluster running I was easily able to create/import a new ‘Virtual Machine’ from the Acronis disk image very quickly and then just copy over the backed up data files from the night/early morning before. WORKED LIKE A CHARM! If I’d had an available server (Hardware wise) I could also have restored that image to it too.

I’m telling this to you to remind you – I believe in Images(Clones) for my backups, alone with periodic ‘file backups’. That way I’m protected against full drive failures/loses AND stupidity – accidentally erasing or overwriting files. :)
[Imaging or cloning is the procedure by which you create a backup that is identical to a bootable system either to another internal or external drive. This is the ultimate backup! Should your drive fail you can just ‘pop in’ your cloned drive or ‘restore’ that clone to a new drive and your are up and running.]

If you are not regularly creating full image backups you WILL be sorry! I have written numerous articles about cloning and back up.

PLEASE read here if you any kind of concern for you data.

For Mac images and cloning go here.

So of course this weekend I created two new images on separate drives for my home system(s). I can’t tell you the peace of mind you will get from knowing that the worst that could happen to your system is that you might lose a couple of days or a weeks worth of information. If your drive gets corrupted or fails or you get trashed by some virus, you could be back up and running within a very short period of time! No re-installing your Operating System and programs and ‘trying’ to find you data files. Just restore the image and BAM, you up!

What prompted me to start on this rant is that Apple has finally acknowledged it is having some major issues with some of the hard drives in some of their newer systems they have been selling. Looks like some of the drives just ‘fail’. OUCH! You can read about that here.

And although you can have your drive replaced – YOU WILL LOSE YOUR DATA! The Apple folk and/or kids the the ‘Genius’ bar will NOT re-install your system software or clone your drive for you!! Unless you have an image to restore you will have to re-install you System and applications. And unless you had at least some kind of backup to another drive (Time Machine type) your data (read pictures and music!) will be gone!

So folks, backup, backup and then backup again.

The cost of a couple of extra external drives and a little program setup is minuscule to the cost of losing you ‘digital life’. Right now Acronis has a special – only $29.00 US for their home product!! With Apple’s you can even get a way with out purchasing any software!

Be safe, be secure and gain some peace of mind.

More on backups and archiving

“UPDATE!”

After a few weeks of removing loads of nasties from Windows and Mac machines and recovering data from dead or corrupted drives from both types of systems because of malware/viruses and hardware failures, I thought I would republish this.

I must ask you – in this digital age what price will you put on your data?! You family pictures, you financial documents and communications – everything? I don’t ask this lightly. For only a couple of hundred dollars you can KNOW that you will be safe!

People PLEASE HAVE A SYSTEM BACKUP – COMPLETE AND TESTED!!

I have been asked again to explain in more detail with examples of how I personally backup/archive my data. My previous article is here and should be read first.


So here it is in a simple, I hope, form.

I have two external HDDs (actually many but for example this will work) I use Acronis as my primary imaging software. If you use OS X you can use Time Machine, Carbon Copy or Apple’s built in disk image utility. I covered these in the post above.

To create my images I use an external HDD mount, like this.  with drives something like this or this. You can mount the drives in your system if you like or use any other external type of drive. I just like the ease and economy of this set up. It also makes it easy to just take the drives, place them back in the protective bags they come in and put them( rotate) into a safe deposit box.

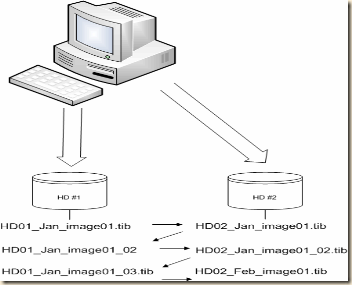
I create a full image of my system on external HD #1 on Jan 1st  – HD01_Jan_image01.tib
On Jan 2nd I create a full image of my system on external HD #2 – HD02_Jan_image01.tib

I now have two images on two separate drives.

At the end of week one for the month I create an incremental backup to external HD #1 – HD01_Jan_image01_02.tib (or whatever Acronis auto names it.)

At the end of week two for the month I create an incremental backup to external HD #2 – HD02_Jan_image01_02.tib

At the end of week three for the month I create an incremental backup to external HD #1 – HD01_Jan_image01_03.tib

On the 1st of the next month I create a new FULL image to HD #2 – HD02_Feb_image01.tib. Once that image is created I can then delete the previous months images ON THAT drive.

On the 2nd of the month I create a full image to HD #1 – HD01_Feb_image01.tib. Once that image is created I can then delete the previous months images ON THAT drive.

This assures me that if my system were to die AND one of my external drives failed I would lose no more that two weeks of data – usually just one week or less!

You should also copy or store one of the external drives in a fire safe or safe deposit box for true disaster recovery!

As with any good backup plan you should regularly test your backups! Either do a full restore (highly recommended) or at least validate and mount your images to insure they are fully readable.

If you wish to, or have to, for compliance issues (corporations) you can archive your monthly images to additional external drives. I do. I have images of machines that are long gone (some over ten years!) and I have been able to retrieve data I needed very easily and quickly. In fact I needed a Photoshop file recently that I was able to retrieve from one of my images of an old Mac G3!!

Archive3

I hope this helps. Please don’t be the person who loses important personal, family or business data because you couldn’t take a little time and effort to set up a backup and recovery plan. The costs and time are insignificant when compared to the cost of loss!

The connection to Microsoft Exchange is unavailable. Outlook must be online or connected to complete – Cant add Outlook accounts…

How I recently fixed one hell of an Outlook 2007 to Exchange 2003 connection problem.

This occurred on brand new Windows 7 Enterprise AND brand new Windows XP workstations while trying to configure the Outlook clients to connect to our Exchange 2003 server.

The actual error is:
"The connection to Microsoft Exchange is unavailable. Outlook must be online or connected to complete – Cant add Outlook accounts.."

Worse still is that this problem did not occur one every new workstation! Windows XP or Windows 7 – only some random ones.

I checked all network/connectivity parameters I could – DNS, LDAP, RPC, TCP/IP etc., and otherwise checked routing and name resolution ad nauseum. And all checked out.
I had this problem a year or so ago but could not find any of my notes! Aggravating to no end. So I swore I would make sure to document my fix when I found one.
So Google here I come….

One of the first things I did then was this:
http://support.microsoft.com/kb/913843/en-us

I checked that the ‘Attendant’ service was running on Exchange; it has been for a few years.

And virtually everything mentioned in every article I could find – 5 days of searching and hundreds of pages!!
Like:
http://social.technet.microsoft.com/Forums/en-US/exchangesvrclients/thread/44a24ec6-33b5-4b66-9fdb-2318b4874fbc

and

http://social.technet.microsoft.com/Forums/en-US/exchangesvrclients/thread/1227b956-c533-4c08-b56d-150ad8486b4c

I also tried importing the Outlook registry keys from machines (both Windows 7 and Windows XP) that do work – still no joy.

I literally went 11 pages deep on Google http://goo.gl/EddW9 and many, many more deep from each of those, looking for a fix!

I read deep somewhere in one post that someone mentioned running ‘Outlook rpcdiag’ – I don’t remember that switch. I checked RPC on the machine(s) and it showed no errors already right..

But since this was a specific ‘Outlook’ switch I though what the hell.
So…
I ran:
"outlook /rpcdiag" from the command line.

It tried to ‘find connections error’ but did not report anything. Damn..
Then it just closed after it could not really start.

Then I started Outlook in Safemode (I was prompted to upon launching Outlook, but it can be run "outlook /safe").

I was then able to add and configure the Exchange account and get connected!!
I waited until it updated the mailbox completely.
Then I restarted Outlook normally and IT WORKS NOW on all of the affected boxes!

I am not sure if all of these steps need to be taken but I now have a plan to follow.

I hope this may help someone, because from most of the posts I read it is a MAJOR issue and MS is not doing much about it! At least I’ll have my notes.

Updating to Firefox 4

I’ve written previously of my heavy reliance on Firefox and the many add-ons I use to make my time more productive and enjoyable while using the Internet.

Read here.

Now Mozilla has release the final version of Firefox 4.

Firefox 4 provides a MUCH faster and integrated browsing experience than version 3.x. The speed improvement will be noticed more on systems that allow for ‘hardware acceleration’ (more on that later) but it is still much faster on older systems.

Here is how I went about doing the upgrade.

1st download and install the latest version of Mozbackup here:

Download location here

Information page here

This application is wonderful. It completely backs up your profile; bookmarks, settings and extensions.

Run Mozbackup and back up your profile(s) completely.

Download/install Add-on Compatibility Reporter. This requires a few Firefox restarts to be properly loaded.

This add-on will let extensions that are not explicitly ‘approved’ for version 4 to run.

And it will provide a nice interface to report those that don’t work correctly to Mozilla and/or the developer.

[If you use LogMeIn (and you should, if you need remote access to machines – Mac or PC!) here is the process to get the older add-on working in version 4:

Download by right-clicking and choosing to ‘save link as’ to your desktop or wherever this file: https://secure.logmein.com/activex/npRACtrl_ff3.xpi and then open the file with a zip extractor:  (this is zip-file, you can use Winzip, 7-Zip or Winrar. I use 7zip,)

extract the file:

install.rdf

modify it the part ‘3.6 – to read 4.6 here: <em:maxVersion>4.6.*</em:maxVersion>

Then save the file and ‘put it back into the xpi (zip file) overwriting the original.

In the xpi file (opened via 7zip or whatever) delete zigbert.rsa in /META-INF folder

Save all back to single xpi file.

Open Firefox then go to the menu bar on top and choose ‘File>Open File’ and select the xpi file and install it.]

OK so let’s get to it!

Download Firefox 4 here and install/upgrade.

I had very few issues with the upgrade on all my machines. So I’ll address them here.

Once installed there are a few things that may need adjusting. I had to do this on some machines and not others.

If your ‘Menu’ bar disappears it can be brought back very simply. Just right-click on free space in one of the toolbars and the selection of ‘Menu Bar’ switches back to the old layout. I also check the ‘Navigation Toolbar’, the ‘Add-on Bar’, and the ‘Bookmarks Toolbar’.

clip_image002

By choosing ‘Customize’ you can select more items to add to the toolbar and place them where you like.

If you have ‘blurry fonts’ you may have an issue with ‘hardware acceleration’.

Simply go to the Options section from the ‘Tools’ context menu. Then in the Advance then General tab you can ‘uncheck’ the ‘Use hardware acceleration when available’.

clip_image004

Tabs on top? The new version puts them there. I don’t like that, you may. Firefox displays tabs on top by default which is a big change for Firefox 3 users. The customize menu has an option to move tabs back down. The entry Tabs on top needs to be unselected to move them below the address bar again.

On my OS X Machines there was one peculiar thing during the installation. Once the dmg was downloaded and mounted I could not copy the install to the applications directory until I trashed the existing Firefox application. Once installed, most of the above still apply.

On Linux (at least on my Ubuntu installs) Firefox 4 is real fast too!

UPDATE:

Lifehacker.com has some great tips on ‘fixing’ some of the quirks with Firefox 4

Well I hope this help some.

SMS from GMail

I’ve written many times about how awesome a tool Google Apps Gmail is. Check out these links.

One

Two

Three

Four and I’m sure there are more just look.

And I’ve also written about how to send and SMS text to a phone via email.
Here
But that does require you know the service provider of your recipient.

BUT you can also send SMS messages directly to any telephone number from Gmail/Google Chat. A super useful tool if you are in front of a computer and the party you need to contact is not.
To do so from Gmail:

  1. Enter your contact’s name in the ‘Search or invite friends’ box in Chat, and select Send SMS from the box of options that appears to the right of your contact’s name. Or, if you already have a Chat window open for this contact, just click Options, and select Send SMS.
  2. In the dialog box, enter a phone number in the ‘Send SMS messages to this number’ field. For now, this feature works only on United States phone numbers. If you’re outside the US, you can still use it, but you won’t see the SMS option in Chat until you enable it manually in the Chat settings page. 
  3. Click Save.
  4. A Chat window appears. Just type your message as you would normally. When you hit Enter, the message will be sent to the phone number you entered.

If your contact replies, the text message response will appear as a reply in Chat. These conversations are stored in your Chat history just like regular chats (but keep in mind that you can’t go off the record while communicating via SMS).

Note regarding mobile phone subscribers in North America: depending on which mobile plans your contacts in North America have, they may be charged by their mobile providers for receiving text messages.
Read about more about it here:

Note that as you ‘use’ SMS quota you can increase the number you are allowed to send very easily.
A quota is an allocation of SMS (text messages) that you’re able to send to a mobile phone:

  • Initially, you’re granted a quota of fifty messages.
  • Every time you send a message, your quota decreases by one.
  • Every time you receive an SMS message in Chat (for example when a phone user replies to one of your messages) your quota increases by five, up to a maximum of 50.

If your quota goes down to zero at any point, it will increase back up to one 24 hours later. So, you won’t ever be locked out of the system

SMS in Chat Commands:
Here are some commands that might come in handy for you down the road when using SMS with Chat:

  • HELP: Text this command to any Gmail SMS number and you’ll get a response reminding you of some of the basics of SMS and a refresher of some of the other useful commands
  • STOP: This command will block all SMS messages from Gmail
  • START: Re-enables you to receive SMS messages from Gmail if you’re currently blocking them
  • BLOCK: Send to the code number for a particular contact to block messages from that specific person
  • UNBLOCK: Allows a blocked contact to send you SMS messages in the future

Mac vs Windows Personal Computers – PC’s

People very often ask me about the differences between Apple products and Microsoft’s.
My usual answer is this simple – one sells hardware (Apple) the other software (Microsoft). Both provide Operating systems that run PC’s (Personal Computers where the abbreviation PC really comes from!); Apple’s Operating system is OS X, Microsoft’s is Windows 7 (both latest). Both are fantastic. But there are many other distinct differences in the philosophies that drive each company.
I just spend another good bit of time trying to explain this to a few folks so I thought I’d pass on some of my points.

Microsoft does software primarily (yes there are some good hardware products by Microsoft like the Xbox and K’nect) – operating systems and applications and let’s just about anybody ‘build’ the hardware ‘around’ that software. In fact Microsoft was the premier software provider that helped Apple really get started in the 80’s.
Heck after Apple ousted Steve Job’s and nearly imploded, it was Microsoft that, along with the ‘re-hiring’ of Jobs literally saved the company with loads of cash and promises to continue software development for Apple!! Without Bill Gates, today’s Apple probably wouldn’t exist! Lets go back to Aug 6th, 1997 …Read here and Read here.

Apple is primarily a hardware seller. They tightly, and I mean very tightly, control the hardware that they allow their software (OS) to run on. In fact it is against the licensing agreement for OS X to run it on anything but Apple hardware! This helps Apple deliver hardware (with the associated software OS) that is usually of fairly good quality. But of course at a premium price.

Apple is great at ‘user interfaces’. The iPod and iPhone are simple and very easy to use, very intuitive. With such a large following the iPhone(and iPad now) also now have many great applications. The iPod took a technology that had existed for while and made it unbelievably user friendly Same with the iPad. Again simplicity of software interface to pretty hardware. Something that is sometimes missed is that ‘prettiness’ and the price people are willing to pay for it.
Apple has an awesome marketing department.
Apple ‘Fan-boys’ far out number any others.

My primary systems are MS Windows machines and servers of course. But I also run some Linux servers and a few Apple desktops. And I have been intimately working with all of them for decades (Linux being a ‘build/port’ of Unix that has been around for over 30 years). And my knowledge is simply not just web surfing or printing pictures. I have and do continue to use all of these in business production environments – digital pre-press, medical fields, financial fields, government and many other industries. [I also won’t even go into the ‘more stable’ argument I often here from some fan-boys because I’m sure they have never RIP’d a 300+MB file on a Mac vs a PC or had to crunch massive digital files. Suffice it to say all systems crash but in my personal experience it has been Mac’s that do so more than any other under heavy processing]

Before you jump on me; I have had apples since my first Apple IIe. I still have lots of Apple hardware. So don’t call me a hater. I just don’t like being ‘locked’ into items or forced to spend loads of cash for hardware upgrades just to keep my software up to date.
As an illustration of that point.
"If you took your car in for service and they welded your hood shut, you wouldn’t be very happy,"- Apple shutting owners out of their iPhones.
http://goo.gl/HDmNY

Another VERY important thing for many to consider is the cost of hardware of each system. Apple systems do and will cost you a HIGH premium over similar Windows based systems. AND Apple is very good at making sure you will have to replace your system every few years! I am not kidding. If you have an Apple machine that is over 3 or 4 years old there is most likely no way you could run the latest version of their OS (OS X Snow Leopard). If you have a ten year old Windows PC sitting around you could still put Windows 7 on it and also upgrade most of the hardware too!!

However please remember the best’ product is one that will do what you want it to (or minimum you will accept) and provides the user experience you desire.
That’s it!

Technology is only a tool, a means to an end. Not the end in and of itself.

I also won’t waste the space here to go over the VERY false argument that Mac’s are immune to being hacked or compromised. This is a statement NEVER made by anyone who deals with security on a regular basis such as myself and many of my colleagues! Mac’s have just had a much smaller ‘target’ on their head in the past but are still just as easily compromised as PCs.

If you have been using a Mac or Windows PC and it works for you stick with it unless you have some other overriding need to switch. The learning curve for Windows 7 and OS X is very short now days compared to the differences of even a decade ago.

If you are primarily just going to be browsing the web, looking at photos and some simple office type application work you will do OK with either one.

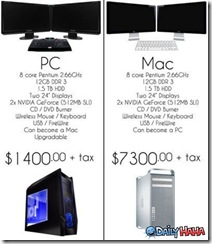
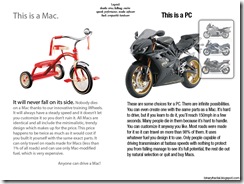
Now some entertaining illustrations:

mac-vs-pc

macpc

PC_Mac994

Great Simple How To & Tech Support videos from Google

These videos are from Google’s "Send Your Parents A Tech Support Package" site.

Basically it is a site that lets the techies (usually the younger generation) send some ‘canned support’ to their parents and elders. But these are also especially useful to those that are either new to computers and technology or just a little less tech savvy.

The short videos are actually very well thought out and clearly and quickly presented so that just about anyone can learn from them.

I believe that many folks who ‘think they know it all’ should just take a look anyways. In my line of work I am amazed that people who literally work for 8+ hours on a computer do not know how to do many of these simple tasks.
The reasons, I think, are that many people are afraid to ask for help, they think they can just ‘figure it out’, or truly don’t care to learn how to more efficiently or properly use technology. Some people refuse to learn out of some warped sense of ego or pride too.
Don’t be one of those. No one’s head has every exploded from learning how to do something new or more efficiently.

I am going to link to all the videos directly so you can peruse them at your leisure. This is very large post with LOADS of great information. I really hope many of you will take the time and view these very short helpful videos. If you wish to watch them full screen you can click on the ‘arrow’ below the YouTube icon on the lower right hand corner and choose ‘full screen modes’.

So let’s start with the first category – THE BASICS:

COPY & PASTE

ADJUST THE TIME ON YOUR CLOCK

CHANGE YOUR DESKTOP BACKROUND – MAC

CHANGE YOUR DESKTOP WALLPAPER – PC

MAKE TEXT BIGGER OR SMALLER

TAKE A SCREENSHOT

CHANGE YOUR SCREEN SAVER – MAC

CHANGE YOUR SCREEN SAVER – PC

Next – WORLD WIDE WEB (INTERNET)

CREATE A STRONG PASSWORD

MAKE BOOKMARKS

MAKE A BLOG

SHORTEN A LONG URL

CHANGE YOUR DEFAULT HOME PAGE

CREATE AN ONLINE CALENDAR

BROWSE THE WEB WITH TABS

Next – COMMUNICATION

SET UP AN EMAIL AUTO-RESPONDER

TRANSLATE TEXT

MAKE CALLS FROM YOUR COMPUTER

CHECK YOUR SPELLING

http://www.youtube.com/watch?feature=player_embedded&v=En8e79YvA0Y

CHAT

VIDEO CHAT

GET A NEW PHONE NUMBER

CREATE A MAILING LIST

CREATE AN EMAIL SIGNATURE

CHECK YOUR EMAIL ON YOUR PHONE

Next – MEDIA

RESIZE A PICTURE

SHARE A BIG FILE

ATTACH A FILE TO AN EMAIL

SHARE PHOTOS

CROP PHOTOS

SHARE VIDEOS

TRANSFER FILES BETWEEN COMPUTERS

KEEP TRACK OF FREQUENT FLIER MILES

Lastly – FINDING INFORMATION

FIND A PIZZA(OR OTHER) RESTAURANT NEAR YOU

GET MOVIE SHOWTIMES

FIND THE DEFINITION OF A WORD

GET DRIVING DIRECTIONS

TRACK A FLIGHT’S STATUS

CONVERT CURRENCY

USE GOOGLE AS A CALCULATOR

GET PUBLIC TRANSPORTATION DIRECTIONS

FIND A BUSINESS’S PHONE NUMBER

GET STOCK QUOTES

FIND RESTAURANT REVIEWS

VIEW LIVE TRAFFIC

Learning Photoshop and tips

Photoshop left you confused?

Start at the Beginning!

Check out the How-To Geek’s Guide to Learning Photoshop.

I’ve been in and around Graphic Arts, printing pre-press and service bureaus for over two decades and this is one of the simplest and well thought out basic how to’s for Photoshop I’ve seen in a long time.  I hope it helps some of you. I’m sure it will if you take the time.

 Part 8: Filters