Exchange 2003 P2V and drive expansion fix

It’s been a long few weeks.

I Had an Exchange 2003 server whose physical hardware was failing – drive and drive controller errors and the physical disk was running out of space on the system drive. Which happened to be the ONLY drive in the server. Yes I know that the system, log and dbase files should all be on separate drives, but I did not build this machine. And it has been the only Exchange server in the organization for almost six years! So I can’t just shut it down.

I did a P2V (physical to Virtual) conversion using and Acronis Image (VMware kicks as at this by the way) and moved it to my ESX Cluster on my SAN, with the hope of being able to at least add some more space to the existing drive and then add additional hard drives (virtual of course) to split up the log and dbase files onto drives other than the %system’% drive.

The P2V went OK with some minor issues with ‘hidden network’ cards and such causing problems. But I got past that. Following ‘Method 1’ here http://support.microsoft.com/kb/269155 (note that you must not close the command line window after step 2 or you will not see the devices!!).

I also had to re-run the Exchange adprep/domainprep on the Domain controller to fix some messed up AD containers/connectors. I also found that after the adprep that was a reference to on old SBS2000 Exchange server that was no longer on the network (fax service too) and I manually removed those via the ADSIedit.msc. So finally it was at least working again! We, as do most organizations that have been around for a while, have a huge spam/malicious email flood that is continually taxing the server. But that is for another post.

So on to the next MAJOR issue. When I moved the machine to a VM I expanded the one and only drive – C: from 32GB to 40GB before starting and connecting it. This sounds all well and good but that extra 8GB of space just shows up as ‘unallocated’ space in the Windows 2003 Server Disk Manager.
I also did create two other volumes on the datastore that houses that machine for the future moving of the logs and dbase files and attached them to the Server.

So now my Exchange 2003 server has three disks (drives) listed in Disk Manager a C: drive still running out of space (but showing 8GB of ‘unallocated space) and two additional large (30GB) drives (F & G); which I will eventually move my log and dbase files to.

So how to expand the system drive to it’s full available size?! I need to have enough room just to be able to move the dbase and log files.

There are LOADS of articles out there ranging from using DiskPart, using Acronis DiskDirector, using gparted and many others. But all seem extremely complex and with poor success rates according to the very long responses on the posts.

I finally found a SUPER blog post By JJ Clements here that looked VERY promising!

So I gave it a try. My first issue was that (as noted in some of the comments) that I had to run the Dell EXTPART utility in safemode. Kind of a bitch to get into in VMware – you have to be VERY quick with the F8 key!

But I was able to expand the drive to the full 40GB. All would be good and well if this wasn’t an Exchange server.

BUT THEN MY INFORMATION STORES WOULDN’T MOUNT!! ARRGGG!!!

The solution – run a repair on the information stores (as per MS’s article here). I could not however run the offline defrag (step 3 in the MS article) to the local system – I’m still out of space! But I will run that to another drive later. I then restart all services.

BAM!! THE F$*ker works!

Well that’s all in a 15hour day I’m done.

More on fixing Facebook

I wrote about using the Firefox (Chrome works too) add-on Greasemonkey and the super script BetterFacebook and I have been getting loads of requests for people asking me to go into a little more detail of how to use it. You should read that first here.

I am amazed at how well I was able to ‘un-muck’ my Facebook pages!

Here is what my Facebook home page now looks like now after setting up and using the BetterFacebook Greasemonkey Script in Firefox:

image

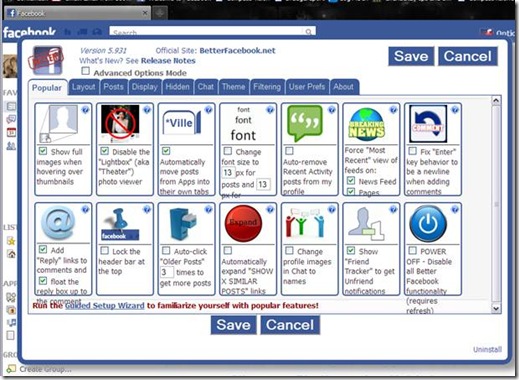
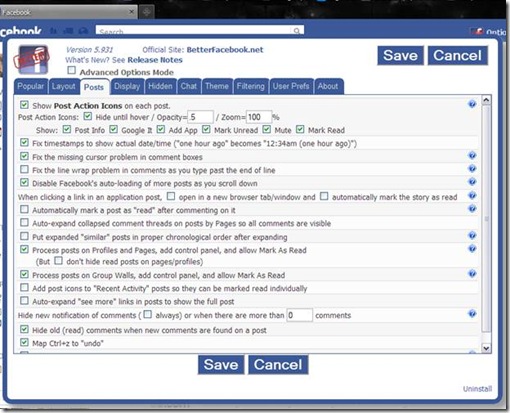
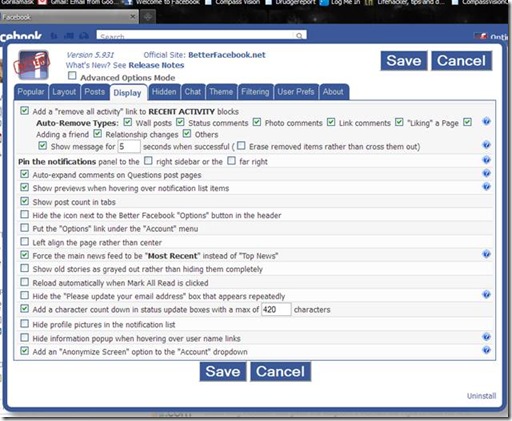
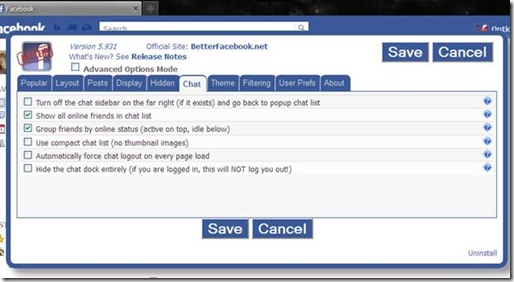
Here are the options as I’ve selected them. Once installed and you restart your browser then ‘re-login’ to Facebook, cancel the set up wizard. Then go to the ‘new’ Options button near your User Name and click on it.

The options I selected give me virtually the same/old layout I’ve been used to and added the ‘feed’ to the right; which I actually find useful so long as it doesn’t try and take over the whole page. Also removed are ads and other garbage I never use – applications being the major one.

clip_image005

clip_image007

Note above that I selected the ‘Stech the Layout…’ option

clip_image009

clip_image011

Note that above I selected the ‘Force the main news feed to be ‘Most Recent’..

clip_image013

clip_image015

And that’s all the settings I chose and hit ‘Save’.

I hope that helps those that asked. You’re all grown ups. I hope that you can take the time and a  chance to experience some ‘pain’ and learn how to do this.

Fix the ‘new’ Facebook feeds

Let’s try and fix some of the ‘new’ Facebook enhancements.

As some of you know I recommended that to get Facebook back to normal. You could Go Account Settings -> Language -> English (UK). And it seemed to work. But Facebook is pushing the crap out globally, so that may only work for a short time if at all now.

I have written many times previously about how to improve your browsing performance and productivity using Firefox and add-ons. Read here please  with special consideration of the Firefox add-on Greasemonkey.
Greasemonkey is a hugely popular add-on for Firefox browsers.
To me this is my most used add-ons the first being AdBlock Plus – Get that here. A GreaseMonkey script could be anything from blocking ads, to adding several different things to Google search, to a bot which basically browses the internet for you. Greasemonkey is most known for Firefox, however many scripts can now be run in the latest version of Chrome!
Get Greasemonkey here.

So on to the Facebook issues. We all now know how Facebook has made radical changes to the way the feed and news are presented, and more are on the way! And it has many in a tizzy. There are a few things that can be done to try and regain some functionality that many of us had been used to. That involves using Greasemonkey scripts and by extension the Firefox or Chrome Browsers.
The first script I would get is one:
BetterFacebook you can read about it here. Note that there are many options you should consider looking at once the script is installed. They will by up in the right hand corner in a drop down menu. I really like this one!
The script install for Firefox is here.

The next is FFixer, you can read about that here. I have noticed that this one requires loads of settings and you my not like it. If you installed it and don’t like it in Firefox go to Tools>Add Ons>User Scripts>then Disable FFixer.

The script install is here.

I also use Facebook Cleaner

As the next few days roll on I am sure that there will be many updates to these scripts and the addition of others to ‘fix’ Facebook. I will keep an eye out and let you all know what I find useful.

I hope this helps some of you.

Here are some articles on using Greasemonkey to improve other browsing:
http://findtricks.com/2011/08/24/top-25-best-facebook-greasemonkey-scripts/

http://www.maximumpc.com/article/features/ultimate_greasemonkey_guide_google_chrome

Amazon Prime, Roku and saying goodbye to Cable TV fees

I have been happy with my high-speed internet from my service provider – Comcast for my internet. I pay for and get very high speeds up and down and get a lot of bandwidth.
I am not however, happy with being butt raped for the cost of my TV services. Recently, after three years my TV services portion of my bill went up $75.00 (U.S)!! Above the $80.00 I was already paying to begin with.
So time to end that!

Obviously I am a techy, so I have watched TV via my computers through the use of TV Cards and streaming services etc. for over a decade. Both on my computer monitors and ‘piped’ to the TV. And in the past few years there have been so many awesome services for watching movies and TV shows that saying goodbye to cable/satellite TV services has never been easier.

To watch streamlining media on your PC or TV you can use an HTPC (home theater PC as I’ve written about before connected to your TV or use many of the ‘set top’ boxes available to ‘stream’ movies and shows from different providers. Heck even some new Blu-ray players and TVs are set up for using these services [Hulu, NetFlix, Amazon Prime etc.]

To be able to ‘stream’ video content from the Internet you will still need a high-speed internet service provider with sufficient speeds and bandwidth allotments. Cable, FiOS and the top level DSL services will usually suffice. For me I’m still stuck with Comcast but I am OK with that, their internet, for me so far, has been great.

Services and devices I use.
Services first.
Amazon prime is great for streaming TV, movies and music and my top pick.
I already pay for Amazon Prime ($79.00/year see here to insure I almost never pay any shipping charges and get 2 day shipping on most items ( buy hundreds of items a year and the savings in shipping alone is well worth it!), but this is just great!

With Amazon Prime you also get to watch thousands of movies and TV shows, included with your Amazon Prime membership at no additional cost!!
Here is some information. And if it isn’t available for free on Prime you can still find it for ‘rent’.

Amazon Prime members will still pay $79/year to access those 9,000 movies and TV shows, but now even non-Prime subscribers will have access to purchase or rent titles from the entire library.  New release movies will cost $3.99, and new TV episodes will stream the day after they air for $.99.

Another plus for Amazon is that you can stream your music too! I posted an article about getting loads of free storage from Amazon; you can read that here. You can purchase AND upload your music to your ‘cloud storage’! Effectively providing you with the ability to stream you music to any device that can access Amazon’s sites!

Netflix is another service that has been fairly good but has recently seen about 1 million uses leave because of some pricing and service shenanigans. They are still a good service and if you already have them you might as well keep them.
Just know that a month ago, Netflix raised the prices of its subscription plans by almost 60%, effectively signaling that it would be charging customers separately for DVD plans vs. streaming plans.
AND Netflix Inc is separating its movie streaming business and its DVD by mail service, which will be called Qwikster, Chief Executive Reed Hastings said in a company blog post on September 09, 2011.

Still, Netflix’s on-demand, unlimited streaming for one price subscription model can’t yet be beat by Amazon’s pay-as-you-go system, although Amazon’s on demand options now dwarf Netflix’s streaming catalogue.

Now for some devices.
If you don’t already have an HTPC as I mentioned above you can always get a ‘set top’ box for accessing TV/Movie and other media content.
I am now a huge fan of the Roku box! This thing is amazing! Simple, easy to operate and able to get virtually everything I need.
With this device you can access pretty much any service such as Amazon, Hulu, Netflix, news shows, TV networks (CBS, NBC and so on), Network streaming services like History Channel, SyFy etc.. AND as with any of these devices – YOU OWN THEM! No rental fee for a box to the cable company. NO monthly fee for TV channels etc.

Here is a short, but by no means complete, list of the most popular devices around.

Roku http://www.roku.com/

AppleTV http://www.apple.com/appletv/

Google TV http://www.google.com/tv/getit.html

Boxee Box http://www.boxee.tv/

Xbox 360 http://www.xbox.com/

PlayStation 3 http://us.playstation.com/

Wii http://www.nintendo.com/wii

So there you go. I hope that some of you will check them out and I hope you are able to break free and truly watch what you want when you want and where you want it.

Stopping spam tip.

1st. USE GMAIL. Then enable ‘SmartLabels’ in Gmail’s labs portion of the ‘Settings’. This alone will cut bulk and spam to next to zero!

You can set up Gmail to retrieve just about any other type of email account you have. Read about that here.

If you don’t want to use Gmail the next part is still just as important.

2nd. DO NOT click on the ‘unsubscribe’ anywhere within a spam email. That just lets the spammer/scammer know that your email account is not only active, but you actually took the time, read and acted upon the email they’ve spammed you with!

Doing that only means your email address just got put onto the priority confirmed working spam list!

Facebook news feed settings update

Facebook has changed its News Feed, so that by default, you can only see updates from people you’ve "recently interacted with." If you don’t change this and aren’t that active, then only a few of your friends will actually see your posts and vice versa.

YOU ACTUALLY HAVE TO CHANGE IT AT THE BOTTOM OF YOUR HOME PAGE, CLICK EDIT OPTIONS AT BOTTOM AND ADD "ALL FRIENDS" TO MAKE THE CHANGE

So Here is how to do that:

Login to Facebook:

clip_image002

To Search for ‘Options’ link at the bottom of the page. The best way to do this is to

Press Ctrl F (if you are on a Windows PC) or Command F (if you are on a Mac) this will open a ‘find’ dialog box. The box will be located in the upper right, upper left or lower left depending on your Browser.

clip_image005

Type in ‘Options’

clip_image009clip_image006

You will find it at the bottom of the page. Click on it to bring up the options:

clip_image011

Open the drop down menu

clip_image013

Change and then save and you’re done.

Another OS X tool updated for Lion

The folks at Titanium’S Software have a new version of a great tool out for the latest version of OS X – Lion. The tool is called ‘Deeper’. It gives you quick access to a number of Mac OS system options and tools that are normally buried in different utilities and menus. You can find the Lion version and versions that work on older OS X systems here along with Onyx for all versions of OS X.

As I have written about before, Titanium makes some great software. I put Onyx, a multifunction utility for Mac OS X, on every Mac I work on or own.  [Read more here]

The guys at Addictive tips have a super run down on how to use Deeper. You can read and should read about that here.

Also, all their software is FREEWARE!

Re-Installing Windows 7 if you don’t have original installation media.

Many people who purchased a computer with Windows 7 installed have found that nearly every manufacturer no longer provides you with the Operating System Media (DVDs). You will only be provided with a ‘restore to factory settings option’. Which will only work if the system ‘restore’ partition has not also been corrupted. And if like a recent case I had (you can read that here)you have ‘dual booted’ or otherwise changed your partitions configurations you may not be able to get to the ‘Factory Restore’ option. And if, when you purchased your system you didn’t immediately create the ‘restore media/DVD’s disc(s) you may be hosed if you have to re-install your your Windows 7 Operating system because it died, became corrupted or was otherwise compromised.
Well fear not!
As long as you have your installation Key – contained on your COA (Certificate of Authenticity) you can download and re-install your system! COA is that sicker put on by the manufacturer somewhere on your system

If you cant read it or it has been rubbed off, you can also use one of these tools to find out your installation Keys. [You must use your legally obtained key on the same hardware by the way, or you are breaking the law!]

LicenseCrawler (Excellent tool by Martin Klinzmann!)
Download here

More information

Or you can try Aporah KeyFinder:

Or Majic JellyBean (I’ve used this one many times too)

[note – these applications will be flagged by 90+% of all virus scanners as a ‘key finder/logger’ IT IS A KEY FINDER OBVIOUSLY. So often you must disable you AV protection for the brief moment you download and use this. Get your key information. then Copy the information to paper and TURN YOUR AV SOFTWARE BACK ON!]

Windows 7 comes in various editions like Ultimate, Professional, Home Premium, Home Basic and Starter. Now there might be many cases when you would like to choose the edition during setup. But in reality they are pretty much the same except for one configuration file!

Here are the individual downloads:

Windows 7 Home Premium x86 SP1 (bootable) download

Windows 7 Home Premium x64 SP1 (bootable) download

Windows 7 Professional x86 SP1 (bootable) download

Windows 7 Professional x64 SP1 (bootable) download

Windows 7 Ultimate x86 SP1 (bootable) download

Windows 7 Ultimate X64 SP1 (bootable) download

BUT I recommend downloading the ‘Ultimate version’ (either 64bit or x86) and then deleting the configuration file that ‘tells’ the installation program which version it is. This way you will have ALL options available and then should be able to use YOUR LEGITIMATE installation Key.
I also recommend that you make a bootable USB installation. It will make things much quicker and easier in the long run. If you have multiple Windows 7 Systems (netbooks especially, as most don’t have DVD drives etc.) you can use the single USB with your valid installation keys on every one. [Again you must have valid/legal keys for each installation.]

Simplest way to make you installation ‘version free’ is to delete the file ‘ei.cfg’ from the sources directory of the installation media. Doing this step is what makes the USB memory stick allow you to install any version of Windows 7 as it no longer has a default version configured.

I wrote about the simplest way(s) to do that (create Bootable USB) using Microsoft’s USB tool here. You can run “del F:\sources\ei.cfg” (replace ‘F’ with whatever drive you’re USB is) from the command prompt and you Windows 7 Bootable USB memory stick is ready to go.

You can now either boot from the USB memory stick or just run setup.exe from the drive to start the install process. Either way you will now prompted for the version of Windows 7 you want to install!

If you are going to burn the ISO directly to DVD then you can can also use a free tool "ei.cfg Removal Utility" to delete "ei.cfg" file so that you can choose the desired version at the time of installation.

OR you can use another free tool "Windows 7 ISO Image Edition Switcher" to modify "ei.cfg" file so that you can convert a specific Windows 7 edition setup ISO file (e.g. Windows 7 Ultimate) to another one (e.g. Windows 7 Professional).

I hope this helps for those who asked.

Problems connecting VPN. Error 609 and error 800 WAN Miniport

I just updated some of my home Virtual Machine software this weekend. Virtual Box and VMware.
Also last week there were numerous Windows, application and Browser(s) updates.
Somewhere along the line my ability to connect VPN stopped working.
The errors I was getting were:
"Error 800: Unable to establish the VPN connection. The VPN server may be un-reachable, or security parameters may not be configured properly for this connection."
and
"Error 609: A device type was specified that does not exit"
and
"VPN Connection Error 800: Unable to Establish Connection"

I searched long, deep and hard and found all kinds of information but none helped. Until I found one article that suggested my actual ‘devices’ and their listing in the ‘inf’ file(s) may have been removed. So I dug deeper and tried to find the entries for the PptMiniport. And found it. It was however missing on the machine that wasn’t working!

Seems that a bunch of entries in one of the very important ‘inf’ files got ‘wiped’ along with the devices!

So how to easily fix this.

This is how to do it:
Download devcon.exe from some Microsoft site HERE.

Open netrasa.inf in c:\windows\inf (c:\winnt\inf on win2k3) (I used notepad.exe to view the file – "open with")

In the DeviceID column, you can see the installable devices.
Look for the section [Msft.NTx86] You will probably see a bunch of the below listed devices missing – I did!

Open a command prompt (choose ‘Run as administrator’ if on Vista or Windows 7).
Navigate to whatever folder you extracted the devcon.exe file to – example c:\Devcon
Then:
Run these commands (one at a time/individually) to install the WAN Miniport (PPTP) and other devices:

devcon.exe install c:\windows\inf\netrasa.inf MS_PptpMiniport

devcon.exe install c:\windows\inf\netrasa.inf MS_L2tpMiniport

devcon.exe install c:\windows\inf\netrasa.inf MS_PtiMiniport

devcon.exe install c:\windows\inf\netrasa.inf MS_NdisWanIp

devcon.exe install c:\windows\inf\netrasa.inf MS_PppoeMiniport

The commands may take a while to complete.
Once done try and connect your VPN again and see if it works. You may have to reboot.
This was one heck of a bugger till I figured it out. I hope some others will benefit from this information.

Fix broken Dual boot machine–Linux and Vista/Windows 7

I you have a Windows machine and you’ve installed Linux (Ubuntu, Puppy or the like) and all of a sudden you can’t get into your Windows 7 or Vista Operating system you are not alone.

Many updates to both Linux and Windows seem to ‘bork’ the bootloaders of each. I just got done with a repair on a family members machine so I thought I put down what I did to fix the issue.

First and foremost I won’t say this anymore than once – HAVE YOUR SH$T BACKED UP REGULARLY! I have written so many articles on backups if, by now, you don’t have a back up and recovery solution you deserve to get f&^ked.

OK so let’s start. The system I was recovering was a Windows Vista installation that had recently had Ubuntu 11.04 installed ‘on top of/along side of’ the existing Windows installation – making for a ‘Dual Boot’ system.

After Ubuntu updated the Vista installation became un usable – the system would only boot into Ubuntu and would crash if trying to get into Vista.

You will need to boot with your Vista/Windows 7 installation disk. A repair disk will do. If you don’t have a Vista installation or repair disk you can check out here for information on how to create on. If you don’t have a Windows 7 installation or repair disk you can go here the process is simple.

Put you repair/installation disk in the drive and start your computer off of the DVD/CD. This often entails holding or hitting the ‘F12’ key and selecting the option to boot from the optical/dvd drive.

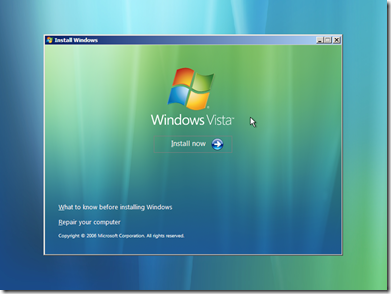
Hit Enter at the language selection prompt

WelcomeToVistaSetup

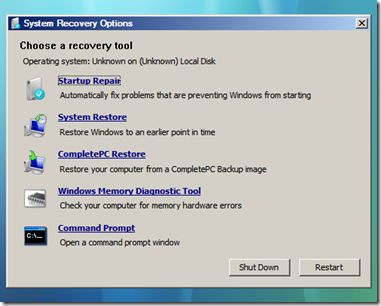
then hit "R" to get to the repair section. You can then select the automatic boot repair tool, but it often will not do any good. Try that at least once. If it doesn’t work then select the command prompt (console)

SystemRecoveryOptions

and type in the following commands:

On Vista:
bootrec.exe /fixmbr
then hit enter
Then type in:
x:\boot\bootsect.exe /nt60 all /force
then hit enter (you may get error, just ignore for now)

On Windows 7:
bootrec.exe /fixmbr
Then hit enter
bootsect.exe /nt60 all /force
Then hit enter (again you may get error – just ignore)

Then type in:
BootRec.exe /FixBoot

DON”T EXIT THE COMMAND PROMPT YET!

Next type in:
attrib bcd -s -h -r C:\boot\BCD
Then hit enter

Next type in:
ren c:\boot\bcd bcd.old
Then hit enter

Then type in:
BootRec.exe /ScanOs
and Enter

Then type in:
bootrec.exe /rebuildbcd
And enter again

Type in:

Exit. and reboot your system.

HOPEFULLY you will be able to get back in.

If not be prepared to spend a few hours or more searching the web for solutions. Or better yet just restoring your system from a backup image Smile