Stop unresponsive service via command line. (Windows & some Linux distros)

In Windows:

If you have a service that is not responding or showing pending in Windows services that you are unable to stop, use the following directions to force the service to stop.

  1. Click the Start menu
  2. Click Run or in the search bar type services.msc
  3. Press Enter
  4. Look for the service and check the Properties and identify its service name
  5. Once found, open a command prompt. Type sc queryex [servicename].
  6. Press Enter
  7. Identify the PID
  8. In the same command prompt type taskkill /pid [pid number] /f
  9. Press Enter

In Linux (Ubuntu for example)

1. Open the System Monitor app. In the Processes tab, scroll down the list until you find the unresponsive app.

Use the system monitor to kill an unresponsive application in ubuntu

2. Right click on it and select “Kill Process”.

Once confirmed, this will kill the unresponsive application.

Via Command line:

Open terminal

Enter the command to show currently running services. Type ls /etc/init.d into Terminal and press ↵ Enter. This will bring up a list of currently running services and their corresponding command names.

If this command doesn’t work, try ls /etc/rc.d/ instead.

Find the command name of the service that you want to restart. You’ll typically find the name of the service (e.g., "Apache") on the left side of the screen, while the command name (e.g., "httpd" or "apache2", depending on your Linux distribution) will appear on the right side.

Enter the restart command. Type sudo systemctl restart service into Terminal, making sure to replace the service part of the command with the command name of the service, and press ↵ Enter.

For example, to restart Apache on Ubuntu Linux, you would type sudo systemctl restart apache2 into Terminal.

Enter your password when prompted. Type in the password that you use for your superuser account, then press ↵ Enter. This should restart the process.

If the service doesn’t restart after doing this, try typing in sudo systemctl stop service, pressing ↵ Enter, and then entering sudo systemctl start service.

To list running services in the command line:

Use this command:

service –status-all

Here’s an example of what this looks like on an Ubuntu 16.04.2 LTS system:

root> service –status-all Example:

[ + ] apache-htcacheclean

[ + ] apache2

[ + ] apparmor

[ – ] bootmisc.sh

[ – ] checkfs.sh

[ – ] checkroot-bootclean.sh

[ – ] checkroot.sh

[ + ] console-setup

[ + ] cron

[ + ] dbus

[ – ] hostname.sh

[ – ] hwclock.sh

[ + ] irqbalance

[ + ] keyboard-setup

[ – ] killprocs

[ + ] kmod

[ – ] mountall-bootclean.sh

[ – ] mountall.sh

[ – ] mountdevsubfs.sh

[ – ] mountkernfs.sh

[ – ] mountnfs-bootclean.sh

[ – ] mountnfs.sh

[ + ] mysql

[ + ] networking

[ + ] nginx

[ + ] ondemand

[ – ] plymouth

[ – ] plymouth-log

[ + ] procps

[ + ] rc.local

[ + ] resolvconf

[ – ] rsync

[ + ] rsyslog

[ – ] sendsigs

[ + ] ssh

[ + ] sysstat

[ + ] udev

[ + ] ufw

[ – ] umountfs

[ – ] umountnfs.sh

[ – ] umountroot

[ + ] urandom

[ – ] uuidd

The meaning of the Ubuntu service command output

From the Ubuntu Linux service man page:

service –status-all runs all init scripts, in alphabetical order, with the status command. The status is:

[ + ] for running services

[ – ] for stopped services

[ ? ] for services without a ‘status’ command

This option only calls status for sysvinit jobs; upstart jobs can be queried in a similar manner with initctl list.

Some services are managed by Upstart. You can check the status of all Upstart services with sudo initctl list. Any service managed by Upstart will also show in the list provided by service –status-all but will be marked with a ?

[Note: Running with/without sudo can make a difference.

Some services in /var/run/ have read access only to root user. Those services show status [-] without sudo, and [+] with sudo.]

Meltdown And Spectre info

I’m sure many have heard of the recent MASSIVE security holes found in computer processors.

The threat is real so you should take notice. Here is a good description  form Stu Sjourwerman of what it is and what to do.:

"Computer researchers have recently found out that the main chip in most modern computers—the CPU—has a hardware bug. It’s really a design flaw in the hardware that has been there for years. This is a big deal because it affects almost every computer on our network, including your workstation and all our servers.

This hardware bug allows malicious programs to steal data that is being processed in your computer memory. Normally, applications are not able to do that because they are isolated from each other and the operating system. This hardware bug breaks that isolation.

So, if the bad guys are able to get malicious software running on your computer, they can get access to your passwords stored in a password manager or browser, your emails, instant messages and even business-critical documents. Not good.”

So, What Can We Doing About This?

You need to update and patch all machines on your network. This could to take some time, some of the patches are not even available yet.

In the meantime, we need you to be extra vigilant, with security top of mind and Think Before You Click.

Here is a good site with an FAQ and videos about this SNAFU, that you can refer people to if they want to know more. For instance, antivirus does not protect against this vulnerability.

Zero Day Adobe and Microsoft Exploits

Adobe has released (for the second time this month) an emergency update for its widely used Flash Player to combat active attacks that exploit a previously unknown security bug that hackers are actively exploiting to surreptitiously install malware on end-user computers.

Attackers are already exploiting it!

Please apply this patch and stay secure.
If your version of Flash on Chrome (on either Windows, Mac or Linux) is not yet updated, you may just need to close and restart the browser. The version of Chrome that includes this fix is v. 33.0.1750.117 for Windows, Mac, and Linux. To learn what version of Chrome you have, click the stacked bars to the right at of the address bar, and select “About Google Chrome” from the drop down menu (the option to apply any pending updates should appear here as well).

The most recent versions of Flash are available from the Adobe download center here, but beware potentially unwanted add-ons, like McAfee Security Scan, Chrome browser etc..). To avoid this, uncheck the pre-checked box before downloading, or grab your OS-specific Flash download from here. Windows users who browse the Web with anything other than Internet Explorer will need to apply this patch twice, once with IE and again using the alternative browser (Firefox, Opera, e.g.).

AND..

Microsoft has released a stop-gap fix for a previously unknown zero-day vulnerability in Internet Explorer versions 9 and 10 to combat a separate zero-day campaign. IF possible (many users cannot because of other ‘line of business software’ that requires versions 9 or 10) to update to version 11 of IE, since it contains exploit mitigations not available in earlier releases. Those who are prevented from running version 11 should install the Microsoft fix as soon as possible.

Microsoft site explanation is here

Actual ‘Fix-It tool is here

If you run it make sure you ‘right-click’ on the file after it’s downloaded and ‘Run As Administrator’

Be safe folks, Peace.

Fix broken Dual boot machine–Linux and Vista/Windows 7

I you have a Windows machine and you’ve installed Linux (Ubuntu, Puppy or the like) and all of a sudden you can’t get into your Windows 7 or Vista Operating system you are not alone.

Many updates to both Linux and Windows seem to ‘bork’ the bootloaders of each. I just got done with a repair on a family members machine so I thought I put down what I did to fix the issue.

First and foremost I won’t say this anymore than once – HAVE YOUR SH$T BACKED UP REGULARLY! I have written so many articles on backups if, by now, you don’t have a back up and recovery solution you deserve to get f&^ked.

OK so let’s start. The system I was recovering was a Windows Vista installation that had recently had Ubuntu 11.04 installed ‘on top of/along side of’ the existing Windows installation – making for a ‘Dual Boot’ system.

After Ubuntu updated the Vista installation became un usable – the system would only boot into Ubuntu and would crash if trying to get into Vista.

You will need to boot with your Vista/Windows 7 installation disk. A repair disk will do. If you don’t have a Vista installation or repair disk you can check out here for information on how to create on. If you don’t have a Windows 7 installation or repair disk you can go here the process is simple.

Put you repair/installation disk in the drive and start your computer off of the DVD/CD. This often entails holding or hitting the ‘F12’ key and selecting the option to boot from the optical/dvd drive.

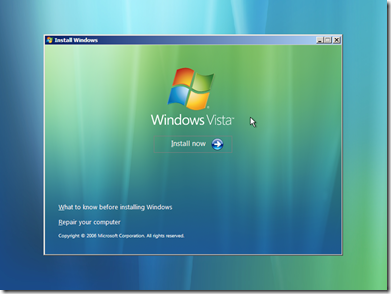
Hit Enter at the language selection prompt

WelcomeToVistaSetup

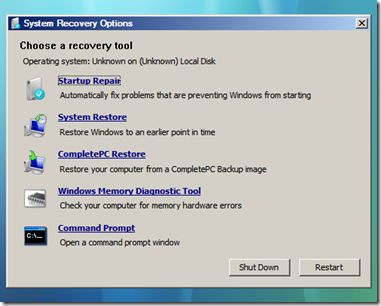
then hit "R" to get to the repair section. You can then select the automatic boot repair tool, but it often will not do any good. Try that at least once. If it doesn’t work then select the command prompt (console)

SystemRecoveryOptions

and type in the following commands:

On Vista:
bootrec.exe /fixmbr
then hit enter
Then type in:
x:\boot\bootsect.exe /nt60 all /force
then hit enter (you may get error, just ignore for now)

On Windows 7:
bootrec.exe /fixmbr
Then hit enter
bootsect.exe /nt60 all /force
Then hit enter (again you may get error – just ignore)

Then type in:
BootRec.exe /FixBoot

DON”T EXIT THE COMMAND PROMPT YET!

Next type in:
attrib bcd -s -h -r C:\boot\BCD
Then hit enter

Next type in:
ren c:\boot\bcd bcd.old
Then hit enter

Then type in:
BootRec.exe /ScanOs
and Enter

Then type in:
bootrec.exe /rebuildbcd
And enter again

Type in:

Exit. and reboot your system.

HOPEFULLY you will be able to get back in.

If not be prepared to spend a few hours or more searching the web for solutions. Or better yet just restoring your system from a backup image Smile

Firefox 5 news

Today Mozilla released the Final version of Firefox 5 ahead of its scheduled date. It has been slated for official release next Tuesday June 21. If you’d like, you can get it now here:
Windows

Mac

Linux

Before installing I HIGHLY recommend backing up your complete profile. For that I use MozBackup on Windows. You can get the Windows install here

For other OS’s you can use FEBE
To install FEBE download the .zip file then rename it with a .xpi extension and open it with Firefox.

I would also recommend that you install the "Firefox Add-on Compatibility Reporter" to Firefox 1st too. Get that here.  This will keep unsupported or updated plugins/add-ins from crashing the browser and may let some of them work even if they are ‘not supported’.

So what’s new in Firefox 5?

  • Added support for CSS animations
  • The Do-Not-Track header preference has been moved to increase discoverability
  • Improved canvas, JavaScript, memory, and networking performance
  • Improved standards support for HTML5, XHR, MathML, SMIL, and canvas
  • Improved spell checking for some locales
  • Improved desktop environment integration for Linux users
  • WebGL content can no longer load cross-domain textures
  • Background tabs have setTimeout and setInterval clamped to 1000ms to improve performance
  • The Firefox development channel switcher introduced in previous Firefox Beta updates has been removed.

As with any new software be aware that some items may have changed locations and some Extensions/Add-ons may not function correctly or at all. So once again let me re-iterate – MAKE A BACK UP OF YOUR SETTINGS/PROFILE before installing!! You may also with to download the version prior to version 5 incase you have to uninstall version 5 and re-install your old version.
Windows:
http://releases.mozilla.org/pub/mozilla.org/firefox/releases/latest-4.0/win32/en-US/Firefox%20Setup%204.0.1.exe
Mac:
http://releases.mozilla.org/pub/mozilla.org/firefox/releases/latest-4.0/mac/en-US/Firefox%204.0.1.dmg
Linux:
http://releases.mozilla.org/pub/mozilla.org/firefox/releases/latest-4.0/linux-x86_64/en-US/firefox-4.0.1.tar.bz2
For other versions and languages go here:
http://releases.mozilla.org/pub/mozilla.org/firefox/releases/latest-4.0/

Here’s to hoping that it proves to be a worthwhile upgrade!

Virtualization 101 – Getting started

It’s no secret I like Virtualization technologies a lot. I have written several other articles on some of my tips and tricks mostly involving creating Virtual Machines of OS X. You can read some of those here, here, here or simply just search my blog.

For those who support multiple operating systems or simply have a desire to learn about them, Virtualization is a fantastic way to just that. Virtualization, in computing, is the creation of a virtual (rather than actual) version of something, such as a hardware platform, operating system, a storage device or network resources. Here is a good description tailored to the IT professional or CEO http://youtu.be/MnNX13yBzAU but you can get a good grasp of the concepts.

At my organization I have installed and manage a VMware ESXi clustered installation on a SAN (Storage Area Network) with hardware and software that starts in the six figures. This is obviously way out of reach of the home user or enthusiast. But Virtualization can be inexpensive and or downright free for the taking. Microsoft, VMware and Virtual Box all have freeware solutions!

For this article I am going to concentrate on the hardware required and the simplest to use application for the novice or even intermediate user – VirtualBox a freeware application by Oracle. So on to the hardware:

Virtualization product or solution such as VMWare Workstation (and the ‘industrial ESXi), VirtualBox and Windows Virtual PC often require Hardware Assisted Virtualization (HAV) CPU feature in order to function properly as it allows a virtual machine hypervisor to run an unmodified operating system without incurring significant emulation performance penalties. The largest chip makers, Intel and AMD implement hardware assisted virtualization in their processors as Intel VT (VT-x) and AMD-V respectively. However, not all modern CPU has hardware-assisted virtualization capability built-in though; you will want to make sure. The VT capability in the processor on the computer is built onto the tiny piece of chip, and cannot be added or removed using any manual process. And even if the CPU features VT, it must be enabled in BIOS.

Most newer CPUs include VT operation by default. However, some older or even current processors available for purchase for DIY or operating on OEM computers may not support VT. When there is no VT support, Virtual Machine Technologies based on VT may fail to install or cannot be powered up and started.

If you are going to create or use virtual machines you should verify, check, determine or get to know whether his or her PC computer supports hardware-assisted virtualization. There are a few software utilities you can use to quickly determine whether there is hardware virtualization system on the system CPU. One is name named SecurAble which is able to display hardware virtualization support status as Yes, No, Locked On and Locked Off. The other is Microsoft’s HAV Detection tool.

SecurAble Detects CPU Processor Security Features (Bit Length, DEP and Virtualization)

Most users who buy computer are just paying notice to the speed (how fast) and size of RAM memory (how big) of the PC. In fact, most modern CPU microprocessors have great lots of features and capabilities other than constantly higher clock rate. With the evolving of software development, some of these features are now required. With SecurAble, user can easily check and determine if the system is x86 or x64 architecture, support hardware DEP and/or hardware virtualization.
SecurAble probes the system’s processor, determine the presence, absence and operational status and displays the status of the three most significant security-related processor features:

  • 64-bit instruction extensions
  • Hardware support for detecting and preventing the execution of code in program data areas
  • Hardware support for system resource “virtualization”
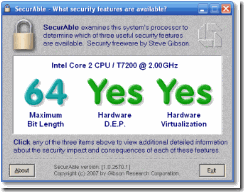
clip_image001

All these features are deemed to be security-important by developer of SecurAble, GRC. 64-bit capable CPUs have the ability to run the 64-bit versions of Microsoft’s substantially more secure Windows XP, Windows Server 2003, Windows Vista, Windows Server 2008 and Windows 7 operating systems, which has the operating system kernel locked down. Hardware-enforced DEP can stop exploitation of buffer overflow attacks, while virtualization technology (VT) can be used to create fully contained environments that can be used to insulate the real hosting operating system from any actions taken by software running within the “virtual” environment.

SecurAble is free to use, and no installation require.

I use SecurAble the most for checking for Hardware-Assisted Virtualization.

Download SecurAble.

http://www.grc.com/securable.htm

Microsoft has also released a application tool that able to detect status of Hardware-Assisted Virtualization (HAV) support on the computer system’s CPU microprocessor. Aptly named as Hardware-Assisted Virtualization Detection Tool or simply as HAV Detection Tool, the utility can detect and check if the computer meets the processor requirements to run Windows Virtual PC, i.e. hardware-assisted virtualization.

clip_image002

Download HAV Detection Tool: havdetectiontool.exe

Using HAV Detection Tool is easy, just run the executable, and the results of whether hardware virtualization support is existed on the system or not (together with ability to install Windows Virtual PC) will be displayed on result dialog. It’s standalone program, thus no installation or un-installation required

So after you’ve determined you can run virtual machines with HAV you’ll want to try some VM’s out.

As I mentioned for home use I’ve found Virtual Box to be the easiest to use and configure. You can get it here and get the ‘Extension Pack’ here. Install the application first (get the right one for you platform – Windows, Mac, Linux) Then install the Extension pack; it will install automatically IF you’ve already installed the base application first.

Once installed you are ready to start working with just about any operating system you want to within your current system!

Here is a fantastic walk through of how to simply create a VM from a downloaded Linux installation disk (ISO)

This method can be used for installing Windows VMs too! If you have a Windows installation CD/DVD and you wish to install it as a VM you can. [For OS X you will have to follow some of the very specific tutorials I have put together – Apple does not like you to install OS X on non Apple hardware]

VirtualBox.org has a very detailed description and walkthroughs too, you can find that here.

The easiest way to get started with VirtualBox is to import an already made image/appliance. Virtualbox.org has many already made Linux installations you can get them here. And with a little diligent searching you can find LOADS of them.

I hope this helps some to get started and have a better understanding of these technologies. More knowledge and experience can only be good.

Here is an image of some of the VM’s on one of my home machines in Virtual box.

clip_image004

As I noted if you are interested in OS X VMs you can go here and read the second half on using Virtual Box. Here are two walkthroughs from other tech sites worth checking out too.

http://thetechjournal.com/electronics/computer/steps-to-install-mac-os-x-snow-leopard-in-virtualbox-on-windows-7.xhtml

and here: http://www.sysprobs.com/mac-os-guest-virtualbox-326-snow-leopard-1064-windows-7-32-bit