Simple Performance Tips

I am asked a few times a week at minimum “how can I speed up my system?” by friends, family and colleagues alike. Here are some very simple performance tips I perform on nearly all Windows systems I work with.

Before starting any system modifications please make sure you have a recent backup. Follow my previous posts here and here on backups and images. Run Windows update and update your Antivirus/Antispyware apps and other applications like Adobe Reader [launch the app, go to Help on the menu bar and go down to ‘Check For Updates’ and run and install.] Also update Adobe flash by opening your browser and going to Adobe’s site and getting the latest version. PDF and Flash are the most common vector for malicious code.

BE CAREFUL WHEN INSTALLING ADOBE PRODUCTS!!! They like to include ‘SHITWARE’, third party applications YOU DON’T NEED OR WANT’, like McAfee scanner or other ‘toolbars. Make sure to ‘uncheck’ any options to download AND install these when updating Adobe (or any others for that matter) applications. Be careful they are tricky and put other toolbar installers in the application updates – so before ‘just clicking’ ok/next make sure NOT to install any toolbars or other applications.

The run an Anti-virus and Anti-spyware scans to make sure your system is clean.

OK now for the meat:

First go to Mike Lin’s home page and get his great little ‘startup’ application.

http://mlin.net/StartupCPL.shtml

Download the standalone application here.
It’s in a zip file.

Extract and save somewhere like ‘My Documents’ or your desktop.
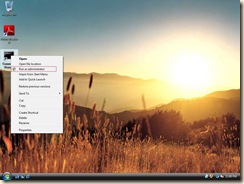
Then just double click to launch it. If you are on Windows Vista or Windows 7 right-click and run as administrator.

4_run_as_administrator

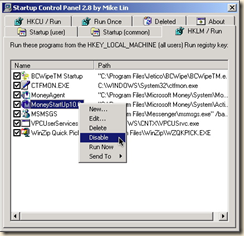
You will then be shown all the different start up parameters for your system and the applications which are scheduled to start at various events – login, machine startup, user login etc. Simply click on an item to highlight it, right click and choose and option.

StartupCPL

Using

The dialog contains six to seven tabs, depending on your system configuration. Each tab represents one place where a program can be registered to run at system startup. These include:

    * Startup (user) – the current user’s Startup folder in the Start Menu.
    * Startup (common) – the common (all users) Startup folder in the Start Menu.
    * HKLM / Run – the Run registry key located in HKEY_LOCAL_MACHINE. These apply for all users.
    * HKCU / Run – the Run registry key located in HKEY_CURRENT_USER. These apply for the current user only.
    * Services – system services that are started before the user logs in. This appears only in Win9x; on NT/2000/XP, use the Services control panel, or the Services item in Computer Management.
    * Run Once – started once and once only at the next system startup.
    * Deleted – programs go to the Deleted tab when you remove them from another location. They will not run at system startup, but will merely be stored should you ever want to use them again. If you delete an item from the Deleted tab, it is removed permanently.

Each page contains a list of the programs registered at that location. Use the checkbox to enable or disable individual items. Additional operations are available by right-clicking an item. You can select multiple items using the Shift and Control keys. Options include:

    * New… – create a new entry. You can also drag & drop files from My Computer or Explorer.
    * Edit… – edit an existing entry.
    * Delete – delete the currently selected entry.
    * Disable / Enable – disable or enable the selected entry. A disabled program will appear in the list with a special icon, and will not run at system startup. You can also use the checkbox next to an item to enable or disable it.
    * Run Now – executes the program now.
    * Send To – moves the entry from the current location to another.

Press F5 to refresh the list at any time.

Be careful to NOT remove items critical to Windows and your Antivirus/Antispyware applications. Things that should stay are things like ‘ctfmon.exe (an office application), and your sound and /or track pad drivers.
Please note:
Before you disable or delete any listed startup items ‘Google’ the exact ‘exe’ file located in the path and FIND OUT WHAT IT IS AND DOES FIRST!

Here is and example of what I mean.

I usually find dozens of items that do NOT need to be starting at startup and/or login. Things like Adobe Acrobat ‘speed loader’, Adobe Updater, Google Updated, QuickTime, Messenger, Yahoo Toolbar, HP Image Center apps etc.

Another source of system hogging apps at startup are printers. HP (and nearly all software nowadays) is notorious for loading as many as a dozen ‘helper’ applications that you don’t need to run at start up. Things for updates, scanner updates, help desks, online help files and the like. All these items put a strain on system resources.

I find I can often dramatically increase the performance of most peoples machines by stopping all this ‘crapware’ from loading in the first place.

Once you have unchecked or deleted all the crapware from loading at startup restart your machine to make sure all works. If something is amok you can start in SafeMode (hold F8 before Windows starts) and run the app again and recheck or undelete any items as needed. If all is working time for next step.

Next item is clearing out temporary files. I use CCleaner. In fact I run this application EVERYTIME I close any browser, before I log off or shut down!

Here is the line for the application. Download, install, run and choose  ‘Run Cleaner’.

The first time this is run many people are stunned by the size and amount of files it cleans out.

Then it’s time to do a ‘super defrag’ on your system.

I like Defraggler a lot.

Get it here. Since this is an intense defragmenter – it makes files ‘contiguous’ on the disk, it can take a long while the first time it is run. Sometimes all night! But definitely run this.

Please read my other posts on resolving Windows problems too.

I you have a Mac check out this article here.

Well that is all for now have a save fun computing experience.
Gmail Integrates with Google Voice for Free Calls from Your Inbox.

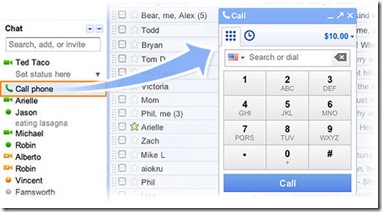
Gmail is integrating Google Voice, bringing free calls to the U.S. and Canada and cheap international calls to Gmail—and it’s available today.

Calls to the U.S. and Canada will be free for at least the rest of the year and calls to other countries will be billed at our very low rates. We worked hard to make these rates really cheap (see comparison table) with calls to the U.K., France, Germany, China, Japan-and many more countries-for as little as $0.02 per minute.

500x_screenshot2

As soon as it’s available in your account, you’ll see a Call phone link in the Chat sidebar of Gmail. Click it, search for a contact or dial their number, and voila—phone call. If you’ve already got a Google Voice number, calls you make from Gmail will show your Voice number in that person’s caller ID. You can also receive calls (if you choose) made to your Voice number directly in Gmail—making it a fully legitimate VoIP solution.

Google’s rolling out the feature over the next couple of days in the U.S., so keep your eyes open. You’ll need to have installed the Voice and Video plug-in to use it. It’s not available on Google Apps accounts (yet), but Google says they’re working on it.

Here is the rate chart for international calls.

With the great quality of voice and video chat already built into Gmail/GChat I think this is a killer solution.

Getting started Blogging with MS Live Writer

I won’t go into a long winded explanation of ‘why’ you should have a blog, or many blogs, if you are a person with many fields of interest and or a business owner, so I will provide a few links to some good reasons but you can find many more yourself.

I blog for a few reasons; get my ideas on paper(albeit digital paper), share news and ideas with others and probably the primary reason is that it allows me to put information into a place that then allows ME to easily find that information I know I have ‘somewhere’ into an easily ‘searchable’ format. I often go back to my own blogs to find technical information on how to do things I know I have done in the past but can’t remember exactly how to now. By putting this information online I can easily find that information. A recent example was trying to help someone share an external Mac Volume. I couldn’t remember the  terminal syntax. But I know I’ve done it many times before in the past. So I just searched my blog for ‘external Mac volumes’ and found what I was looking for! For business owners, special interest groups and artists blogs can be an invaluable method for connecting with the public!

Here is a good article on 10 reasons a small business should have a blog:

Here is another guys blog with 33 good reasons:

Of course you can do this: http://tinyurl.com/2vs5trg and find many more.

There are some other ‘rules’ or tips you can find via the search engines too. Two which I will mention are; adding content on a regular basis and having others provide links to your content on their sites. These two things will, more than anything short of paid advertising, get your blog ‘noticed’. If your desire is to actually make money (monetize your blog) you can also find that via the search engines too. Though that subject is way too convoluted and complex for me to handle here, there are hundreds of thousands of sites to explain that. Just Google ‘how to monetize your blog’. Even then 99.999% of blogs will never generate real revenue anyways. [If you are nice you’ll click on my adds here in the hope I might though 🙂 ha ha]

So let’s get started. Virtually all blogging services offer a simple ‘new post’ option to add new entries. It’s as simple as logging into your Blogger, LiveJournal, WordPress or other account, going to the ‘dashboard’ and choosing ‘new post’. Simple and easy but not that customizable or feature packed. For many people this is usually more than enough to get started. But once you decide you really want to continue your writing you should look at some other ‘publishing’ tools.

My favorite tool for creating posts/blog entries – Windows Live Writer. Live Writer makes it easy to share your photos and videos on almost any blog service—Windows Live, WordPress, Blogger, LiveJournal, TypePad, and many more. Live Writer lets me truly create the post I am looking for. It also allows me to create ‘drafts’ that I can work on as time permits and review them before publishing.
You can get Live Writer here:

The following videos directly from the Live Writer Team are excellent and way better than anything I could have done by just doing screen captures and writing explanations. They are short and very instructional and well worth bookmarking and watching several times.

Note that if you use Google’s Blogger blog service or WordPress (or even host your own) blog you do NOT have to set up a Windows Live blog.
Make sure to click on ‘ I already have a weblog set up’ and go from there.

Basic Authoring:

Live Writer is VERY much like MS Word in it’s formatting options. This makes it very easy to get the look and feel you are shooting for much easier than trying to do this via the ‘dashboard’ of your blog account.

Inserting Rich Content:
How to insert images, video and other content into your post.

And the last video in the series – Saving drafts, printing, modifying existing posts and categorizing posts:


If you really want your blog to be ‘found’ by people searching and actually read you should make a concerted effort to create appropriate ‘categories’ or ‘tags’ for you posts.
Just like you organize your hard copy files in a file cabinet, you can organize blog posts into categories or with tags, so they’re easy to find by people using search engines (Google, Bing, Yahoo etc.) and by people searching your blog site in the future. Tags are often listed on blogs ‘sidebar’.
In order for your blog’s categories to be helpful to your readers, they need to be fairly intuitive, meaning it’s obvious what kinds of posts are included in each category. As you create your categories, think like your readers would. It’s also important to strike a balance between creating categories that are too broad and therefore don’t help readers narrow their searches and those that are too specific and offer so many choices that readers are confused.

I could go on and on but I just wanted to get this out there for those that were looking for some good directions to start.

For now LiveWriter is still only a Windows application – Sorry Mac enthusiasts. But you can run it from a Virtual Machine ‘inside’ OS X. Or use the Firefox plug-in ‘ScibeFire Blog Editor’ for LiveWriter ‘like’ functionality. But I’ll save that for another post.

Desktop and Browser Pizzazz

I don’t use much ‘eye candy’ or bells and whistles for my computing experience. I tend to be very minimalistic in my approach to my working computing environment for three reasons.

First is security – I do not wish to install toolbars, sidebars or other desktop widgets that could introduce one more vector for an intrusion to my system.
Second is that most of the just mentioned things also drain system resources and tend to slow down systems and applications, sometimes dramatically!
And thirdly excessive ‘eye candy’ tends to strain they eyes and make it more difficult to find application shortcuts/aliases and links to items and files.

But there are a few places you jazz up and personalize without much impact to performance and usability usually without any security risk; the desktop background image and your browser theme (sometimes called skin).

The first and obvious place is your desktop. If you choose to personalize your desktop I recommend a picture or theme that allows you to easily find your shortcuts. [I have had to work on systems where it was nearly impossible for me to locate the icons from the image on the desktop!]

To change the desktop wallpaper:
For OS X:
1. Launch System Preferences by clicking its icon in the Dock, or by selecting ‘System Preferences’ from the Apple menu.
2. In the System Preferences window that opens, click the ‘Desktop & Screen Saver’ icon.
3. Click the ‘Desktop’ tab.
4. In the left-hand pane you’ll see a list of folders that OS X has pre-assigned for use as desktop wallpaper. You should see Apple Images, Nature, Plants, Black & White, Abstracts, and Solid Colors. You may see additional folders, depending on version of OS X you’re using. You can of course add your own pictures.

For Windows XP:
1. Right-Click on the desktop or open the Control Panel
2. select "Display Properties
3. Click on the Desktop tab and choose from the available background images. Or, use the "Browse" button to locate photos on your computer. Use the "Position" menu to set the background image as tilted, centered or stretched. Use the "Color" menu to set the background color. Click "Apply" to lock in your choices.

For Windows 7:

    1. Open Desktop Background by clicking the Start button and clicking Control Panel. [Alternatively you can Right-click on the desktop and choose ‘Personalize’] In the search box, type desktop background, and then click Change desktop background.

    2. Click the picture or color that you want to use for your desktop background.

    If the picture you want to use isn’t in the list of desktop background pictures, click an item in the Picture location list to see other categories, or click Browse to search for the picture on your computer. When you find the picture that you want, double-click it. It will become your desktop background.

Picture of the Picture location menu

Look for pictures in other locations on your computer.

3. Under Picture position, click the arrow and choose whether to crop the picture to fill the screen, fit the picture to the screen, stretch the picture to fit the screen, tile the picture, or center the picture on the screen, and then click Save changes.

After the desktop the next place is you internet Browser.

I use Firefox as my primary browser for a number of reasons I have previously listed so I won’t go into those here. And I will concentrate on Firefox Themes.

First open your Firefox Browser

To locate themes just visit Mozilla’s theme library here:

Choose a category or search:

image

If you find something you like click on the image ‘details’

image 

image

And choose ‘Wear this Persona’. You will then be prompted at the top of the browser to ‘Allow’, choose allow and the theme will be installed.

You can try a multitude of different themes by just doing the same thing over and over.

To manage or switch back to themes you previously installed follow this:

In the Firefox Browser go to the toolbar at the top and click on ‘Tools’ then ‘Add-ons’ Select the ‘Themes’ tab:

image

From here you can manage/switch your themes. Simple as that.

Currently Internet Explorer and Safari require third party tools/apps to change the Browser theme and I don’t use them.

If you use Opera there is a pretty good tutorial here.

Have fun!


More iPhone/iPad Jailbreak info

There is now a web based solution to easily Jailbreak you iP.. device for you.
JailbreakMe
Jailbreaking allows you to get tweaks and apps Apple won’t allow in the App Store.
Free, legal and safe.
You should sync with iTunes before using this tool.

Using this service to jailbreak your iPhone, iPad, or other iOS-driven devices is as simple as visiting the link below and swiping the slide-lock style interface at the bottom of the page.
http://www.jailbreakme.com/
For more info:
http://www.jailbreakme.com/faq.html

Also see my previous post here.

iPhone/iTouch Jail Breaking

I’ve been asked a whole lot recently since the courts ruled that jailbreaking is now legal about how to do this. So here are the links I HIGHLY recommend:
Hope this helps.
Latest exciting news:

Jailbreaking you iPhone/iPad just got even easier!

The Jailbreak Matrix is a massive chart of all the iOS devices and lists the various versions as well as the different firmware, baseband, and boot loaders that run on each. You check what you’ve got against the chart and it will tell you if the device/firmware combination is jailbreakable, what tools you need, what version of iTunes the said jailbreak technique has been tested with, and a step-by-step guide on how to apply the jailbreak.

As always check out these folks too!:
http://blog.iphone-dev.org/

http://www.iphonedownloadblog.com/jailbreak/

[great information is here:
Great new article from Gizmodo on jailbreaking iPhones and iPads]
————————————-
This is the site to start at!!:

http://www.quickpwn.com/2009/01/jailbreak-firmware-2-2-1.html

Forums which will tell you how to use the downloads below:
http://www.quickpwn.com/2009/01/jailbreak-firmware-2-2-1.html

QuickPWN
Software Version: 2.2.5-2
Creator: iPhone Dev Team and poorlad
Description: QuickPWN allows you to unlock and jailbreak your iPhone and jailbreak your iPod Touch so you can modify it, SSH into it, choose your own theme and many other cool things.
Downloads:
For Windows:
http://www.quickpwn.com/2009/01/jailbreak-firmware-2-2-1.html
Mac:
http://quickpwn2-2-1.googlecode.com/files/QuickPwn_2.2.5.dmg

iPhone Firmware
iPhone firmware 2.2

iPhone 2.2.1 firmware

iPhone 3G Firmware
iPhone 3G 2.2 firmware

iPhone 3G 2.2.1 firmware

iPod Touch Firmware

iPod Touch 1G 2.2.1 firmware

iPod Touch 2G 2.2.1 firmware

Software Downloads

WinSCP – WinSCP allows you to SSH into your iPhone/iPod Touch and add/remove/edit files and execute commands.

AND:

See Here:
http://www.ipodtouchhacks.com/ipod/touch/jailbreak/

Using Opera Unite to share files and media

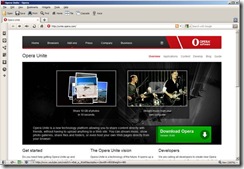
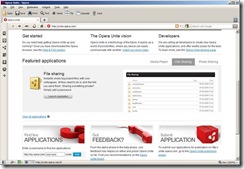
Here is another really cool and fairly secure way to share files and or content with people you choose. Or even just access your own files whilst away. It is called Opera Unite. It is actually built into the Opera Web Browser!

I am still a huge fan of LiveSync/Skydrive as I have previously written about here and here. And I use them as my primary means of ‘cloud storage’.

But to just share some files with co-workers, family or friends Opera Unite looks really cool. And some might find it simpler.

With Opera Unite, your friends view the content that is sitting on your computer. You can stream music or video or share actual files. Since this is a ‘live’ connection to your system you will be using internet bandwidth; this may be a consideration if your ISP has very low limits. Also since it is a live connection to your system you should consider all the security implications.

To run Opera Unite applications (File Sharing, Photo Sharing, Media Player etc.), you need an Opera browser version 10.10 or later from http://www.opera.com and an Opera account.

To view or access most of your applications, your friends can use any browser.

Operating systems: You can use those supported by the Opera browser; Windows, Mac, or UNIX/Linux.

To get started with Opera Unite, you just need to install an Opera browser version 10.10 or later, start an application, and then you can begin sharing and collaborating.

Opera Unite applications make it quick and easy to share content. There is no need to upload anything; you share the content sitting on your computer. And, you do not need to configure anything else, such as DNS services or complex access controls. For example, you can install the Media Player application on your home computer for your favorite songs. When you get to work, you can visit your Media Player application and listen to the songs directly from your home computer. No download, no fuss.

How Opera Unite is different to traditional data sharing

clip_image001

With more traditional content sharing, you have to upload the content you want to share, and this is then stored on a central, third-party server, out of your control. Your friends access this stored content from the third-party server.

clip_image002

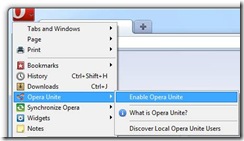
Enable Opera Unite

To enable Opera Unite for the first time:

clip_image004

From the menu, select "Enable Opera Unite". A welcome dialog displays.

Select "Next".

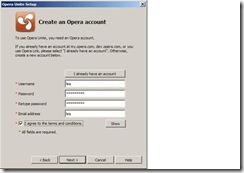
To use Opera Unite, you need to have an Opera account. This is an account that you use for My Opera, Dev Opera (Opera’s developer-community resource site), or Opera Link. Your existing username cannot contain any symbols or spaces to work with Opera Unite.

If you already have an Opera account that does not contain symbols or spaces, select "I already have an account", if necessary, and type your existing username and password. Go to step 4.

If you do not have an account, or have one that contains symbols or spaces, select "I do not have an account", if necessary, and complete your details to create one.

Choose a unique and easy-to-remember username without any symbols or spaces. The username will become part of the link (Web address) for your Opera Unite applications, which your friends will use to access your content or communicate with you.

Select "Show" to read the terms and conditions, and check the box to indicate that you agree with them.

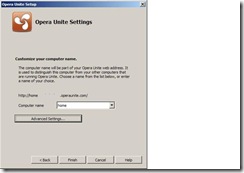
Choose a computer name from the drop-down menu. This name identifies the computer you are using, to distinguish it from other computers you may use. It also becomes part of the link for your Opera Unite applications. Choose an option that best describes how you use your computer, or write your own.

Select "Finish".

In the panel at the left, highlight an application that you want to use, and select the Start button at the top of the panel. The application start

clip_image006

Scroll down

clip_image008

clip_image010

clip_image012

clip_image014

clip_image016

The official guide is here: http://unite.opera.com/guide/

And after creating all this I found this super video!

Enjoy.

OS X Virtual Machines Two Methods

I recently had the need to test some ‘fixes’ for a co-workers iMac. Since I don’t like to make system changes on ‘live’ machines I went to my Virtual Machines (VM) and was able to easily test what I needed. I mentioned that to a colleague and they asked me to explain how I was able to create VMs of OS X.  So I thought I would put together some of my older tutorials I’ve created and update and add loads of information for those that want it.

I have three Virtual Machine solutions I use. One is based on the industry leader – VM Ware, another the open source (and much improving) Virtual box and finally Microsoft’s Virtual Server (now HyperVisor). I will not discuss Microsoft’s VM solution here because I have not used it to create OS X VMs.

There is lots of information on how do create an OS X VM on both of these VM platforms but I hope I can give some of you some direction. There are now some greatly improved and easier to use ‘boot loaders’ and patches (kexts) for getting OS X to run in a VM or as a Hackintosh as mentioned in some of my previous posts. For some information on that check out these sites.

Hackintosh.com

OSx86 Project

myHack

Chameleon OSx86

Here is my workhorse server System configuration and specs:
Windows 2003 Server SP2
QuadCore Intel Core 2 Quad Q6600
Abit IP35 Pro
8GB RAM
1.5TB SATA HDD (7200RPM)
GeForce 9600 GT (512 MB)
2 Realtek RTL8169/8110 Gigabit Ethernet NIC
Using VMwave Server Console:
Version 1.0.0 build 28343

First up the solution I have been using the longest – VM Ware. I have included as many screen captures where necessary to show some of the configuration changes I made. The VirtualBox solution is actually really easy now so I will explain that one last.

To get it up and running I followed the steps here:

I followed that fairly closely with some exceptions which are in the screen captures below and I will note later*. These guys are great and should be recognized.

Some other sites that were of great help:

http://wiki.osx86project.org/wiki/index.php/Main_Page

I run an older version of VMware Server and so did not use the freely available VMware Player or the new VMware Server version2.x. Since my version is older, I suspect the newer free version would have worked as well. [After writing this and doing a lot of reading on the new – version 2.x of VMware Server- I now don’t think I would recommend it. Stick with the new free VMplayer/workstation version or VMWare server 1.5x or lower.]

I may try the new VMWare server versions on my other server eventually.  But if it’s not broke don’t futz with it.

VMware products are available here:

http://www.vmware.com/

http://www.vmware.com/download/player/

I own Virtual CD v9, Alcohol 120, and a few other CD emulators but I am sure you can find free ones. Here are a few:

DAEMON Tools lite

MS Virtual CD

MagicDisc

I have a few copies of Mac OS’s around from 9 on up to 10.5 (Legal for my Mac’s – some alive and some put to rest), But I decided to try a version that had already been prepped/patched for running on x86 – it is named the “Mac OS X 10.4.8 [JaS AMD-Intel-SSE2-SSE3 with PPF1 & PPF2].iso distro”. I some others I’m going to try too – “Kalyway_10.5.2_DVD_Intel_Amd.iso” and “JaS.OSx86.10.5.4.Client.Server.Intel.SSE2.SSE3.iso”

If you want those you will have to ‘hunt’ for them (there is a torrent of information available to you hunters our there…). There are continuing updates to some of these builds to include the latest loaders built in.

Also did an ‘upgrade’ with a new Snow Leopard disk I have.

And just so you know;

“Even though Apple suggests Mac users without Leopard buy the $169 Mac box set to get Snow Leopard, anyone can purchase the $29 Snow Leopard disc and install Snow Leopard in its entirety without having already installed Leopard. This means the $29 Snow Leopard DVD isn’t an "upgrade" at all; it’s the full-on Mac OS X operating system for 30 bucks.”

I bought a few upgrade disks here, since I will be upgrading my physical a well as virtual/Hackintosh ones.

Below is a capture of my ‘vmx’ file with the changes I made:

clip_image002

OS X ON VM Ware: Follow these instructions in the link I posted above. Just take note where I changed some options.

Here are some captures of one of my OSX ‘Virtual Machines’ running on my pc.

clip_image002[4]

clip_image004

clip_image006

clip_image008

clip_image010

clip_image012

I have reduced the plethora of VMWare VMs I was running to two for now (OSX and an Ubuntu desktop/client).

But I did have a couple of Vista’s instances, an Ubuntu Desktop, an Ubuntu Server, 2 WinXP, and Windows Server 2008 with Exchange 2007 and SQL2005(time limited) all running and talking to each other!

I use some of my images of existing (real world/live business servers – PDC, Exchange, SQL and other application servers) virtualized to experiment with upgrade/optimization strategies.

I just convert my recent images – (Acronis and Ghost type)together and converted to Virtual Machines [http://www.vmware.com/products/converter/get.html]. Big time and space issue now.

OS X on Virtual Box

First you will need the newest Virtual Box application, get it here. You will also need a ‘patched’ ISO version of OS X Snow Leopard such as one of the latest as mentioned above. Or  The group Hazard has put out a good patched Snow Leopard installer that should do fine (just search for it on Google). Of course, if you feel bad about downloading the ISO of Snow Leopard, you could always go buy a copy to feel a bit better, karmically.

Install VirtualBox.

Then click on New at the top left. At the Create New Virtual Machine window, click Next.

clip_image001

At this window type OSX as the name and it will automatically change the system and version. The next window will let you choose your RAM amount:

clip_image001[4]

If you can spare it, crank it up as far as you can go, but 1024MB should be sufficient.

clip_image001[6]

This is where you’ll make your hard disk. 30GB should be enough so what it comes down to is dynamic or static. Dynamic will expand on use and Static will be a fixed 30GB no matter how much data is actually in it. Dynamic is better for not taking up your hard drive but static will give you better performance. I normally use dynamic. Click next unless you want to change it from dynamic or if you want to increase the disk size or file location.

clip_image001[8]

It will show a summary of your settings. Click Finish, then click Settings at the top.  Make sure you choose only one ‘core’ for processor too.

At this window click on System in the left pane and uncheck Enable EFI

image

image

Now click on the Storage button on the left. From there click on Empty under the OSX.vdi, then click the folder with the green arrow on the right (next to "CD/DVD Device").

clip_image001[12]

clip_image001[14]

At this window click the Add button at the top. Then find and add the OSX86 ISO (Hazard or other) you downloaded earlier. Then highlight it and click Select at the bottom.

image

image

Then click OK, and hit the Start button on the left side of the main VirtualBox window.

image

As it starts up, click inside the window and hit F8. Then at the boot: prompt type –v so you can see what exactly went wrong if something does go wrong. All the services will run and eventually you should come to the language screen. Choose your language then click next.

If you are unable to move your mouse around then hit Right-Ctrl + I.  To ‘free your mouse to move outside of the VM window hit the right ‘Alt’ key.

Click Continue and Agree. Next, start up Disk Utility by going to Utilities in the menu bar.

clip_image001[16]

At this screen highlight 20GB VBOX HARDDISK. Then click the Erase tab, name it what you want in the name box and click the Erase button on the bottom right of the window. It shouldn’t take long. Then click Disk Utility in your menu bar and quit it.

Now you’re back at the installer. Highlight the drive that is now showing up and click Continue.

clip_image001[18]

The next window is important!

Don’t click ANYTHING YET!

Click the Customize button on the bottom left. Expand the options (arrows) and check the necessary boxes for your processor.

AMD Users check:
Any Updates included at the top.
Drop down Kernels and choose Legacy kernel.
AMD option below System support.

Intel Users check:
Any Updates included at the top.
Drop down bootloaders and check the newest Chameleon.
Drop down Kernels and choose Legacy kernel.

Then click Done and hit the Install button. To speed up the process you can click Skip when the disc check pops up.

clip_image001[20]

As soon as it says "installation finished" and starts counting down to restart, press the right Ctrl key. Click on Devices at the top of the VirtualBox window, hit CD/DVD Devices and click Unmount CD/DVD Device.  Remember you will probably have  to hit the right ‘Alt’ key to ‘free’ your mouse! Do that before you get to the end of the install.

Then go to Machine > Reset and click Reset at the prompt. Next you’ll see the Chameleon loader , click inside the VM and hit and hit enter and then OS X will begin to boot.

clip_image001[22]

After it boots you will see the setup screens for OS X! You’re good to go.

On a side note if you use NAT for networking you can control your Virtual Machines from any computer on your network or even remotely using a multitude of remote access solutions.

Google Voice Tips Tricks and Tutorials

I am a huge fan of Google voice. I use it for both my personal, and professional life. I am able to set up rules for contact groups that define many different scenarios. I like that I can give my Google voice number to my family and close friends and know that I can be reached no matter where I am – I can and do ring multiple phones. For business I can ring my office AND my cell ONLY during business hours and then after business hours only my office line is rung or people are sent right to voice mail. The list of really cool things that can be done is just limited to your imagination.

I am constantly asked for tips on how I do all this so I put together as many good and simple tips as I could find in this post. There are sure to be many many more if you just search for ‘Google Voice Tips’.

BIG TIP: To edit or create forwarding schedules you need to us “Legacy Google Voice” which is the old format.
Under that format, you can forward calls on a schedule (calls, edit, advanced settings).

To get a Google voice number you will of course need a Gmail/Google account.
You can get that here

Then sign up for Google voice here

Find and choose a number locally (or actually in any area code you prefer). I recommend doing a search for something that has a mnemonic – like ‘coffee1’ (263-3331) or some other easy to remember number.

And before you ‘set up’ your Google voice  number check out these articles and walk through’s.

Great Google Voice information:

http://www.google.com/googlevoice/about.html

http://www.youtube.com/watch?v=oFVXAqFNgic&feature=player_embedded

http://www.youtube.com/watch?v=m4Q9MJdT5Ds&feature=player_embedded

http://lifehacker.com/5311254/how-to-ease-your-transition-to-google-voice

http://mycraniumdrain.blogspot.com/2009/08/more-on-google-voice.html

And here are some other excellent video demonstrations and how to’s. They are short, quick and easy to follow:

Call Screening:
Listen In

Block Calls

SMS

Place calls anywhere

Taking/Receiving calls

Phone Routing

Forwarding Phones

Voicemail Transcripts

Listen to voicemail

Notifications

Personalize Greeting

Share voicemail

Conference Calling

Call Record

Call switch

Mobile Site

GOOG-411

Manage Groups

More on Cloud Storage, Backup, Synchronization and Sharing Using Dropbox, Livesync and now Office Live.

I have written previously about cloud storage and backup solutions and how to use those to synchronize data between your many systems at different locations on differing platforms. Most cloud storage and synchronization services can synchronize between differing operating systems too! You can share and access files from Windows, OS X, Linux and even Smartphones. With this post I’d like to just add update some information on how you can use Windows Live services (OfficeLive, and Skydrive) and Dropbox.

1st. OfficeLive.

There have been some exciting recent announcements regarding Microsoft’s cloud storage and synchronization services that have made their offering even more compelling than ever. If you’ve read my previous post (link above) you already know I am a fan of SkyDrive. You can use SkyDrive to upload, store and share photos, documents and data both privately and publicly -  it offers a whopping 25GB of free cloud storage and it integrates nicely with Office 2010. You can use this free service on both a Windows PC and a Mac computer.

Microsoft’s Office Web Application is now live on SkyDrive! It’s called Office Live. You can access Microsoft’s Office web version on your browser.

Office Live now provides for access to Microsoft’s Office suite of applications even if you don’t have MS Office installed on the system you are on! If you just use the Office Live portion you get a default 5GB of storage, but by using your SkyDrive account you get the full 25GB of storage.

While Goolge Docs has allowed for the sharing and publishing of individual documents to the web for a long time, Office Live(and SkyDrive) and Dropbox provide for true sharing of folders with individual, groups or the public. With Office Live you can create a truly amazing collaborative workspaces. Check out this video!

Instead of going through a long and detailed walk through I’ve put together a bunch of links and videos that YOU can go through. Suffice it to say I believe you should use at least one of these services to backup or synchronize your data across the ‘cloud’.

Here is a good how to on SkyDrive

And another.

You can get started with Office Live here.

Here are some very good Office Live and SkyDrive Links. I would highly recommend spending a few hours and going over these. The future of data storage and retrieval is tightly integrated to web services and the ‘cloud’.  Here are some links:

01, 02, 03, 04, 05, If you do a search for Office Live or SkyDrive you should find many more.

2nd. Dropbox.

I have also found this service highly useful for sharing files with other people with whom I am working.
What is Dropbox?
Dropbox  is a “cloud computing” Web2.0 file hosting service offering both free and paid services. The free version offers 2GB of “shared storage”. The difference between SkyDrive/OfficeLive and Dropbox is that Dropbox requires software to be installed onto your system. Something I am not always fond of but this does work well.

Dropbox is file hosting service which enable users to synchronize files and folders between computers across the internet.
This is done by installing a software and then picking a “shared folder” on your computer. From that moment on, that folder will be synced with any computer you choose to install the software on (for example, your home/work computer, your laptop – and so on).

DropBox also enables users to share some of their folders with other DropBox users. This seamless integration of the service with your OS file system (Windows, Mac or Linux) is what’s making this service so comfortable, by allowing me to work with co-workers and have the same “project tree” of folders, all of which are always synced.
You could also share a file “online”, by getting a link to it which you could share with others.

While I will always believe in ‘hard storage’ especially for highly sensitive and personal information you should also look into ‘cloud storage’. You should always have a rocks solid local backup solution but collaboration and the ability to have your information available nearly everywhere is invaluable. If not to store and backup your data, at least for it’s huge collaborative possibilities. That is what I primarily use it for.

I really hope some of you will use this information to make your life, and possibly jobs easier and more productive. As we head into the second decade of the 21st century it’s exciting to see how we can have our information available nearly everywhere and be able to usefully share that information with anyone in the world.