Fix–“You’ve launched and older version of Firefox” error

IF you get the error “You’ve launched and older version of Firefox”..

image

DON’T create a new profile:

If you create a new profile will not have your bookmarks, lose your cookies and site specific settings and any extensions you had installed and enabled.

You can amend the target in the shortcut – add:

-allow-downgrade

1

After:

2

This will allow Firefox to start without having to create a new profile.

Then launch the application and then check for upgrade – it should update.

After the update, remove the “-allow-downgrade“ info in the target and Firefox should be able to work properly.

Inexpensive Cell Service Experience

Recently I went in search of new secondary service for a work phone. And my really old iPhone was totally dead. So I figured I grab my current ‘spare’ Samsung 8+, which is wholly owned by me supposed to be completely unlocked etc, and use that.
When I tried to get the phone ‘registered’ (have to check the IMEI on sites to see if compatible and not under contract etc.) with any MVNO it was showing that it was NOT TRULY unlocked by Sprint – still had some contractual issues.
To finally get that BS cleared up was a complete exercise in determined persistence. A hassle requiring 30+ hours of chatting and numerous calls!. More on that incredible story in and upcoming post.

I was looking for an inexpensive, non contract and non big three service provider – one that would compliment my current Sprint backbone phone service – CDMA network(s). But again, without the Verizon prices. And I won’t use ATT because of their horrid service everywhere I am or have been.
I searched far and wide for and MVNO that rides on Verizon’s and Sprint’s backbone. [More on what an MVNO is here
I finally settled on Twigby after checking out compatibility and network information of all the MVNO’s I could find that met my criteria.
And … I’m now using Twigby https://www.twigby.com/page/howitworks for my work phone. (I still have Sprint for main phone because I want the priority of a top tier provider for that phone)

Twigby is an MVNO that primarily provides talk, text and data service on the Sprint network with talk and text roaming on Verizon’s network – so you should be able to call from just about anywhere in the US.

Most newer iPhones and Android phones are compatible. If you currently have Sprint, Verizon, Virgin, Boost and just about any other CDMA network provider it’ll work.
GSM only phones (read many of AT&Ts older offerings) are NOT compatible with Twigby’s service.

I’m on WiFi most of the time and don’t take many calls – my work calls are usually pretty short. And Twigby’s plans come with unlimited texts.
They also have data overage coverage will bump you up a plan notch to keep you from getting hosed with giant bill.
I chose 300 minutes and 3GB data and it’s only $19/mo for 1st 6 months, and then $24 after. And you get hotspot included.
NO contract!
A few things I had to do. First when trying hotspot – it didn’t work/load so chatted with them online and they reset my ‘network/plan’ settings and then on phone updated settings and it worked!
When checking my LTE speeds at first I was frustrated because they seemed slow (using the Ookla Speedtest app), so signed into account and checked the bandwidth settings (they can be adjusted to enable you to throttle yourself so you don’t use loads of data), changed settings to lower speed, saved then back to unlimited and BAM ripping 4G speeds.

For the past few months now I have been amazed at the service – inexpensive and it works!

If you have an unlocked phone and want to check it out go here:
www.twigby.net/friend
When signing up, on the last page I believe, if you enter my account (Account Number: 41549 in the referral section YOU and I will each get a $20 credit!

Stop unresponsive service via command line. (Windows & some Linux distros)

In Windows:

If you have a service that is not responding or showing pending in Windows services that you are unable to stop, use the following directions to force the service to stop.

  1. Click the Start menu
  2. Click Run or in the search bar type services.msc
  3. Press Enter
  4. Look for the service and check the Properties and identify its service name
  5. Once found, open a command prompt. Type sc queryex [servicename].
  6. Press Enter
  7. Identify the PID
  8. In the same command prompt type taskkill /pid [pid number] /f
  9. Press Enter

In Linux (Ubuntu for example)

1. Open the System Monitor app. In the Processes tab, scroll down the list until you find the unresponsive app.

Use the system monitor to kill an unresponsive application in ubuntu

2. Right click on it and select “Kill Process”.

Once confirmed, this will kill the unresponsive application.

Via Command line:

Open terminal

Enter the command to show currently running services. Type ls /etc/init.d into Terminal and press ↵ Enter. This will bring up a list of currently running services and their corresponding command names.

If this command doesn’t work, try ls /etc/rc.d/ instead.

Find the command name of the service that you want to restart. You’ll typically find the name of the service (e.g., "Apache") on the left side of the screen, while the command name (e.g., "httpd" or "apache2", depending on your Linux distribution) will appear on the right side.

Enter the restart command. Type sudo systemctl restart service into Terminal, making sure to replace the service part of the command with the command name of the service, and press ↵ Enter.

For example, to restart Apache on Ubuntu Linux, you would type sudo systemctl restart apache2 into Terminal.

Enter your password when prompted. Type in the password that you use for your superuser account, then press ↵ Enter. This should restart the process.

If the service doesn’t restart after doing this, try typing in sudo systemctl stop service, pressing ↵ Enter, and then entering sudo systemctl start service.

To list running services in the command line:

Use this command:

service –status-all

Here’s an example of what this looks like on an Ubuntu 16.04.2 LTS system:

root> service –status-all Example:

[ + ] apache-htcacheclean

[ + ] apache2

[ + ] apparmor

[ – ] bootmisc.sh

[ – ] checkfs.sh

[ – ] checkroot-bootclean.sh

[ – ] checkroot.sh

[ + ] console-setup

[ + ] cron

[ + ] dbus

[ – ] hostname.sh

[ – ] hwclock.sh

[ + ] irqbalance

[ + ] keyboard-setup

[ – ] killprocs

[ + ] kmod

[ – ] mountall-bootclean.sh

[ – ] mountall.sh

[ – ] mountdevsubfs.sh

[ – ] mountkernfs.sh

[ – ] mountnfs-bootclean.sh

[ – ] mountnfs.sh

[ + ] mysql

[ + ] networking

[ + ] nginx

[ + ] ondemand

[ – ] plymouth

[ – ] plymouth-log

[ + ] procps

[ + ] rc.local

[ + ] resolvconf

[ – ] rsync

[ + ] rsyslog

[ – ] sendsigs

[ + ] ssh

[ + ] sysstat

[ + ] udev

[ + ] ufw

[ – ] umountfs

[ – ] umountnfs.sh

[ – ] umountroot

[ + ] urandom

[ – ] uuidd

The meaning of the Ubuntu service command output

From the Ubuntu Linux service man page:

service –status-all runs all init scripts, in alphabetical order, with the status command. The status is:

[ + ] for running services

[ – ] for stopped services

[ ? ] for services without a ‘status’ command

This option only calls status for sysvinit jobs; upstart jobs can be queried in a similar manner with initctl list.

Some services are managed by Upstart. You can check the status of all Upstart services with sudo initctl list. Any service managed by Upstart will also show in the list provided by service –status-all but will be marked with a ?

[Note: Running with/without sudo can make a difference.

Some services in /var/run/ have read access only to root user. Those services show status [-] without sudo, and [+] with sudo.]

How to download videos from the Internet

I am asked VERY often how I am able to save videos from the Net (read disclaimer at bottom please)

There are many reasons one might want to download a video for later viewing. To watch while offline or traveling, to study. Maybe because so many videos get removed if they don’t fit the ‘censor lords’ narratives or views. Or sometimes the vids show a happening that would undermine a current narrative or lie.

What ever your reason here are a couple ways.

This extension lets you download most flash videos EXCEPT YouTube (more on that in a moment)

https://www.downloadhelper.net/install

To download YouTube Videos.

First, install Tampermonkey

Open https://tampermonkey.net/ and install the extension for your browser.

Firefox: [https://addons.mozilla.org/en-US/firefox/addon/tampermonkey/]

Then go here https://en.savefrom.net/userjs-setup.php and install the script:

clip_image002

Or

clip_image004

Now you can download any YouTube videos as you like.

(you may have to switch your YouTube viewing to the ‘old format’ search google for how. For Chrome you can try this extension here but note some said it doesn’t work or requires authentication)

Head over to YouTube and select a video. You’ll see a button you can click to download files (has dropdown to choose quality too)! See example:

Untitled

NOTE: Sometimes you must ‘right-click’ on the download link and choose ‘Open in new Tab’ for the download options to show. Then you can save to whatever location you wish

There you have it. Two ways to get some videos.

[disclaimer: by downloading ANY copyrighted or owned property YOU are responsible for that action and any possible consequences. You may be violating some ‘terms of service’ or other legal shtuff. ALL that is your decision or choice. The information provided is just that – information. Not an endorsement of these methods.

How to export your YouTube channels to a RSS feed reader

To help make my time more productive while online, I use QuiteRSS portable RSS feed reader. Get it here:  https://quiterss.org/en/download (I use the portable version but you can use fully installed version if you like. Or use any feed reader you’re comfortable or familiar with.)

I find it so much easier to check up on what I want to without getting squirrelled onto tangents by being able to have my preferred providers in one spot.
I actually have 50 subscriptions for news and such alone, not including all my YouTube channels.

Okay so how to get all your subscribed YouTube channels into your RSS reader..

Make sure you’re logged into your Google/Youtube account first of course:

Got to: https://www.youtube.com/subscription_manager
At the bottom look for the ‘Export to RSS Readers’ line and then Export Subscriptions.
This will save all your subscribed feeds (feeds NOT content obviously) to an OPML XML file (download and save somewhere) that can then be imported into your RSS reader of choice. Simply open you reader and ‘import feeds’ and BAM all your subscriptions will now be there.

Additional tip for those that actually want to download YouTube videos. (YouTube does not wish you to this and sometimes it’s said you’re not supposed to via copyright or some other T.O.S. – but I believe that for personal has been adjudicated in the positive for individuals)
These two addons allow for a button to ‘Download’ at the bottom of the video. I Simply right-click and choose ‘Open In New Tab’ and have the option to download the video to my HDD.

My default browser it Chrome (sometimes I switch to Firefox) but both have the Tamper Monkey Extension/Add on on both browsers and have these two scripts installed
https://greasyfork.org/en/scripts/371817-youtube-best-video-downloader-2
and
https://greasyfork.org/en/scripts/33219-fastest-youtube-downloader-video-or-mp3/code

Block a phone number or contact iPhone

Block a phone number or contact iPhone

There are a few ways that you can block a phone number or contact.

Phone

If you’re in the Phone app under Recents, tap  next to the phone number or contact that you want to block. Scroll to the bottom of your screen, then tap Block this Caller.

FaceTime

If you’re in the FaceTime app, tap  next to the phone number or contact that you want to block. Scroll to the bottom of your screen, then tap Block this Caller.

Messages

If you’re in Messages, open the conversation, tap , then tap the name or phone number. Scroll to the bottom of the Info screen, then tap Block this Caller.

When you block a phone number or contact, they can still leave a voicemail, but you won’t get a notification. Messages that are sent or received won’t be delivered. Also, the contact won’t get a notification that the call or message was blocked.

Manage your blocked phone numbers and contacts

To see the phone numbers and contacts that you’ve blocked from Phone, FaceTime, or Messages:

Phone

Go to Settings > Phone > Call Blocking & Identification.

FaceTime

Go to Settings > FaceTime > Blocked.

Messages

Go to Settings > Messages > Blocked.

From these screens, you can add or unblock contacts or unblock phone numbers.

To add a contact from Phone, go to Settings > Phone > Call Blocking & Identification > Block Contact. Then tap the contact that you want to block. To add a contact from Messages or FaceTime, go to Settings > Messages or Settings > FaceTime, scroll down and tap Blocked, tap Add New, then select the contact that you want to block. To unblock a contact or phone number, swipe left over the number, then tap Unblock.

Filter iMessages from unknown senders

You can filter iMessages from people who aren’t saved in your Contacts.

clip_image005

To filter iMessages, go to Settings > Messages and turn on Filter Unknown Senders.

clip_image007

In Messages, you’ll see a new tab for Unknown Senders but you won’t get notifications for these iMessages.

clip_image009

Report spam or junk in the Messages app

You can report iMessages that look like spam or junk from the Messages app. If you get an iMessage from someone who’s not saved in your Contacts, you’ll see a Report Junk link under the message. Tap the link to forward the sender’s information and the message to Apple.

To report SMS and MMS messages, contact your carrier.

Un-F@#k Facebook

I was logged into Facebook recently to search for and show someone something I saw posted. The person that was with started to freak! They said, “How come your Facebook looks so much different? Where’s all the other shtuff on the pages?”

I explained I use the F.B Purity extension (Available on Chrome, Firefox, and other browsers too) Formally called Facebook Flufbuster. It has been my go to extension to un-f@#k Facebook for some time now. I recommend it to many but they often don’t take the time to read the guides/how to’s on their site or just can’t get it to work as well I they saw on my browser(s).

So for those that are interested or care here you go.

Here’s a view from my timeline:

clip_image002

Simple easy to read posts and no extemporaneous crap or distractions. Below are my current exact settings:

clip_image004

clip_image006

clip_image008

clip_image009

clip_image011

clip_image012

clip_image013

clip_image014

Improving iPhone Battery Life

First thing to do is make sure there are no iOS updates awaiting installation.

If there are, run those.

Make sure you have more than 35% battery (Preferable to plug your phone into charger).

Tap Settings > General > Software Update.

clip_image002

Tap Download and Install. If a message asks to temporarily remove apps because iOS needs more space for the update, tap Continue or Cancel. Later, iOS will reinstall apps that it removed.

Next:..

Go to Settings > General > Background App Refresh and take a look at the list. Do you really need all those apps updating themselves in the background and draining your battery life? Be ruthless and turn off all the apps you don’t need to update automatically. Remember, they’ll still update and work as normal when you fire them up, they just won’t keep running when you’re not using them. If you find that you don’t like the change, you can always head back into this section and toggle the apps back on again.

clip_image004

Some apps will send you notifications that you don’t really need. Go to Settings > Notification Center and look under Include. Tap on any apps that you don’t need notifications from and choose None under the Alert Style, and then toggle Show in Navigation Center to off and Show on Lock Screen to off.

clip_image006

You can have your iPhone update Music, Apps, and iOS automatically, but it will eat a lot of battery life. Your iPhone might also choose an inopportune moment to update everything. You can save power and battery life by going into Settings > iTunes & App Store and sliding Use Cellular Data to off, so it only updates on Wi-Fi. You’ll save even more if you just turn the automatic downloads off altogether and update on your own schedule.

clip_image008

You don’t need AirDrop turned on all the time either, so swipe up from the bottom of the screen to bring up the Control Center and turn it off until you actually need it.

clip_image010

Get along without iPad/iPhone Home Button

Home Button not Working on iPhone or iPad?

Here’s how to get along without it.

Extensive usage or actual damage can cause the home button can become unresponsive.

Using your iPod touch, iPhone or iPad without the Home Button CAN still be done via the touch screen.

You may have to restart you device and login freshly to get basic ‘home/start page’

Here’s how:

1. Open Settings.

2. Go to General > Accessibility

3. Scroll down to the section labeled INTERACTION and tap on AssistiveTouch.

4. On the next screen, toggle AssistiveTouch to the green On position.

5. A white circle with a grey box will appear on screen. Tap this circle to expand it to a big box on screen. The square Home button at the bottom of the box functions exactly like the physical home button – you can use it to single tap, double tap, or long press the home button even if there is a hardware problem. The grey box remains visible and usable in all apps.

clip_image002

This will put a little ‘Circle’ clip_image004 on your screen that when tapped will bring up this menu:

clip_image006

You will now have a ‘home button’ you can use.

Fix Elevated applications not having access to mapped drives

Fix Elevated applications not having access to mapped drives

One of the side effects of UAC is the inability to access the mapped (over net use) network drives from the applications running in privileged mode (Run As Administrator). This means that when you run the command prompt or an application (like SpecWin) with elevated privileges, they won’t display the disk letters of the mounted network shares.

A quick way to show what this looks like. Open command prompt, as a regular user, not an administrator and run/enter:

net use

Your screen should look something like this:

clip_image002

And if you change directories and looked at what’s there, it would look something like this

clip_image004

If you run the command prompt ‘As Administrator’ the prompt will look something like this:

clip_image006

If you try and change drives you will get something like this:

clip_image008

This behavior of the system can lead to some inconveniences when trying to run apps elevated often.

Why does it happen? This peculiarity is connected with UAC mechanism for a user with the local administrator privileges. The matter is that when this user signs in, two access tokens are created: the first token provides access without the administrator privileges (the filtered access token, with which most apps are run) and the second is the administrator token with full privileges in the system (all apps approved elevated in UAC are run using it).

When connecting shared network folders, they are associated with the current session for the current process access token and are not available with another token.

There is a solution. To implement it, you have to make some changes to the registry:

Open the registry editor (regedit.exe)

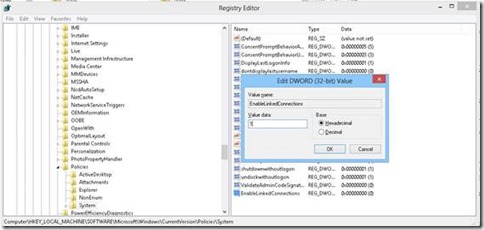
Go to HKEY_LOCAL_MACHINE\SOFTWARE\Microsoft\Windows\CurrentVersion\Policies\System

Create a new parameter (DWORD type) with the name EnableLinkedConnections and the value 1

clip_image010

Restart your computer

After the computer has been restarted, make sure that you have access to the network drives from the apps run with the administrator privileges.

How it works. After you enable EnableLinkedConnections parameter of the registry, LanmanWorkstation and LSA will check if there is the second access token associated to the session of the current user. If this token is found, the list of the mounted network drives will be copied from one token to another. Thus, the network drives mounted elevated will be seen in the standard mode, and vice versa.

Ref:

https://support.microsoft.com/en-us/help/3035277/mapped-drives-are-not-available-from-an-elevated-prompt-when-uac-is-configured-to-prompt-for-credentials-in-windows

https://technet.microsoft.com/en-us/library/ee844140(v=ws.10).aspx

https://social.technet.microsoft.com/Forums/en-US/49e551df-8e18-45fa-b4bf-923b5a317337/windows-8-issue-with-drive-mapping-and-uac-enabled-enablelinkedconnections?forum=w81previtpro