Stop unresponsive service via command line. (Windows & some Linux distros)

In Windows:

If you have a service that is not responding or showing pending in Windows services that you are unable to stop, use the following directions to force the service to stop.

  1. Click the Start menu
  2. Click Run or in the search bar type services.msc
  3. Press Enter
  4. Look for the service and check the Properties and identify its service name
  5. Once found, open a command prompt. Type sc queryex [servicename].
  6. Press Enter
  7. Identify the PID
  8. In the same command prompt type taskkill /pid [pid number] /f
  9. Press Enter

In Linux (Ubuntu for example)

1. Open the System Monitor app. In the Processes tab, scroll down the list until you find the unresponsive app.

Use the system monitor to kill an unresponsive application in ubuntu

2. Right click on it and select “Kill Process”.

Once confirmed, this will kill the unresponsive application.

Via Command line:

Open terminal

Enter the command to show currently running services. Type ls /etc/init.d into Terminal and press ↵ Enter. This will bring up a list of currently running services and their corresponding command names.

If this command doesn’t work, try ls /etc/rc.d/ instead.

Find the command name of the service that you want to restart. You’ll typically find the name of the service (e.g., "Apache") on the left side of the screen, while the command name (e.g., "httpd" or "apache2", depending on your Linux distribution) will appear on the right side.

Enter the restart command. Type sudo systemctl restart service into Terminal, making sure to replace the service part of the command with the command name of the service, and press ↵ Enter.

For example, to restart Apache on Ubuntu Linux, you would type sudo systemctl restart apache2 into Terminal.

Enter your password when prompted. Type in the password that you use for your superuser account, then press ↵ Enter. This should restart the process.

If the service doesn’t restart after doing this, try typing in sudo systemctl stop service, pressing ↵ Enter, and then entering sudo systemctl start service.

To list running services in the command line:

Use this command:

service –status-all

Here’s an example of what this looks like on an Ubuntu 16.04.2 LTS system:

root> service –status-all Example:

[ + ] apache-htcacheclean

[ + ] apache2

[ + ] apparmor

[ – ] bootmisc.sh

[ – ] checkfs.sh

[ – ] checkroot-bootclean.sh

[ – ] checkroot.sh

[ + ] console-setup

[ + ] cron

[ + ] dbus

[ – ] hostname.sh

[ – ] hwclock.sh

[ + ] irqbalance

[ + ] keyboard-setup

[ – ] killprocs

[ + ] kmod

[ – ] mountall-bootclean.sh

[ – ] mountall.sh

[ – ] mountdevsubfs.sh

[ – ] mountkernfs.sh

[ – ] mountnfs-bootclean.sh

[ – ] mountnfs.sh

[ + ] mysql

[ + ] networking

[ + ] nginx

[ + ] ondemand

[ – ] plymouth

[ – ] plymouth-log

[ + ] procps

[ + ] rc.local

[ + ] resolvconf

[ – ] rsync

[ + ] rsyslog

[ – ] sendsigs

[ + ] ssh

[ + ] sysstat

[ + ] udev

[ + ] ufw

[ – ] umountfs

[ – ] umountnfs.sh

[ – ] umountroot

[ + ] urandom

[ – ] uuidd

The meaning of the Ubuntu service command output

From the Ubuntu Linux service man page:

service –status-all runs all init scripts, in alphabetical order, with the status command. The status is:

[ + ] for running services

[ – ] for stopped services

[ ? ] for services without a ‘status’ command

This option only calls status for sysvinit jobs; upstart jobs can be queried in a similar manner with initctl list.

Some services are managed by Upstart. You can check the status of all Upstart services with sudo initctl list. Any service managed by Upstart will also show in the list provided by service –status-all but will be marked with a ?

[Note: Running with/without sudo can make a difference.

Some services in /var/run/ have read access only to root user. Those services show status [-] without sudo, and [+] with sudo.]

Microsoft takes Antivirus/Protection to a new level

I no longer use any ‘always on’ third party Antivirus software on any of my Operating systems, and I haven’t for some time. I rely heavily on my expertise, current systems, and applications setups and experience to keep my self as protected as possible.

I realize that most users do not have the extensive training and skills that I do. So I recommend most Windows users use Microsoft’s built-in Windows Defender AV – it is surprisingly good. AND doesn’t jack up as many systems as do nearly all paid solutions.

Microsoft is now REALLY stepping up the game in system protection.

The HowToGeek has a superb article on this. Check it out.

Fix Elevated applications not having access to mapped drives

Fix Elevated applications not having access to mapped drives

One of the side effects of UAC is the inability to access the mapped (over net use) network drives from the applications running in privileged mode (Run As Administrator). This means that when you run the command prompt or an application (like SpecWin) with elevated privileges, they won’t display the disk letters of the mounted network shares.

A quick way to show what this looks like. Open command prompt, as a regular user, not an administrator and run/enter:

net use

Your screen should look something like this:

clip_image002

And if you change directories and looked at what’s there, it would look something like this

clip_image004

If you run the command prompt ‘As Administrator’ the prompt will look something like this:

clip_image006

If you try and change drives you will get something like this:

clip_image008

This behavior of the system can lead to some inconveniences when trying to run apps elevated often.

Why does it happen? This peculiarity is connected with UAC mechanism for a user with the local administrator privileges. The matter is that when this user signs in, two access tokens are created: the first token provides access without the administrator privileges (the filtered access token, with which most apps are run) and the second is the administrator token with full privileges in the system (all apps approved elevated in UAC are run using it).

When connecting shared network folders, they are associated with the current session for the current process access token and are not available with another token.

There is a solution. To implement it, you have to make some changes to the registry:

Open the registry editor (regedit.exe)

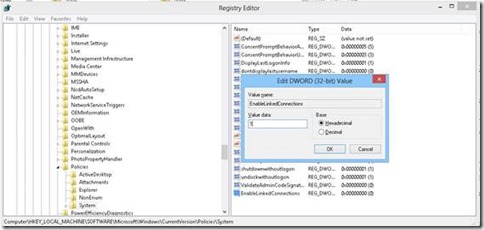
Go to HKEY_LOCAL_MACHINE\SOFTWARE\Microsoft\Windows\CurrentVersion\Policies\System

Create a new parameter (DWORD type) with the name EnableLinkedConnections and the value 1

clip_image010

Restart your computer

After the computer has been restarted, make sure that you have access to the network drives from the apps run with the administrator privileges.

How it works. After you enable EnableLinkedConnections parameter of the registry, LanmanWorkstation and LSA will check if there is the second access token associated to the session of the current user. If this token is found, the list of the mounted network drives will be copied from one token to another. Thus, the network drives mounted elevated will be seen in the standard mode, and vice versa.

Ref:

https://support.microsoft.com/en-us/help/3035277/mapped-drives-are-not-available-from-an-elevated-prompt-when-uac-is-configured-to-prompt-for-credentials-in-windows

https://technet.microsoft.com/en-us/library/ee844140(v=ws.10).aspx

https://social.technet.microsoft.com/Forums/en-US/49e551df-8e18-45fa-b4bf-923b5a317337/windows-8-issue-with-drive-mapping-and-uac-enabled-enablelinkedconnections?forum=w81previtpro

Creating Customized Windows 10/8.1 Media (ISO, WIM, Flash Drive)

Creating Customized Windows 10/8.1 Media (ISO, WIM, Flash Drive)

In the Enterprise environment Windows Operation Systems are usually created, captured and deployed via MS SCCM, WDS or other imaging deployment technology. This allows for an Operating System to be deployed that is updated to the latest version(s) and standards of the organization along with any other software (Office suites, AV etc.) or configurations required by that organization. These system images can be ‘pushed’ out to machines, ‘pulled’ across the network via network (PXE) boot, or be placed on portable media to be installed by technicians (usually USB drives).

I also personally install a lot of Operating systems for my SMB clients, friends and family. This requires me to have install media that is as up to date (patch wise) as possible so that I do not have to spend hours, or often days, downloading security updates and patches just to install a system and get it safe.

I used to have a full server farm (including SCCM) on my home server/workstation so creating custom images (.wim) was not too much work. However, that machine physically gave up the ghost a while ago. So for personal images I decided to create a custom image on my laptop using Microsoft Hyper-V (available on Windows 8.1 and Windows 10).

Below is how I created my latest Windows 10 fully patched image. After following these steps you will have a UEFI capable ISO and the ability to produce a UEFI bootable flash drive.

So here we go…

You will need a Microsoft Windows 10 (or 8.1) installation ISO. If you don’t have your Windows 10/8.1 installation media available or someone else’s (just iso not license key needed) it is possible to find the .iso files via a good search.

[Note: you will need a valid installation key once you install your image to a machine to activate it. Or use a KMS server/volume license.]

Download and install the Microsoft Deployment Toolkit here.

image

image

image

Download and install Windows 10 (1607) or Windows 8.1 ADK with these options; you can get them here.

image

Next let’s enable and configure the Microsoft Hyper-V Platform on your workstation.

You can go to the Control Panel and click on Program and Features or hold the Windows key + X and select Programs and Features at the top.

Select Turn Windows features on or off.

image

Select Hyper-V and click OK. When prompted, click Restart now.

image

Once rebooted, open the Start Screen and type "Hyper" > Open Hyper-V Manager.

image

Select your host (computer name) on the left and then click Virtual Switch Manager. (on the right)

image

Select New virtual network switch on the left and External under the type to create. Click Create Virtual Switch.

image

Name the switch something appropriate (I’m using "Main").

Select External Network > Select your main NIC (wireless or wired).

Check Allow management operating system to share this network adapter and click OK.

image

Click Yes on the notice prompt.

image

Create the Staging VM

Now that you’re prepped, within Hyper-V Manager select New > Virtual Machine and then click Next.

image

Type a name for your staging VM (I’m picking stage01) then click Next.

image

Select Generation 1 and then click Next.

image

Enter an appropriate amount of memory (I’m entering 4096 MB), UNselect Dynamic Memory and then click Next.

image

Choose the Network Connection you previously created and then click Next.

image

Designate an adequate amount of storage for your VM (not less than the total GB of all applications you will be installing) and then click Next.

image

Select Install an operating system from a bootable CD/DVD-ROM > Select Image File (.iso) > Find and select the Windows ISO you downloaded earlier > Click Next > Click Finish.

image

image

Back at the Hyper-V Manager, right click stage01 and select Connect… (This will open the console of the VM.)

image

Navigate to Action and click Start.

image

Install Windows 10 by accepting the EULA and choosing Custom > selecting the entire virtual disk and clicking Next.

image

Then let the setup continue until it reboots and you get to the first ‘customization’ screen.

Enter Audit Mode and Install Applications

Start Windows installation normally. After reboot or two Windows is installed and process stops waiting your input. At this point we need to click on the Use express settings button. On next dialog you should not type a username, so don’t enter it. – STOP.

image

Instead, press and hold down the CTRL+SHIFT+F3 keys combination. Windows will now reboot to a special customization mode, the Audit Mode.

When presented with the System Preparation Tool window, click Cancel

image

You’re now in Audit mode. Audit mode is used to add customizations to Windows images. When you use audit mode, the system does not have to apply settings in Windows Welcome – things like creating user accounts, read and accept the Microsoft® Software License Terms, and select their language and time zones etc. It is designed specifically for preparing Windows images for deployment.

Okay so now let’s prepare and update the system. In Windows 10 (and 8.1) you can forcefully check for updates here:

image

OR you can use PowerShell to update – as in my previous article. I’d make sure ALL the updates are done – reboot several times (clicking ‘Cancel’ each time) until you’re sure that there are no more updates.

You may also want to uninstall any Windows ‘Store’ apps per this article.

Here is where you will download/install any software you wish to be on your image.

I install things like Office Suites, Acrobat, 7-zip, Java, different Browsers (Chrome Firefox etc.), plugins (Flash, Shockwave etc.) and such.

Once done with all your installs you should clean up all temp files (I use CCleaner portable) and run Disk Cleanup too.

So now let’s finalize and Sysprep the disk.

Shutdown your Staging VM.

Create a Checkpoint

Click Action > Checkpoint.. > Enter "Ready for sysprep" > Click Yes

Power your Staging VM back on.

When logged in, do not close the System Preparation Tool window this time.

Select Enable System Out-of-Box Experience (OOBE)

Checkbox Generalize

Select Shutdown

Click OK

image

Now we’re going to create the WIM file that we’ll use for creating our install media. The WIM file is a compressed image which is deployed during Windows installation. The install.wim file is the actual source used when installing Windows 10. Thus, we need to create our own WIM file, and replace the stock one with it. To do this, we need to "capture" the last Checkpoint – the one named ‘Complete’.

We’ll use the DISM tool to capture a mounted hard drive.

So we first need to mount the VHD (virtual hard drive) of our very last/updated VM – the checkpoint we named complete.

Once your VM is shut down, create another Checkpoint named "Complete". 
Do NOT power your VM back on.

As mentioned above, the install.wim file is the actual source used when installing Windows 10. Thus, we need to create our own WIM file, and replace the stock one with it. To do this, we need to "capture" the last Checkpoint.

On your host (physical machine), open up Disk Management. 
WIN+X > Disk Management

image

Navigate to Action > Attach VHD

image

Click Browse

image

Navigate to the directory where the virtual disks are stored for stage01. By default this directory is: C:\Users\Public\Documents\Hyper-V\Virtual hard disks/

In the bottom right, change Virtual Disk files (* .vhd, * .vhdx) to All files (* . *)

image

Select the file with the most recent Date Modified – this is your Complete Checkpoint!

image

Click Open

Check box Read-only and then click OK.

image

At this point you will see one new disk with two partitions. Make note of the second partition drive letter (in my case, the F: Drive).

image

Now the capture!

Open the Command Prompt with Administrator Rights.

WIN+X > Command Prompt (Admin)

image

Type:

dism /capture-image /imagefile:c:\customInstall.wim /capturedir:F:\ /name:"Windows 10 Enterprise – Customized by: Darth Sidious" /Description:"Windows 10 Enterprise – Customized by: Darth Sidious" /compress:maximum /checkintegrity /verify /bootable

replacing F: with the second partition drive letter you made note of earlier – and replacing "Customized by: Darth Sidious" with whatever you want.

Depending on your processing power, this may take a little while. When complete, you will see "This operation completed successfully." You should now see a file named "customInstall.wim" at the root of your C:\ Drive.

image

Build the Customized Media

Open/Double click the stock ISO you used to install Windows in stage01 to mount it within File Explorer.

Open This PC and double click the newly mounted drive.
(In my case, Drive E: SW_DVD5_WIN_ENT_10_1607_64BIT_English_MLF_X21-07102.ISO)

CTRL+A (to select all) and CTRL+C (to copy)

Create a new folder named WinExtract off your C:\ drive

(Another location is fine too, but these instructions will be assuming C:\)

Navigate to C:\WinExtract\ and CTRL+V (to paste).

image

After the copy completes, navigate to C:\WinExtract\sources\ and delete the install.wim file.

image

Move C:\customInstall.wim (your custom WIM) to C:\WinExtract\sources\.

Rename C:\WinExtract\sources\customInstall.wim to install.wim.

image

At this point, you are ready to create your ISO.

Create UEFI Bootable ISO:

Open Admin Command Prompt

Change directory (cd) to:

C:\Program Files (x86)\Windows Kits\10\Assessment and Deployment Kit\Deployment Tools\amd64\Oscdimg

Then enter and run:

oscdimg -m -u2 -bC:\WinExtract\boot\etfsboot.com C:\WinExtract\ C:\Windows10Updated.iso

Once complete, you now have a UEFI bootable ISO named Windows10Updated.iso

[If you are making a Windows 8.1 image you will need to use the right directory for the ‘Windows Kits/adk selection]

You should now test your .iso by using it to create a new VM. Verify that it installs and works. Then you can create a bootable USB drive.

I use Rufus Portable to create my bootable USBs. Portable download here.

One of the first cool things about Rufus Portable is that no installation is necessary to run it. When you run it, setting it up is simple. Select the USB drive you want to use. To make sure your drive will boot on most devices including newer UEFI ones select the ‘MBR partition scheme for BIOS or UEFI Computers’ and also ‘Use Rufus MBR’ option.

Then select the disc icon next to the ISO drop-down and navigate to the location of your newly created Windows 10 ISO.

image

After that click Start and you should be good to go, within minutes.

image

Hope this helps some. I put this up here, like most of my stuff, mainly so I have a place to remember what I did. 😛

Happy image building.

Let’s get backing up this New Year!

So another year is gone and a new one is upon us.
Many of us have received or purchased new computer systems for personal use, work or school or will be soon.
Nowadays many of us have a great deal of our lives – pictures of family, personal and legal documents and more stored digitally on our computers. And many do not have any backups of said systems.

I continually preach the benefits of using system images for backing up your computers. With imaging you can restore entire systems in case of hard disk failure, restore individual files and folders, upgrade/migrate to newer larger and faster HDDs (usually SSDs) and even move to completely new systems.

One of the first things everyone should know is that your digital system(s) WILL fail. And can at anytime. And if you have no recoverable backup your data will be gone forever. Please don’t let this happen to you.
One thing I do – because I am such a stickler on having my own stuff backed up, is have TWO full backups on SEPARATE disk drives. This allows for me to keep the two seperate full images in two different locations. And should one backup drive fail, I have another to go to. The likely hood that both would fail (along with my primary system) is remote and if I had that triple whammy I’d have to assume God needed me to lose it all.

External Hard Disk Drives can be had very inexpensively. For example here is a good deal on one from Amazon. And the cost of imaging software is under $100.00 US (often way less too). A VERY small price to pay for peace of mind and the security of knowing you’ll be able to recover your important files, pictures and entire system.

Here is a previous article I’ve written. All points valid still.

Here are the tools I regularly use:

Acronis – Acronis works on Mac and PC. I prefer the 1-time purchase option because I like to OWN my stuff and not ‘rent’ it. Check that out here. They have loads of tutorials in their knowledge base.

For Mac only there is Carbon Copy Cloner (CCC), my favorite. Or another good alternative SuperDuper.

Of course on Macs, you can use Apples built in Disk Utility to create an image but it is more onerous. And you can’t really make incremental backups. You can of course, create an image and use TimeMachine backups to make up the difference I guess.

As a free alternative for Windows 8.1 and 10 there is the built in backup utility which includes and imaging option. However I’ve had issues restoring images to differing hardware. Here is a very good article on how to do that.

Another very good option for PC is Macrium Reflect. They even have a free version (here) that works very well. I’ve used the latest version successfully a few times.

One more way I use to augment my backups is with the "Cloud".
Cloud storage sounds very nebulous, but is really just utilizing large storage pools made available by numerous internet service providers to augment their offerings and services.
Cloud storage is GREAT for storing a large amount of ‘nonproprietary’ information; things like most pictures many documents and files etc. I just make sure to not put up to the cloud any critical/personal/financial documents or other highly private information.
I pay a little extra to Google to have loads of extra Google drive space that I upload many pics and files to. [and of course Google provides for free unlimited photo storage with some gotchas on the having to do with photo size and quality].
I have Microsoft’s One Drive that came with my purchases of Microsoft Office and some Windows 10 devices; but that storage size has been cut down recently.
With my Amazon Prime account I also have unlimited picture storage too. 
And I also even have Dropbox.

So for plain mundane data storage you can see I use many of the available options in the cloud. But the ‘cloud’ does NOT enable you to recover your entire system should the drive or other major component fail. Or worse – burn up in a fire or get damaged by some other catastrophe.
So no matter what I store in the cloud I ALWAYS have copies on my own personal systems somewhere.

I may be a more than a little "tight" about keeping data. But decades of dealing with data losses in the corporate and personal world has made me so.

I hope that some of you take some time in this New Year to do some digital safe guarding. Like a fire extinguisher you need to have it on hand and ready before you have the fire.

Fix "The trust relationship between this computer and the primary domain failed" error

This is something that happens very often in large organizations with remotely connected sites (whether via MPLS nodes, connected VPNs or remote VPN users).

If you’ve spent any time in the desktop support arena you’ve likely had this error/issue dozens of times.
Here are some surefire ways to fix this fairly quickly.

MANY, many sites will tell you to remove the PC from the domain, delete the computer account and then re-join the computer. This does work – SOMETIMES and can bring on even more problems when it fails.

A simpler solution, that actually works, is to use PowerShell to resolve the issue.
You will need to log into the computer as a local administrator (or possibly you can use the cached domain admin credentials if that’s still an option)

Here are the commands to use in order of preference.

Depending on what version of Windows you are on and how up to date it is you should first download the latest Windows Management Framework (WMF). this contains the latest versions of PowerShell, DSC, WMI, and WinRM for downlevel versions of Windows and Windows Server. Here’s that link

1st try this one from an Admin Powershell:

image

Test-ComputerSecureChannel -Repair -Credential (get-credential)

After that completes restart computer and try domain login.

If that doesn’t work try this one:

Reset-ComputerMachinePassword -Server <ClosestDomainControllerNameHere> -Credential <DOMAIN\domain.admin>

Make sure to specifiy you DC and your domain user name, you’ll be prompted for you password.
The script will run and you’ll be back to the Powershell prompt.
Then just restart machine and try domain login.

An older method you can also try the NETDOM way ( most useful on some non upto date Win7 machines).
You’ll likely have to download the Microsoft Remote Server Admin Tools from here.  Install and then

use the following from an elevated cmd prompt:
netdom.exe resetpwd /s:dc-hostname.domain /ud:domainadminusername /pd:* (enter the domain admin password when prompted)

Hope this helps some.

Completely Uninstall Default Windows Store Apps in Windows 10 (8/8.1 too)

I am NOT a fan of the Windows Store or ‘Charm’ apps. If I want an application – I’ll seek out and get it myself. I don’t like being force fed a bunch of useless stuff I don’t want or need. With the advent of Windows 8 through Windows 10 MS has pushed their default/charm style applications. I use none of them. So I set out to remove them. Here is what I’ve found. Hope it helps.

If you wish to uninstall individual apps in Windows 10, run the following command in an elevated PowerShell window:

Get-AppxPackage | Select Name, PackageFullName

You will be able to see the list of all installed apps and its PackageFullName information.

image

Note down the PackageFullName and replace it in the following command:

Get-AppxPackage PackageFullName | Remove-AppxPackage

So the command to remove some of the apps will look as follows:

Uninstall 3D Builder

Get-AppxPackage *3dbuilder* | Remove-AppxPackage

Uninstall Get Office app

Get-AppxPackage *officehub* | Remove-AppxPackage

Uninstall Get Started app

Get-AppxPackage *getstarted* | Remove-AppxPackage

Uninstall Get Skype app

Get-AppxPackage *skypeapp* | Remove-AppxPackage

Etc…

Run the command to uninstall the particular pre-installed default Windows 10 Store app and then restart your computer.

If you want to uninstall the particular pre-installed app from all user accounts, use the following command format:

Get-AppxPackage -allusers PackageFullName | Remove-AppxPackage

Seems some people lost the Windows Store and wanted/needed it to get Window apps.

Another fully scripted way to remove everything BUT the Windows Store is here:

Get-AppxPackage

-AllUsers | where-object {$_.name –notlike "*Microsoft.WindowsStore*"}

| Remove-AppxPackage

Get-appxprovisionedpackage –online | where-object {$_.packagename –notlike "*Microsoft.WindowsStore*"}

| Remove-AppxProvisionedPackage –online

There are some tools available that will assist users in doing all this via a Graphic Intereface – Notably theWindowsClub’s 10AppsManager for Win10; it’s a freeware that will allow you to easily uninstall and reinstall the default, built-in, preinstalled Windows Store apps in Windows 10. It can be downloaded here.

How to remove a printer and its drivers from Windows 8/10

How to remove a printer and its drivers from Windows 8

Press the keyboard shortcut Win+q. Find Printer Management in the section Administrative Tools and launch it.

clip_image002

Removing a printer

Open Custom Filters, All Printers, select the printer you want to remove and click on Delete.

clip_image004

Confirm it by clicking Yes.

clip_image006

Removing drivers

Go to item All Drivers. If you have installed your driver from a standalone installer, it is recommend you to Remove Driver Package… . If you have simply selected the driver from a list offered by Windows when installing the printer, it is recommend you to Delete it.

clip_image008

If you are trying to remove the driver without removing the printer beforehand, or the driver is used also by another printer than the one you removed, the system won’t allow you to remove the driver.

clip_image010

If you resolved the previous problem or you haven’t encountered it, system will show you which packages and drivers will be deleted.

clip_image012

After you click on the button Delete, the packages and drivers will be erased from the system. By clicking on the button OK on the summary window, the process of removing drivers will be finished.

clip_image014

If you removed all drivers you wanted, close the Print management.

Remove Network Printers from Windows via Registry Editor

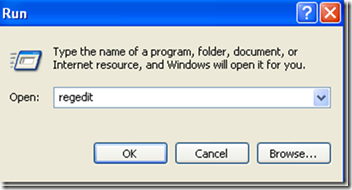
Step 1: Click on Start, Run and then type in regedit and press Enter. This will open the registry editor.

clip_image016

Step 2: Navigate to the following key in the registry:

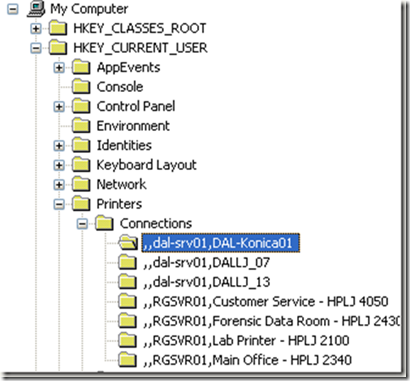
HKEY_CURRENT_USER – Printers – Connections

Here you should now see a list of all network printers with the server name first, then a comma, and then the name of the actual printer.

clip_image018

Go ahead and click on the printer in the left menu and press the Delete button or right-click and choose Delete. Unfortunately, that’s not all! You also have to delete the printer from one more location in the registry:

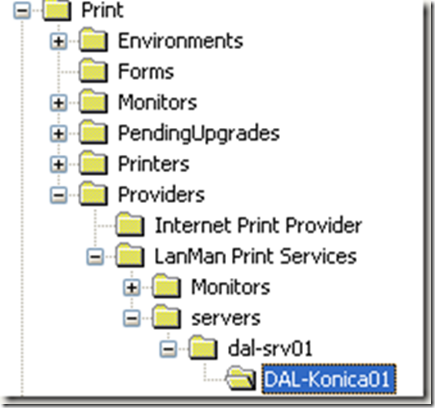
HKEY_LOCAL_MACHINE – SYSTEM – CurrentControlSet – Control – Print – Providers – LanMan Print Services – Servers – Printers

Now under the servers key, you should be able to expand it and see the name of the print server that actually hosts the printer you want to delete. Go ahead and expand the print server key and delete the printer from the list.

clip_image020

Now close the registry editor and reboot your computer. The undeletable network printer should now be gone! Note that the method above is just for network printers. If you have a local printer and want to remove it the same way via the registry, you need to go to the following registry keys below:

HKEY_LOCAL_MACHINE\SYSTEM\CurrentControlSet\Control\Print\Environments\ Windows NT x86\ Drivers\Version-3\

HKEY_LOCAL_MACHINE\SYSTEM\CurrentControlSet\Control\Print\Printers\

Using PowerShell to Manage Windows Updates

Using PowerShell to Manage Windows Updates:  PSWindowsUpdate

Often we have to update computers that have not – for whatever reason been updated in a long time. AND we often have to create new deploy images using sysprep. What usually happens is that Windows update will hang at ‘checking for updates’ for a very long time and either error out or never complete. A secret I found to deploying Windows Updates when this happens or from within Audit Mode is an excellent PowerShell module created by Michal Gajda. This module, aptly called PSWindowsUpdate, allows managing Windows Update on any computer running PowerShell 2.0 or higher. This module even enables Windows admins to check for and install updates on remote PCs and servers. PSWindowsUpdate is particularly handy for installing updates on Server Core machines that have no GUI, or in instances such as Sysprep’s Audit Mode where the Windows Update GUI doesn’t work.

· Get started by downloading the latest version of PSWindowsUpdate.zip.

image

· Once downloaded, extract the contents of the zip file to C:\Windows\System32\WindowsPowerShell\v1.0\Modules\.

image

Extracting files from PSWindowsUpdate.zip.

· Click Continue if a UAC prompt appears.

image

· When the files have been extracted into the PowerShell Modules folder, open an elevated PowerShell prompt. Change PowerShell’s Execution Policy to RemoteSigned. The RemoteSigned Execution Policy allows PowerShell scripts downloaded from the Internet to run on a PC as long as they are signed by a trusted publisher.

· Type Set-ExecutionPolicy RemoteSigned and press Enter. When prompted, confirm the change by pressing Y and then Enter.

image

Changing PowerShell’s execution policy

This completes the one-time configuration of the module! Now it’s time to put PSWindowsUpdate to use!

· If running PowerShell v2.0, type Import-Module PSWindowsUpdate and hit Enter. This isn’t necessary in PowerShell v3 and higher, but it doesn’t hurt anything either. This step simply guarantees that the modules cmdlets will be available to the PowerShell v2.0 session.

· Display a list of all the module’s available cmdlets by typing Get-Command –module PSWindowsUpdate and hitting Enter.

image

Using Get-Command -module PSWindowsUpdate.

· Possibly the most important function for getting and installing updates is Get-WUInstall. Help for each cmdlet is available, so to see full help for Get-WUInstall type Help Get-WUInstall –full and press Enter.

image

Looking at help for Get-WUInstall.

When applying updates, I prefer connecting to the Microsoft Update servers. Using these instead of the standard Windows Update servers allows installing updates to Office and other Microsoft products in addition to the normal Windows updates. Unfortunately, trying to connect to the Microsoft Update servers using the PSWindowsUpdate module from a fresh Windows installation will produce an error, as shown below.

image

· The reason for this error is because Windows is registered to use only the standard Windows Update servers by default. To use the Microsoft Update servers, the Microsoft Update Service must be registered on the computer. In the GUI, this is done by selecting the checkbox for Give me updates for other Microsoft products when I update Windows from the Control Panel – Windows Update – Change Settings applet.

· In the PSWindowsUpdate module, the same process is completed by using the Add-WUServiceManager cmdlet with the ServiceID for the Microsoft Update service specified. Type Add-WUServiceManager -ServiceID 7971f918-a847-4430-9279-4a52d1efe18d and press Enter. When prompted, confirm registering the service by typing Y and pressing Enter one more time.

image

Registering the Microsoft Update servers.

· List available updates from the Microsoft Update servers by typing Get-WUInstall –MicrosoftUpdate –ListOnly and pressing Enter. After a few moments, the system will return a list of the available updates for the current machine. No error this time!

image

· The same results are produced by typing Get-WUList –MicrosoftUpdate and pressing Enter.

image

· Type Get-WUInstall –MicrosoftUpdate and press Enter to go through the available updates, confirming installation of each one manually.

image

PSWindowsUpdate and Parameter Support

Another awesome feature of the PSWindowsUpdate module is its support of parameters. For example, using the –AcceptAlland the –AutoReboot parameters with the Get-WUInstall cmdlet changes the manual process into an automated one. Type Get-WUInstall –MicrosoftUpdate –AcceptAll –AutoReboot and press Enter. The system will download and install all available updates and then automatically reboot if any of the updates require a reboot.

image

Retrieving updates and installing automatically.

Don’t want a particular update to be installed? No problem! Use Hide-WUUpdate. Selection parameters such as –Title or –KBArticleID narrow in and hide specific updates. Feel free to use wildcards with these parameters. As an example, type Hide-WUUpdate –Title “Bing*” –KBArticleID “KB2673774” –MicrosoftUpdate –Confirm:$false and press Enter to hide the Bing Bar 7.3 update.

image

Hiding an unwanted update.

Notice that I used the –Confirm parameter, along with the $false switch, to automatically confirm hiding the selected update. In the future the update won’t appear when listing available updates.

Did you make a mistake and hide the wrong update? No problem! Hide-WUUpdate can unhide an update by using the –HideStatus parameter with the $false switch. To unhide the update hidden earlier, type Hide-WUUpdate –Title “Bing*” –KBArticleID “KB2673774” –MicrosoftUpdate –HideStatus:$false –Confirm:$false then press Enter. As before, I used the –Confirm:$false parameter to keep everything streamlined.

image

Unhiding a previously hidden update.

Once all the updates are complete make sure to open PowerShell (as Administrator) and set the Execution Policy back to ‘restricted’:

Type Set-ExecutionPolicy Restricted and press Enter. Then exit