“UPDATE!”
After a few weeks of removing loads of nasties from Windows and Mac machines and recovering data from dead or corrupted drives from both types of systems because of malware/viruses and hardware failures, I thought I would republish this.
I must ask you – in this digital age what price will you put on your data?! You family pictures, you financial documents and communications – everything? I don’t ask this lightly. For only a couple of hundred dollars you can KNOW that you will be safe!
People PLEASE HAVE A SYSTEM BACKUP – COMPLETE AND TESTED!!
I have been asked again to explain in more detail with examples of how I personally backup/archive my data. My previous article is here and should be read first.
So here it is in a simple, I hope, form.
I have two external HDDs (actually many but for example this will work) I use Acronis as my primary imaging software. If you use OS X you can use Time Machine, Carbon Copy or Apple’s built in disk image utility. I covered these in the post above.
To create my images I use an external HDD mount, like this. with drives something like this or this. You can mount the drives in your system if you like or use any other external type of drive. I just like the ease and economy of this set up. It also makes it easy to just take the drives, place them back in the protective bags they come in and put them( rotate) into a safe deposit box.
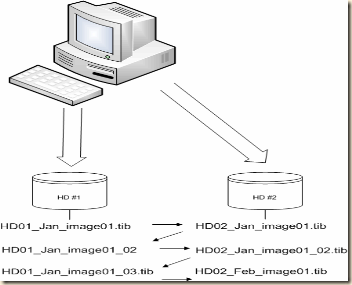
I create a full image of my system on external HD #1 on Jan 1st – HD01_Jan_image01.tib
On Jan 2nd I create a full image of my system on external HD #2 – HD02_Jan_image01.tib
I now have two images on two separate drives.
At the end of week one for the month I create an incremental backup to external HD #1 – HD01_Jan_image01_02.tib (or whatever Acronis auto names it.)
At the end of week two for the month I create an incremental backup to external HD #2 – HD02_Jan_image01_02.tib
At the end of week three for the month I create an incremental backup to external HD #1 – HD01_Jan_image01_03.tib
On the 1st of the next month I create a new FULL image to HD #2 – HD02_Feb_image01.tib. Once that image is created I can then delete the previous months images ON THAT drive.
On the 2nd of the month I create a full image to HD #1 – HD01_Feb_image01.tib. Once that image is created I can then delete the previous months images ON THAT drive.
This assures me that if my system were to die AND one of my external drives failed I would lose no more that two weeks of data – usually just one week or less!
You should also copy or store one of the external drives in a fire safe or safe deposit box for true disaster recovery!
As with any good backup plan you should regularly test your backups! Either do a full restore (highly recommended) or at least validate and mount your images to insure they are fully readable.
If you wish to, or have to, for compliance issues (corporations) you can archive your monthly images to additional external drives. I do. I have images of machines that are long gone (some over ten years!) and I have been able to retrieve data I needed very easily and quickly. In fact I needed a Photoshop file recently that I was able to retrieve from one of my images of an old Mac G3!!
I hope this helps. Please don’t be the person who loses important personal, family or business data because you couldn’t take a little time and effort to set up a backup and recovery plan. The costs and time are insignificant when compared to the cost of loss!
