Roku and Cutting Cable part II

I’ve written a few times about cutting the cable/tv provider tether. Older article here. And, still currently only pay for high speed internet, and I watch any and all media via the Web and streaming services.

Thought I’d share another story about breathing new life into an older TV along with this setup.

I have an older TV – Vizio e472vl that’s about 10 years old in another room. And while great at the time, it’s ‘smart apps’ always lacked and were painfully slow. So I used a Roku Stick to make it work better; and it did for a long time. But with the addition of a much new and nicer TV in the living room, using the older TV became frustrating. The difference in performance was staggering. Also I certainly wasn’t going to break down and get a new TV in today’s economic environment. Plus the TV itself is technically good.

I figured I might try a newer/more powerful streaming device. And….Roku currently has a sale on their top device: $69 ($30 off) on their site and think it’s the same on Amazon and other places. I like Roku because it is not ‘proprietary’ as are the Apple TV, Amazon Fire Stick or the Google Chromecast devices.

So, I ordered this device, received it in a couple of days and got it installed in minutes, configured my apps and WOW! It’s like I again have a new TV! The speed of moving through the menus and streaming apps is incredible, I’m also getting at least high def on all my content, AND I can adjust the volume for the TV from the same remote!!

I was so impressed by this device I had to write about it.

[Some notes: I have this device plugged directly into an Ethernet cable (my house is wired with Ethernet in every room), but it does have very high speed wireless capabilities. For my ISP (Internet Service Provider) I have a high-speed fiber, 1GB. I only pay for Internet service; no TV or phone. In my line of work I must have huge bandwidth at times and this speed is almost a necessity for me. However with even a much slower internet plan most folks could easily be able to stream to multiple devices in their houses. ONLY caveat is if there is a data cap/limit imposed by the ISP – something to keep in mind.]

Serious OS-X and iOS Security Vulnerability Completely Opens Up Your ALL Your Secure Communications

Rotten_plus_GreenApple

It had been know for MONTHS that there was a serious security flaw in iOS and possibly the latest version of OS X that could allow attackers to surreptitiously circumvent the most prevalent Internet security protocol – TLS/SSL and and Security Certificate validations. The issue is a “fundamental bug in Apple’s SSL implementation,” This can allow attackers to view ANY of your ‘secure’ Web communications. This includes e-mail, banking sites. Facebook etc..

Apple finally released an ‘emergency patch’ to the latest version of iOS last week, but it appears that the flaw affects more than just Apple’s mobile platforms. It actually affects the latest versions of OS X – Apples latest desktop Operating System too!!

If you have an iDevice I’d recommend backing it up; via iTunes or any of the other methods I’ve previously recommended. Then checking for any System Updates. Tap Settings > General > Software Update. Then download and Install to download the update. [Updates might download automatically while your device is connected to Wi-Fi and a power source.]

As for you Desktop computer, well there lies the rub. Apple appears to have at first done the usual – deny, then downplay, then finally admit there is a serious problem and ‘promise a quick fix/patch’. [It’s really crazy that they are able to get away with this so often; I guess those reporting are too busy licking Apple sack….but I digress]

So what to do..

If you use the Desktop Apple Operating System – OS X you should always use the latest versions of Chrome or Firefox for internet browsing to help mitigate some of the possible exposure. [I NEVER use Safari and always recommend to all my clients that they don’t either]. Even if you’ve take the latest update on your iDevice I’d still recommend I’d recommend Chrome for iOS.

Here one of the latest articles I’ve found with a VERY good explanation. You should at least read this! But I’d recommend hitting all my sources.

Be safe folks!

Sources to read 1, 2, 3

Mac Maintenance and HDD updates/upgrade

[Updated 06-26-2011]

I just spent a few days doing lots of maintenance on a few Mac’s.
Cleaning up, optimizing and replacing one HDD for a new larger one.
So I thought I’d share what I do with my Mac’s to keep them running happy and having my data safe should there be problems to those of you ‘Mac-ites’ out there.
1st. Let’s clean up.
I install and use Onyx on all my Macs and those I maintain. It makes maintenance a BREEZE.
With Onyx you can do just about everything you need to do on a regular basis to keep clutter down and errors away.
Get it here.

Check out the AppCleaner application to completely remove applications – often installs put files into many other directories than just the applications folder! A great tool for removing leftover ‘gunk’.

I was going to go into some of the other steps I do such as removing unnecessary start-up items and removing unused apps but it looks like the folks at LifeHacker.com have put together a very good article on just that.
So to save the time of me just re-stating what Gina Trapani, founder of LifeHacker, has already said just go here.
The folks at Tested.com also have a good in depth article on how to manually do nearly everything you can do in Onyx. But I find Onyx to be fantastic.
As always make sure you have a good backup before you start messing with system settings!

2nd. Let’s clone/copy.

For backups most know I believe in Images(Clones), alone with periodic ‘file backups’. That way I’m protected against full drive failures/loses AND stupidity – accidentally erasing or overwriting files. 🙂
Imaging or cloning is the procedure by which you create a backup that is identical to a bootable system either to another internal or external drive. This is the ultimate backup! Should your drive fail you can just ‘pop in’ your cloned drive or ‘restore’ that clone to a new drive and your are up and running.
Good description here

Now to backing up and/or updating of a hard drive. By cloning the drive to a new (or back up one) you are creating an exact bootable copy of the original.

This is actually a very simple process that can be done without any 3rd party software on OSX!
I’ll explain how to do that in a moment, but there are some 3rd party tools that make it a little easier for the novice

Whether you are installing a brand new larger hard rive like I just did or making a clone to and external drive the directions are the same. [except of course if it is just a back up clone you won’t be ‘changing the start up disk’]

For the two Easiest ways to Clone (and also backup – remember images rule!):
Use SuperDuper Mac Drive Cloner. Get it here,
The application is freeware/shareware. Meaning to use the clone function it’s free but to use the advance scheduling features you will have to purchase a license. The call is yours.
I have always found it very worthwhile to own and support great utility software.

Or use Carbon Copy Cloner. Get that here. Read about it here. The latest version is fantastic. It’s now my go to OS X disk tool.

Now the no 3rd party software route.
You can do as I have done many times use OS X’s own clone/restore utility!

You insert the MacOS X 10.x install disk, boot from it, select Disk Utility from the Start menu, and choose the volume of the new Mac.
Then use the Restore tab, drag and drop the old drive as the source, and the new one as the target, and press the button.
Et voila!
After copying, just make sure that your new hdd (the clone) is set to be the start up disk.

You can then boot the new Mac with an exact clone of the old one.

Here’s how to use Disk Utility to clone and backup your hard drive in a little more detail using an install disk:
* Fire the Mac OS X disk that came along with your Mac.
To do this, insert the CD or DVD into your Mac, and hold down the C key while your Mac restarts.

[if that doesn’t work try these options:
# Restart your computer and immediately press the Option key. Icons for all available startup volumes will appear. Click the one you want to boot from, and then click the right arrow button to complete the startup process.
# Restart your computer and immediately press Cmd-Option-Shift-Delete. You must press all the keys at once. The computer will start to boot from the CD or DVD drive. If there isn’t a bootable disc inside the drive when you begin the reboot, the computer will attempt to boot from another partition or drive. ]

* Go ahead select your language. Don’t worry: You’re not installing Mac OS X again – this is just what you have to do to get to Disk Utility. When the menu bar appears, select Disk Utility from the Utilities menu.
* When Disk Utility opens, you’ll want to select your source. This is the hard drive you want to clone and/or backup. After you have a source, select the Destination. This is the hard drive you want to save the backup image to. * Click Restore and you’ll end up with a perfect copy of your hard drive.


Restart your computer and you’re good to go!

That’s it……

For backups there is also the included Time Machine application that ships with the latest versions of OS X. It is much improved from previous versions. It allows the user to restore the whole system, multiple files, or a single file. It works within iWork, iLife, and several other compatible programs, making it possible to restore individual objects (e.g.: photos, contacts, calendar events) without leaving the application. Time Machine is a backup utility, not an archival utility, it is not intended as offline storage. Time Machine captures the most recent state of your data on your disk. As snapshots age, they are prioritized progressively lower compared to your more recent ones.

Carbon Copy Cloner, SuperDuper and Time Machine are complimentary. Think of SuperDuper or CCC as your backup against catastrophe (drive-failure or theft) while your TM volume is a hedge against stupidity (deleting/overwriting important files, contacts, etc.).

One last utility that I’d like to mention is AppleJack.

AppleJack is a user friendly troubleshooting assistant for Mac OS X. With AppleJack you can troubleshoot a computer even if you can’t load the GUI, or don’t have a startup CD handy. AppleJack runs in Single User Mode and is menu-based for ease of use. Their main page is here.

The AppleJack download is here.

Peace and happy computing…..

More on backups and archiving

“UPDATE!”

After a few weeks of removing loads of nasties from Windows and Mac machines and recovering data from dead or corrupted drives from both types of systems because of malware/viruses and hardware failures, I thought I would republish this.

I must ask you – in this digital age what price will you put on your data?! You family pictures, you financial documents and communications – everything? I don’t ask this lightly. For only a couple of hundred dollars you can KNOW that you will be safe!

People PLEASE HAVE A SYSTEM BACKUP – COMPLETE AND TESTED!!

I have been asked again to explain in more detail with examples of how I personally backup/archive my data. My previous article is here and should be read first.


So here it is in a simple, I hope, form.

I have two external HDDs (actually many but for example this will work) I use Acronis as my primary imaging software. If you use OS X you can use Time Machine, Carbon Copy or Apple’s built in disk image utility. I covered these in the post above.

To create my images I use an external HDD mount, like this.  with drives something like this or this. You can mount the drives in your system if you like or use any other external type of drive. I just like the ease and economy of this set up. It also makes it easy to just take the drives, place them back in the protective bags they come in and put them( rotate) into a safe deposit box.

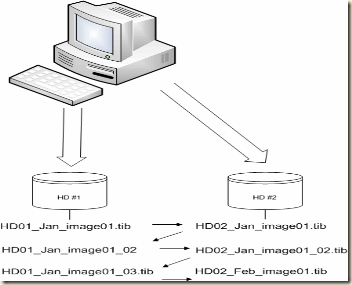
I create a full image of my system on external HD #1 on Jan 1st  – HD01_Jan_image01.tib
On Jan 2nd I create a full image of my system on external HD #2 – HD02_Jan_image01.tib

I now have two images on two separate drives.

At the end of week one for the month I create an incremental backup to external HD #1 – HD01_Jan_image01_02.tib (or whatever Acronis auto names it.)

At the end of week two for the month I create an incremental backup to external HD #2 – HD02_Jan_image01_02.tib

At the end of week three for the month I create an incremental backup to external HD #1 – HD01_Jan_image01_03.tib

On the 1st of the next month I create a new FULL image to HD #2 – HD02_Feb_image01.tib. Once that image is created I can then delete the previous months images ON THAT drive.

On the 2nd of the month I create a full image to HD #1 – HD01_Feb_image01.tib. Once that image is created I can then delete the previous months images ON THAT drive.

This assures me that if my system were to die AND one of my external drives failed I would lose no more that two weeks of data – usually just one week or less!

You should also copy or store one of the external drives in a fire safe or safe deposit box for true disaster recovery!

As with any good backup plan you should regularly test your backups! Either do a full restore (highly recommended) or at least validate and mount your images to insure they are fully readable.

If you wish to, or have to, for compliance issues (corporations) you can archive your monthly images to additional external drives. I do. I have images of machines that are long gone (some over ten years!) and I have been able to retrieve data I needed very easily and quickly. In fact I needed a Photoshop file recently that I was able to retrieve from one of my images of an old Mac G3!!

Archive3

I hope this helps. Please don’t be the person who loses important personal, family or business data because you couldn’t take a little time and effort to set up a backup and recovery plan. The costs and time are insignificant when compared to the cost of loss!

Improving productivity and fun with browser add-ons and scripts

I spend all day working online and managing information systems.
I was asked again how come I don’t have the same ‘bad experiences’ others do when browsing the internet. Why I don’t get things like getting ‘drive by Trojans’, bogus Anti-virus pop-ups, and obtrusive music or videos that play no matter what.
I mentioned that besides the obvious of keeping all of my systems AND applications(browsers, Acrobat etc.)up to date with the latest security patches, always making sure I have the latest Anti-Virus/anti-spyware updates and not going places I know I shouldn’t or clicking on suspicious links, the most likely reason beyond that is the web browser and add-ons I use that make my browsing more productive and fun. I also spend a great deal of time furthering my education, catching up with friends and family and just plane wasting what little free time I may have being entertained online.
I have put together many tools and configuration additions that make all of the things I do with my systems way simpler and easier.
I hope these may help some of you be more productive and provide for a more pleasurable internet experience.
I work with lot’s of different people with varied technical skill sets from absolute newbie’s all the way to the guys with lot’s of CC’s and MS’s after their names, and when they see how much I can ‘just do’ from the browser they are often just amazed.
I am a believer in ‘Kaizen’. Why not try to do everything better if you can. Work, play, rest, worship and just plain life in general. So I hope some will take the time and try and use some of these tools and tips and have some more fun and a more pleasant and rewarding internet experience.
First off I must start off with the ‘machine’ with which I connect to the internet with 90+% of the time.
That is Mozilla’s Firefox browser.
I use Firefox not because it is not any more secure than IE (compared to IE8 it is definitely not, but that is news for another post.), Safari, Chrome or Opera, but I use it because the ‘browser is the machine or portal’ that gets you to all of the ‘stuff out there’ and Firefox has ALL these custom tools and add-ons available to make just about everything I do easier, faster, funner and more efficient.
I use IE only when absolutely needed; usually with custom built applications that require some of IE’s more integrated Windows ‘hooks’. I actually like the way Internet Explorer renders pages better than Firefox. But the lack of add-ons stop me from using it.
Google’s Chrome is a fast simple browser but all of the extensions for Firefox have not been ported yet. AND I really dislike how the ‘Google updater’ is continuously running and connected to Google. As much as I like lots of things Google, especially Gmail and Google Docs, I try to restrict some of the information they are gathering on me.
[While I do love my Gmail, Google is getting more like big digital brother than imagined.]
I used to recommend the Google Toolbar for Firefox and IE but I have now removed it from ALL of my machines. I now recommend that everyone do the same. Seems Google is being even more sneaky and still tracking you even when you disable ‘sending of usage statistics’! I realize it is for ‘marketing’ – to provide you with targeted adds. People forget Google is in the ADVERTISING business; and they are very profitable at it. But I just don’t need that much data collected on me. Here is one article describing the issue. And here is another.]

I was recently asked about these tools and items so I just updated the links and information and added a few items. I hope you all enjoy.
Here are the Firefox Extensions I use:

After the Deadline
After the Deadline checks spelling, misused words, style, and grammar using artificial intelligence and natural language processing.
Now you can use it in your browser. Write better blog comments, tweet with correct grammar, and compose professional messages.

Better Gmail 2:
Developed by the founder of Lifehacker.com Better Gmail 2 compiles the best Greasemonkey user scripts for Gmail into a single package. Adds useful extra features to Gmail, like hierarchical labels, an unread message icon on your browser tab, file attachment icons, and more.

BetterPrivacy
Super-Cookie Safeguard (protects from LSO Flash Objects, DOM Storage Objects).

DownloadHelper:
I use this A LOT. Just surf the Web as you are used to, when DownloadHelper detects it can do something for you, the icon gets animated and a menu allows you to download files by simply clicking an item. It is also possible to capture all the images from a gallery in a single operation.

Adblock Plus:
Ever been annoyed by all those ads and banners on the internet that often take longer to download than everything else on the page? Install Adblock Plus now and get rid of them.

FaviconizeTab:
Alows you to right click on a tab and ‘Faviconize’ it.

FireFTP:
FireFTP is a free, secure, cross-platform FTP client for Mozilla Firefox which provides easy and intuitive access to FTP servers.

gui:conif:
Adds a graphical interface for Firefox about:config tweaking. Useful for the non-geek crowd.

Ghostery:
Ghostery allows you to detect trackers on the sites you visit, learn more about the companies behind them, and control their visibility into your online behavior.

Firesheep:
A Firefox extension that demonstrates HTTP session hijacking attacks. Nice to know if someone is ‘sniffing’ your wireless browsing!

IE Tab  2
Allows you to use IE to display web pages in a tab within FireFox. This updated version includes support for FireFox 3.6 and will continue to be updated with new features and enhancements.

MultirowBookmarksToolbar:
Multi Row Bookmarks Toolbar.

PDF Download:
Use PDF Download to do whatever you like with PDF files on the Web. Regain control and eliminate browser problems, view PDFs directly in Firefox as HTML, and use the all-new Web-to-PDF toolbar to save and share Web pages as high-quality PDF files.

Perspectives:
Perspectives is a new approach to help clients securely identify Internet servers in order to avoid "man-in-the-middle" attacks.

RightToClick:
Defeats a wide varity of javascript annoyances like disabled right click (contextmenu) , disabled text selection, disabled drag&drop and many more.
Enables right-click, text selection, context-menu, drag&drop and much more where it is disabled by Javascript.
Puts little ‘Arrow’ in bottom corner allowing you to enable, then highlight and right-click and/or copy text!

StopAutoplay:
Disable the autoplay of the embedded music and movies. User action (clicking on the play arrow) is then required to hear or see ‘active content’. Some people don’t like this because the want to click on a YouTube link and have it play right away. I DON’T. Being the control freak I am I want things to play ONLY when I choose them to. I would rather go to the page and use DownloadHelper add-on mentioned above, to download the file and view it with out all the buffering and such. Most web videos are ‘Flash’ video format, and can be played back via a freeware flash player like the one from Martijn de Visser his site is here and the actual player download is here.
I love this one! Stops that lousy music or videos from playing automatically playing on certain sites.

TinEye Reverse Image Search:
TinEye is a reverse image search engine. It finds out where an image came from, how it is being used, if modified versions of the image exist, or if there is a higher resolution version.

User Agent Switcher:
The User Agent Switcher extension adds a menu and a toolbar button to switch the user agent of a browser. The extension is available for Firefox and will run on any platform that this browser supports including Windows, Mac OS X and Linux. Helpful for sites that require specific browsers and versions.

Download Context Menu:
Shows the Explorer context (right click) menu of downloaded files in the Downloads list.

Open Bookmarks in New Tab
https://addons.mozilla.org/en-US/firefox/addon/13784

Vacuum Places:
Defragments your Firefox "Places" database (history/bookmarks). This greatly reduces the lag while typing in the address bar and the start-up time.

BetterPrivacy:
Better Privacy serves to protect against not delete-able long-term cookies, a new generation of ‘Super-Cookie’, which silently conquered the internet.

VTzilla:
VTzilla is a Mozilla Firefox browser plugin that simplifies the process of scanning Internet resources with VirusTotal. It allows you to download files directly with VirusTotal’s web application prior to storing them in your PC. Moreover, it will not only scan files, but also URLs.

WiseStamp:
WiseStamp Email Apps enable users to bring social functionality in every email they send.

Greasemonkey:
Greasemonkey is a Firefox extension that allows you to customize the way webpages look and functions by adding additional scripts.
Hundreds of scripts are already available for free. And if you’re the tinkerer sort, you can also write your own.

[ultimate greasemonkey repository – if there is a script it is here:http://userscripts.org/ ]

Greasmonkey scripts I use. You can visit the authors pages to see more details:
Userscripts Updater:
http://userscripts.org/scripts/show/26062
YouTube HD Ultimate:
http://userscripts.org/scripts/show/31864
Gmail Favicon Alerts 3:
http://userscripts.org/scripts/show/24430
YouTube Enhancer:
http://userscripts.org/scripts/show/33042
Google Maps Zoom:
http://userscripts.org/scripts/show/7840
expertsExchange:
http://userscripts.org/scripts/show/37941
and
http://userscripts.org/scripts/show/37941
and
http://userscripts.org/scripts/show/59258

Remove Facebook Ads:
http://userscripts.org/scripts/show/46560

Greasemonkey scripts I don’t use but have heard good things about:
I don’t go on Facebook much but if I were a real ‘facebooker’ I would use this one too:
UnFuck Facebook:
http://userscripts.org/scripts/show/11992

Another one I don’t use but for people who would like to have ‘folders’ in Gmail:
Folders4Gmail:
http://userscripts.org/scripts/show/8810

Now to keep all tidy consistant in all places.
I use MS SyncToy to synchronize my Mozilla Firefox profiles from machine to machine too:
http://www.microsoft.com/downloads/details.aspx?displaylang=en&FamilyID;=c26efa36-98e0-4ee9-a7c5-98d0592d8c52

Pretty good Tutorial:
http://www.pchell.com/support/synctoy.shtml

Location of your Firefox profiles for synching:
Windows/Mac/Linux:
http://support.mozilla.com/en-US/kb/Profiles#How_to_find_your_profile

Lastly even more geeky.
I have a portable version of Firefox on most of my usb flash drives so I can work on machines that might have had their browsers ‘compromised’ by maleware and virii.
To get more information on ‘Portable Firefox’go here:
http://portableapps.com/apps/internet/firefox_portable
Here the more technically savvy will find out how to install, configure and update your portable edition.
Microsoft releases upgrade to Superb Anti-Virus Product

Microsoft’s next version of Security Essentials is actually a pretty great update from its already-great predecessor. Microsoft Security Essentials is sparking the ire of the big security companies for being extremely high quality and annoyingly – free. I spoke about it here and here.

It’s consistently ranked alongside the best paid anti-virus options out there in terms of detection and removal. And it basically blows its free competitors out of the water. The latest version adds an improved heuristic detection engine for weeding out threats that haven’t been positively identified yet.

If you’ve already installed Security Essentials you should find a notice to upgrade under the app’s update tab. If you haven’t downloaded MSE yet, well then, what are you waiting for?
Head over here and grab the latest version to protect your computer for free.

Initially, Security Essentials was legally available only for individual home users, but in October Microsoft relaxed the rules so that businesses with up to 10 users can install the product as well.

Be safe out here folks.

Another reason to use Firefox and Add-ons/Extensions

As I’ve previously written more than a few times I use Firefox as my primary Internet Browser because of extensive amount of add-ons and scripts available. This helps to make the browser a ‘super tool’ for me. With Firefox I can block unwanted adds and scripts, stop annoying ‘auto play’ music and videos, download just about any video, picture or file, FTP from within my browser, download/convert to PDF nearly any web page and many other cool and productive things.

Now I can add virus scanning files BEFORE I download files to that list.
The VTzilla Firefox extension adds a Scan with VirusTotal option to Firefox’s right-click context menu and file download dialog that allows you to scan any file for a virus before you commit to downloading it to your computer.

VirusTotal is a service that analyzes suspicious files and URLs enabling the identification of viruses, worms, trojans and other kinds of malicious content detected by antivirus engines and web analysis toolbars.
It’s a brilliant web service that scans any file you send it against 42 of the best malware scanners available.

They now have an add-on for Firefox that let’s you scan via a simply ‘right-click’ on a file you intend to download.

Get Started

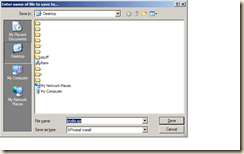
The first thing you must do is to install the add-on itself, you can do this by RIGHT-clicking on the following this link while visiting this site with Firefox and choosing ‘Save Link As, then save it to your desktop or where ever.

saving

Then simply drag the file (.xpi) into an open Firefox browser window and it should start the install process. Make sure to choose to ‘Allow’ and install.

Note: By default, VTzilla turns on a new toolbar in Firefox. To disable it, navigate to View -> Toolbars, then uncheck VirusTotal Toolbar.

After installing the component you will have to restart Firefox to start making use of it, below you can find some examples of use.

Scan suspicious links with VTzilla

Imagine you have logged into your Gmail account and you have received a suspicious email from your bank. The email is informing you about an unauthorized access to your account and is asking you to follow a link and provide your credentials to view the account access log.

Since you are a smart guy, you know that this mail is probably a phishing case. Even though you know that this is a scam, you are committed to help others, hence, you right click on the suspicious link and select the Scan with VirusTotal option from the context menu:

This will open a new tab in the same browser window, such tab will show the report for the requested URL scan. Note that the scanning process will also download the file/site of the target link, so do not forget to click on the View downloaded file analysis link.

Scan downloads before storing them

Let us suppose your good friend John Doe has sent you an email with a slide presentation. You know that very often these slides contain exploit code that will compromise your computer. When you click on the slide presentation in your webmail a download dialog appears, you are a cautious user, you therefore decide to scan the file first with VirusTotal:

Once you have checked the file, you will decide whether or not to download it to your PC.

Simple.

Warning!!: VirusTotal is not a substitute for any antivirus software installed in a PC, since it only scans individual files on demand. It does not offer permanent protection for users’ systems either.

Another reason to use Firefox and Add-ons/Extensions

As I’ve previously written more than a few times I use Firefox as my primary Internet Browser because of extensive amount of add-ons and scripts available. This helps to make the browser a ‘super tool’ for me. With Firefox I can block unwanted adds and scripts, stop annoying ‘auto play’ music and videos, download just about any video, picture or file, FTP from within my browser, download/convert to PDF nearly any web page and many other cool and productive things.

Now I can add virus scanning files BEFORE I download files to that list.
The VTzilla Firefox extension adds a Scan with VirusTotal option to Firefox’s right-click context menu and file download dialog that allows you to scan any file for a virus before you commit to downloading it to your computer.

VirusTotal is a service that analyzes suspicious files and URLs enabling the identification of viruses, worms, trojans and other kinds of malicious content detected by antivirus engines and web analysis toolbars.
It’s a brilliant web service that scans any file you send it against 42 of the best malware scanners available.

They now have an add-on for Firefox that let’s you scan via a simply ‘right-click’ on a file you intend to download.

Get Started

The first thing you must do is to install the add-on itself, you can do this by RIGHT-clicking on the following this link while visiting this site with Firefox and choosing ‘Save Link As, then save it to your desktop or where ever. Then simply drag the file (.xpi) into an open Firefox browser window and it should start the install process. Make sure to choose to ‘Allow’ and install.

Note: By default, VTzilla turns on a new toolbar in Firefox. To disable it, navigate to View -> Toolbars, then uncheck VirusTotal Toolbar.

After installing the component you will have to restart Firefox to start making use of it, below you can find some examples of use.

Scan suspicious links with VTzilla

Imagine you have logged into your Gmail account and you have received a suspicious email from your bank. The email is informing you about an unauthorized access to your account and is asking you to follow a link and provide your credentials to view the account access log.

Since you are a smart guy, you know that this mail is probably a phishing case. Even though you know that this is a scam, you are committed to help others, hence, you right click on the suspicious link and select the Scan with VirusTotal option from the context menu:

This will open a new tab in the same browser window, such tab will show the report for the requested URL scan. Note that the scanning process will also download the file/site of the target link, so do not forget to click on the View downloaded file analysis link.

Scan downloads before storing them

Let us suppose your good friend John Doe has sent you an email with a slide presentation. You know that very often these slides contain exploit code that will compromise your computer. When you click on the slide presentation in your webmail a download dialog appears, you are a cautious user, you therefore decide to scan the file first with VirusTotal:

Once you have checked the file, you will decide whether or not to download it to your PC.

Simple.

Warning!!: VirusTotal is not a substitute for any antivirus software installed in a PC, since it only scans individual files on demand. It does not offer permanent protection for users’ systems either.