Avoid Internet Doomsday: Check for DNSChanger Malware Now

Some background:
The DNS system is a network of servers that translates a web address — such as http://www.google.com — into the numerical addresses that computers use to locate actual websites, computers and servers. It is known as the Internet’s phone book, which translates URLs to the IP address for the server hosting the Web site. This is not only true for Web sites, but also for any other Internet-based service being used, including servers for e-mail, backups, synchronization, chat programs, and calendars AND antivirus programs to update themselves.

Back in November, law enforcement authorities working with the Federal Bureau of Investigation arrested six of the seven individuals in Estonia responsible for infecting millions of Windows and Mac machines worldwide with the DNSChanger Trojan. As part of the “Operation Ghost Click” raid, FBI agents also seized over 100 servers at data centers throughout the United States masquerading as legitimate DNS servers.

If the FBI were to simply shut down the DNS network, then the millions of computers that had been affected by the malware would instantly no longer be able to access the Internet, and given the scope of this malware infection, would suddenly cut off many and very likely have a notable negative impact globally. Being infected with the malware, these systems would not benefit from users checking for and changing their DNS settings, since the malware would continually revert it and thereby continually disrupt communications.

To prevent this, the FBI instead chose to keep the rogue DNS servers active and convert it to a legitimate DNS system for infected computers. Since November 2011, there has been a campaign by the government, security agencies and MANY high profile internet service providers (ISPs) to notify users of the DNSChanger malware and offer services to help users identify systems that are infected.

Most victims don’t even know their computers have been infected, although the malicious software probably has slowed their web surfing and disabled their antivirus software, making their machines more vulnerable to other problems.

To quickly and easily see if this may affect you and what you can do about it visit this site

Click on the link in the middle of the page and you will be notified if you are currently infected.

If you are infected/compromised you can visit this page for resolution tips and instructions.

Remember this trojan/virus will affect PC’s AND Macs. Better safe than sorry. Or you could always call me for a hou$e call when your system won’t connect to the internet.

You can read the FBI’s page here.

Google has one here

Facebook also has one here.

Android App List Backup

Here is a very good app to use to install/re-install applications from phone to phone. It’s called appropriately enough, App List Backup.
It saves a list of your installed applications (Market/Play only. It does not list ‘Non-Market’ applications!) so you can re-download them from the Playstore/Market later (on the same or another device). This way apps will show up in Downloads(PlayStore) and receive updates.

The idea is NOT to physically back up your applications and their settings or to save you from re-downloading apps. For that I use Titanium Backup Pro (root required for Titanium; read my articles on rooting for more information).

This application creates a list that just let’s you VERY easily re-download one or all of your applications.
Great for sharing links of your applications with others. Or duplicating your installed applications on a new phone or one that is ‘reset’; either by wiping or installing new or different ROM version.

Simply download and install the application from the Playstore. Then run it to create a back up list.
OR
Once installed navigate to a list you’ve created and copied over or that someone has given/sent you, and then restore. You can choose which to ‘reload/restore’ individually if you wish too. Now your applications will  show up in the Playstore on your phone and you can then install/update them.
Bam dead simple.

Have fun and be safe. Peace

Another Flashback Variant – 2nd in two days!

Hey Mac users who still haven’t taken the hint and update your systems’ security there’s yet another version of the Flashback Trojan for you to enjoy.

It infects unprotected Macs in the same way Flashback.K did, through a Java applet exploit, and installs itself without the need of your password.
And, just as its predecessor, Flashback.K erases its footprints by deleting the Java cache and ensures its propagation by installing into the Java Update folder. You can read more here.

Apple released a Java patch in early April, as well as a Flashback removal tool, but clearly not all Mac users patched.

But many Mac users don’t even qualify for the patch—it was only available to systems running OS X 10.6 (from 2009) and later. Mac users running OS X v.10.5 and earlier were advised to disable Java altogether. WTF!! However, it’s quite possible that many users of these older systems just didn’t get the memo and are still running insecure software.

Here is F-Secure’s site that has the checker and removal tool. Check that out too. And please update your systems folks.

OK Mac guys here we go again!

There’s Another Mac Trojan Spreading Via Microsoft Office documents and email attachments. The Trojan apparently spreads through infected Office documents, and it’s in “active stage”, which means that it searches through documents on infected machines.

Please note that this is a very sophisticated and malicious attack that not only ‘infects’ your machine but also installs a ‘bot’ to control it, scan through your system, and take what ever it wants to! ALL WITHOUT YOUR INTERACTION AFTER THE FIRST INFECTION!

The attack vector utilizes several vulnerabilities. The Java whole that Apple finally just fixed last week. And a Microsoft vulnerability that MS patched 3 years ago. (but they may update that patch too).

Please folks keep your Operating System, Applications and security software up to date and don’t be one of those poor naive bastards that thinks this cannot happen to you.
You can read more here and here

Mac Fanboys and Girls let the terror start

UPDATE:

There is now a simple tool you can use to check to see if you are infected by this Trojan. So far they are finding more and more people with it!

The tool is called, appropriately enough, the FlashbackChecker tool. You can get that here. Download and run it and see if you are in the clear.

Note that FlashbackChecker can’t actually remove the Trojan, it can only detect it. So, if you or a family member does find it on their machine, you’ll have to go back and run those original terminal commands (from F-Secure’s site) to determine exactly what you need to remove.

—-

Mac Trojan is infecting LOADS of people!! OK now the terror starts for you fanboys (and girls). My last article told you of this Mac Trojan. Now it’s apparently infected at least 600,000 users so far (read here) and it’s terrifying everyone! It’s written in an unknown language, doesn’t even need your password to compromise you! Please read and take precautions.

It’s written in an unknown language, and doesn’t even need your password to compromise you, and.

For instructions on how to check for and how to remove it you can AND SHOULD go here. This is F-Secure’s site.

NO system that is connected to a network is EVER safe. It can only be made more secure. Don’t ever think you Operating System is your security; it’s not – YOU ARE!

Be safe out there people!

[side note: I wonder how many calls I’ll get about this and how to repair the damage? The compromised system I can fix – your emptied bank account I cannot. Just saying.]

Cleanup or Refresh an iDevice and Properly Restore it.

I’ve recently had a few people who had some problems with their iPhones and asked for some help. They were all of a sudden unable to receive calls and texts reliably or at all and or were notified they were running out of space. All were instructed by Apple and/or their carrier (in all three cases it was AT&T but could easily have been others) that they needed to reset their phone to factory settings. Problem is that without properly backing up the device(s), settings, applications and files everything is wiped!

Fortunately it’s pretty easy to back up iDevices and reset them to factory settings then restore the user files and settings such as contacts, call logs and messages. However as I’ve mentioned before Media such as images/videos and other media can sometimes be wiped and lost.

iPhones also have this problem of ‘filling up’ with pictures and videos. The only way to get them off is to manually delete them individually from the phone – a real pain in the anus.

So back to my favorite iDevice backup tool – DiskAid. It has it’s own backup tool that can ‘override’ iTunes backup and works real well. I use it often but some people would rather just use DiskAid to ‘remove’ data from their phone and do their backups in iTunes. So I’ll show that here to show the steps I took.

Get DiskAid and install it on your PC or Mac. And please read my previous post in iDevice backups.

First I used DiskAid to copy all photos and data – Diskaid has the ability to actually ‘SEE’ your data and remove pictures, movies and other items taking up space on your phone.

clip_image002

clip_image004

This copied off the images and movies to the PC.

Then I deleted a whole bunch of images and movies that were still on the phone to free up loads of space.

clip_image006

clip_image008

Cleared up to

clip_image010

The ran the iTunes Backup too.

1. Connect your iOS device to a computer with the latest version of iTunes installed

2. Select your iOS device in iTunes under Devices

3. Right-click (or Control-click) the device and select Back Up

The full iTunes backup can take a while be patient!

clip_image012

Also make sure you ‘Transfer you purchased items to iTunes:

right-click (Windows or Mac) or Control-click (Mac only) your device in the iTunes Source list, then choose Transfer Purchases from the shortcut menu that appears.

clip_image014

Then right-click after that is finished and run the ‘Sync “iPhone” one last time for good measure.

Now to ‘clear and restore’ the device.

Click on the ‘Restore’ radio button and choose the last backup you just created. You will be prompted:

clip_image016

If you have completely backed up, transferred files and synced all should be OK.

clip_image018

clip_image020

clip_image022

clip_image024

clip_image026

When the restore process has completed, the device restarts and displays the Apple logo while starting up:
clip_image028

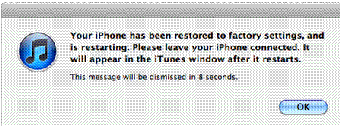
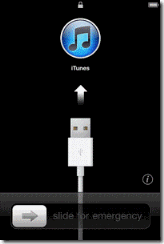
After a restore, the iOS device displays the “Connect to iTunes” screen. Keep your device connected until the “Connect to iTunes” screen goes away or you see “iPhone is activated.”
clip_image030clip_image032

Then to restore information from a backup connect your iOS device to the computer with which you normally sync then in iTunes:

Right-click (or Control-click) the device and choose Restore from Backup

Remember some of these steps can take some time – be patient!!

Your device should run much more smoothly after this.

Well hope this helps some. Peace out.

More Scareware going around–Fake disk errors and hidden files.

More security news. There is another round of Scareware/Trojans going around that trick users into infecting their machines http://bit.ly/zqaBJK and then ransoming a fix for money.

This new threat, named "Trojan.HiddenFilesFraud.A" by Bitdefender’s researchers, hides all files and folders on your machine and disables some standard keyboard shortcuts so you can’t un-hide them. To further inflame your mania it displays error messages as-if from Windows reporting such worries as "damaged hard disk clusters." Disk scareware hides files.Just when your frenzy is at its peak, the fake disk repair tool goes to work. It busily spins and flashes and eventually reports a plethora of errors. Want the problem fixed? All you have to do is register… for $80. The worst of it is, even when you do register it doesn’t unhide your files. Pay $80 for the repair utility that will do absolutely nothing once purchased. The scam is done, the money is gone. And there is a good chance your credit card will be used for more fraudulent activity in the very near future!

It displays a fake ‘error’ and ‘fix window’ that if clicked on (EVEN TO CLOSE!!) actually infects the machine! The the user is supposed to be scared enough and convinced to reach for his pocket and 

Please keep your Anti-virus/Spyware application, Systems and especially your Browsers up to date! I have posted previously on how to ‘get out’ of this bogus application look here http://bit.ly/pUhosM and throughout my blog for MANY articles regarding security please check them out. Or you could just pay me to fix what you mess up for not following my advise. Smile

Be safe folks! Peace.

Fix Running out of Internal Storage Space Android devices

Have you ever received an error stating that “you are running low on storage space” or something to that effect on you Android phone? Then when you check you see that you have what looks like loads of free space on you internal SD card AND your external one too! And then you can’t figure out what is causing that error notification and you are not sure what you are to do?

Like most people, you probably do some research on the net. And in most of the first responses/search results you see people start telling you that you need to either uninstall and remove applications or even ‘move’ some application to the external SD card? Well DONT DO THAT YET! As with most stuff on the internet not all that makes it to the top of the search results is good advice or even close to correct!

But fret not. There is a solution you can use FIRST that is much simpler and probably the RIGHT one. [Don’t get me wrong, you may actually have way too many applications and if your device is rooted (and if it’s not why not?) you can actually move most of your downloaded applications to an external SD card. But that is for another post]

I’m going to add a few ‘pre’ steps here.

1st do a full Titanium Pro backup. [Read through my previous posts about this application.] In case you clear the cache and settings of an application that absolutely needed you can restore the data via Titanium! Saved me having to re-enter all my book marks and settings in my browsers (Dolphin HD and Firefox)! Simply opened Titanium and chose Backup/Restore, found the application in question and restored data. BAM done.

2nd I’d do a full CWM backup. I’m a believer in images. [all you have to do is read through my blog to figure that out.] If you don’t have a custom CWM based recovery don’t worry. Titanium should be all you need.

OK, So let’s free up loads of space by clearing application caches and data stores.

By clearing the cache that some applications use, you can reclaim quite a lot of storage space!

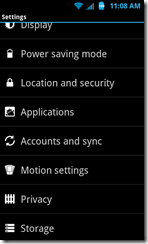
Go to Settings >

01

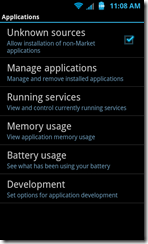
  • Applications >

02

  • Manage applications

SC20120226-110708

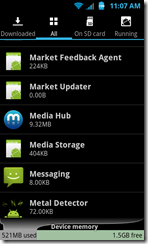
  • on your Android. Press the Menu button and select the Sort by size option. If you’re on Android 2.2 or above, select the All tab first.
  • Select/Click on a chosen application and from the Application info screen.
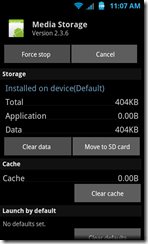
  • To check if an application has a cache, select it in the list and it will be stated on the resulting screen. To clear a cache, simply press the Clear cache button. You may also clear an app’s ‘data’. This will not only clear the cache, but also all the data the app has generated. Basically, when you select Clear data you’re “hard resetting” the app. You will be warned that settings and ‘databases’ will be deleted and you will possibly be required to ‘re-enter’ in information – that is OK. It is what you want.

03 

  • A couple of apps that may have a cache (and data) of several MB or more are Facebook, Maps, Market, Internet, Media and Gallery.
  • For example, I reclaimed 1.2GB!! by erasing the data for Media Storage. It forced my some of my media apps to rescan and locate all my stuff again, but the associated data for Media Storage was still much smaller in size than before I cleared it.
  • I also did this for my Facebook application and cleared 20MB of data. I did have to re-enter my credentials and settings (contacts sync yes or no etc..) when I first launched the application again but WOW, it is much faster now!.

There are some ‘Cache Cleaner’ applications available in the market. You can search and check them out. But why waste time – and more storage for that matter. When you can do it easily as above every few months or so to keep things snappy. Plus I have found most ‘helper/optimizer application whether for PCs, Mac, iPhones or Android are usually a complete waste. There are a few worthwhile applications and utilities – I do use some, but they are ones usually reserved for true developers and or uber geeks like me. And when I find those I will usually post about them.

I hope this helps some. I know I get asked about it often.

Peace out and be productive and have fun!

Acronis Deal

OK here I go again.
Back your sh%t up!

I have written many times previously [read here and here and for Macs here ]about the prudence and wisdom of having backups of your digital data. And by backup I mean that your data exists in TWO places at once and is able to be accessed or recreated from either source.

I believe the best solution is to use Disk Images. And my favorite tool for Windows is Acronis (they should pay me for all the referrals!).
Right now Acronis has another super deal Acronis® True Image™ Home 2012 WITH their Plus Pack which enables restores to dissimilar hardware for only $49.99! And a 3 PC license for only $79.99.

I urge you purchase a large external HDD (or two) – they are very inexpensive now ($100-$150 U.S.) and to invest in this software if you haven’t already. Create a Full Image and breath a sigh of relief, for now. Follow my other posts on continuing a good backup plan. With the option of ‘Universal Restore’ you can ‘take your data forward’ to new/dissimilar hardware too!! OK be data safe! Peace out.

Installing SQL Server 2008R2 to Windows 7 VM

While installing an instance of SQL2008R2 to a Windows 7 Workstation VM (used by my programmers) on my VMWare vSphere cluster I ran into a problem.

While the SQL installation seemed to go OK, it hung up toward the end during ‘Windows Installation Final Tasks – Clean up processes…” or something at “Install_sqlncli_Cpu64_Action”
The install just hung forever – let it actually try to run over night and it never completed.

The solution is simple, and kind of a ‘duh’.
SQL2008R2 needs 4GB RAM and minimum of 4 cores/processors.
My Production SQL VM’s easily met this criteria but not so with the workstations.
So simply cancelled the installation. Shut down the VM. Edited the VM – upped RAM to 6GB and processors to 4.
Restart VM then let it boot and let Win7 reconfigure itself. It will require another reboot.
I then completely uninstalled the failed installation. Then rebooted.
Also remember that this is REALLY IMPORTANT!! – Open the ports on the Windows Firewall for SQL2008

This can be done by copying the following (everything in between the break lines including the last ‘return’ at the end) into a text file and renaming it with a .bat extension. something like ‘opensqlfirewallports.bat’ or what ever and running it with administrative permissions.
————————–
@echo =========  SQL Server Ports  ===================
@echo Enabling SQLServer default instance port 1433
netsh firewall set portopening TCP 1433 “SQLServer”
@echo Enabling Dedicated Admin Connection port 1434
netsh firewall set portopening TCP 1434 “SQL Admin Connection”
@echo Enabling conventional SQL Server Service Broker port 4022
netsh firewall set portopening TCP 4022 “SQL Service Broker”
@echo Enabling Transact-SQL Debugger/RPC port 135
netsh firewall set portopening TCP 135 “SQL Debugger/RPC”
@echo =========  Analysis Services Ports  ==============
@echo Enabling SSAS Default Instance port 2383
netsh firewall set portopening TCP 2383 “Analysis Services”
@echo Enabling SQL Server Browser Service port 2382
netsh firewall set portopening TCP 2382 “SQL Browser”
@echo =========  Misc Applications  ==============
@echo Enabling HTTP port 80
netsh firewall set portopening TCP 80 “HTTP”
@echo Enabling SSL port 443
netsh firewall set portopening TCP 443 “SSL”
@echo Enabling port for SQL Server Browser Service’s ‘Browse’ Button
netsh firewall set portopening UDP 1434 “SQL Browser”
@echo Allowing multicast broadcast response on UDP (Browser Service Enumerations OK)
netsh firewall set multicastbroadcastresponse ENABLE

———————————————–

I also added this registry key below. You can copy everything between the breaks and save as a .reg file if you’d like and run that ‘as administrator’ as well.

—————-
Windows Registry Editor Version 5.00

[HKEY_LOCAL_MACHINE\SOFTWARE\Microsoft\MSSQLServer\Client\SuperSocketNetLib\tcp]
“DefaultPort”=dword:00000599
—————-

After that I was able to very quickly install SQL2008R2.
During server configuration, under Account Name I selected “NT AUTHORITY\SYSTEM”, leaving password blank. In addition I also changed its startup type from Automatic to Manual.

Once installation was complete, I opened SQL Server Configuration Manager. The current setting was that I was logging on as built-in account “Local System”. I started the service without making any changes and this time it started without any error messages.

Just thought I’d put this up for any of those who’ve had the same issue and as a reference for myself.

To connect to the Server make sure you specify the machine name AND the server instance name: Windows7PC1\SQL2008dev or whatever

Well, until I hear differently from my Devs 😛