Critical February Security Patches

Microsoft’s Patch Tuesday is next week. And it’s going to be VERY important

Microsoft’s security patches are due to be released at 1:00pm EST on Tuesday 12th February. [Read more here from MS  ]

The longer you take to update the security patches on your computer, the greater potential risk you could find yourself in!!

In all, 57 separate security flaws are waiting to be fixed.

According to Microsoft, every single version of Internet Explorer – from version 6 to version 10 – needs to be patched, as they are vulnerable to exploitation by drive-by attacks.

That means that simply visiting a booby-trapped webpage could silently infect your computer with malware – hijacking your PC for a hacker’s own ends.

According to an advisory from the software giant, five of the 12 security updates have been given Microsoft’s highest severity rating of “critical”.

Also note that Adobe has again released critical security patches to it’s Flash Player software. [read here]

Even if you are not on a Windows/Microsoft Operating System you should still make sure your Adobe Flash, Adobe Shockwave  and Oracle’s Java software  and Browser Plug-ins are up to date!

Be safe out there! MMm K.

iDevice updates and backups 04

Just thought I’d bump this post. I just had another person tell me about their iDevice backup woes once again.. I was able to recover some stuff thank goodness. But come one people, for your own sanity, backup your data…..

I’ve written previously about backing up and restoring your iDevice.   I’d like to add a short update to that. Having recently dealt with a few people who have ‘lost’ their data (either just photos or all their settings) after updating to iOS 6. I thought I should re-iterate a few things.

First use iTunes to backup your device (including ‘synching purchases) and make SURE you back up to your computer (and then iCloud if you choose) regularly; I’d recommend at least once a week. Read my previous post on how to use Apple’s iTunes method for that.

Second. As I mentioned before, I HIGHLY recommend using a third party application to copy off all your data; photos, contacts, phone logs, messages etc..

My choice to do that is DiskAid. With this application you can copy off all your data AND remove/delete older data such as photos taking up space. You can also copy all your contacts off (they are exported to a vCard format) that will then let import them into other applications like Outlook or other contact management software! I am always amazed that people will spend hundreds of dollars on a device and not spend any money on backing that data up. Folks most of you will spend more on dinner for two that the cost of this application.

I just got done freeing up 4GB of data on a iDevice that would not update because of ‘not enough available space’. There were hundreds if not thousands of pictures on it. To selectively delete them individually would have taken a very long time. Using DiskAid we just copied the entire Camera Roll off to the PC and removed all of them from the device. By default this user has their pictures already uploading to Instagram too.

After freeing up that space we were successfully able to upgrade to the latest version of iOS. BAM dead simple. And now those pictures and files can be backed up from the computer to an external drive for REAL backup and peace of mind.

UPDATE: DiskAid is now iMazing and works even better! So glad to have access to my iDevice!! I can now do most of the ‘stuff’ Apple doesn’t want me to do – delete whole groups of photos, copy off my call and text logs and update my contacts as I see fit. Yay!

Have fun. Peace out.

Tech power and input deals.

For those with laptop/portable computers you know what it’s like to always have to pack everything in your bag for each trip.

Why not keep have an extra power supply so that you can have one at home AND the office (or in your bag) always waiting? No constantly having to reach and dig behind the desk to unplug the power supply. And then do the same when you get to the office.

Here is a super solution. And right now this is on sale for only $19.99 w/free shipping at Newegg.com.
Rosewill RMNA-11001 Universal automatic Notebook Power Adapter 90W
http://bit.ly/KSUOpD

And while your at it how about an additional mouse? I use this one on PCs and Macs. Works great. I have a few of these too – home, office and travel bag.
http://bit.ly/UBT2ib

Just thought I’d pass this on.

Moving Virtual Machines in ESXi from older hardware to new server.

If you have outgrown you current ESXi hardware and need to move to another physical machine and you don’t have vSphere you can still easily move all your VMs to the new server. Without additional software costs.

First install the ESXi Host software on the machine and configure it for access via the management console.

Take note of the IP address and credentials you used for you new installation.

Then login to your existing VMware installation via your management computer/console. And you can then do one of the following.

Simple way?

Use the outstanding free product(s) by VEEAM!
Veeam Backup Free Edition. The free version that will let you backup, replicate/move and restore entire machines from one ESX server to another on the same subnet. The free version limits the backup/migrate tasks to one machine at a time but it works! If you have a VMware environment I highly recommend their product(s) for backup and disaster recovery. You can automate just about everything you need for backing up and restoration. Check out more here http://www.veeam.com .

Older not so quick but still simple old fashioned way.

Open the management console. Connect to the original server/Host. Navigate to the Server (vCenter) containing the VMs you wish to move.
Commit any snapshots in the VM you are going to move.
Power off the VM.
Click the Configuration tab.
Click Storage.
Open/Browser to the Datastore where the VMs are located and find the folder containing the entire Virtual Machine (the one with the disks (vmdk), .vmx file, nvram, .log files etc.).
Copy that entire machine to a drive (a folder on the management station or other attached/network available storage)

Connect to the new host via the management console.
Open the Datastore where you wish to place your new machine(s)
Upload (import) the entire folder – containing the Virtual Machine, you previously copied/downloaded.
Then open the that new folder and right-click on the .vmx file and select ‘Add to Inventory’.
It will then show up in the list of machines in your selected Server/Cluster. Then power off all the old machines and shut down that Host.

When you power on the machines on the new Host you will be walked through a process that will ask you if the machine was copied or cloned. Since you are moving the VM choose that –  move and NOT clone or it will generate a new machine ID/SID and jack up the VMs usability.

Do that for any and all that you moved and test connectivity from workstations.

I’ve done this with virtualized Domain Controllers, SQL servers and even an Exchange server!

That’s it.

Peace out.

Moving Outlook files and Settings to New computer and error (0x8004010F) : ‘Outlook data file cannot be accessed

So after setting up new PC I’ve been going through some things that might help some others.

I needed to transfer my Outlook profile to my new machine. AND I didn’t want to have to create all my connection settings over again. Yes I know I could just copy over my .pst file over to the new machine and then re-create all my accounts and point them to that .pst file. But I have a lot of accounts with unusual configurations (on the advanced connections tab) and I didn’t want to hassle with that for each and everyone of my accounts. [ I have 5 POP3 Gmail accounts I keep separated for various reasons and another 6 personal domain accounts]
So to move my Outlook file and settings I did the ‘usual’.

First, obviously, I installed MS Office (2010) on the new PC. [BUT do not launch the program yet!] I then copied over my Current Outlook folder Located here:

Win 7 and Win Vista  (drive):\Users\user\AppData\Local\Microsoft\Outlook

Windows XP (drive):\Documents and Settings\user\Local Settings\Application Data\Microsoft\Outlook

to a ‘temporary’ folder on the new PC.

I will then copy that folder to the new proper location after I import the Profile settings, as described below. First I exported the old settings and them copied them over to the new machine and imported them.

To export the profile settings (registry) from my original machine:
In Microsoft Outlook you can easily export some types of information to a file. However, there is no option to export your profile e.g. when you want to have the same settings on another computer and you do not want to manually put all of them together with the account details again. In order to do so, you can use the Windows Registry Editor that gives access to all the information.

  • Click Start
  • In the search field type Regedit and hit Enter
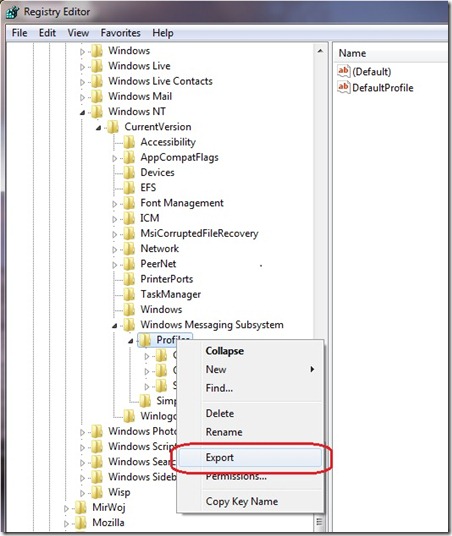
  • Expand the following registry entry: HKEY_CURRENT_USER\Software\Microsoft\Windows NT\CurrentVersion\Windows Messaging Subsystem\Profiles.
  • You will see a list of your profiles.
  • Right click on the profile that you want to copy and click Export

321

  1. Then, you can specify the name of the registry file and the location to save it e.g. Desktop.
  2. Now, you need to copy the file to another computer and double click it there and choose to ‘add the information to registry’
  3. Confirm that you want to make changes to the registry.
  4. Now launch Outlook on the new machine and you will most likely get an error saying the .pst file was not found. NO big deal yet. OK/Close your way through the next few windows to EXIT the application. Here we’re only trying to create the default folder/location.
  5. Now copy the contents of the old Outlook folder from where every you had it temporarily to the new Outlook location. (path should be close to the same as above.)
  6. Now run your Outlook, the new profile will be opened (if you have only one) or you will be prompted to choose one of profiles (if you have more than one). And it ‘should’ work. At the minimum you should see all of your old mail, folders, contacts and calendars.

However I had some errors. Specifically:

Receiving reported error (0x8004010F) : ‘Outlook data file cannot be accessed.’
Sending reported error (0x8004010F) : ‘Outlook data file cannot be accessed.’

Arghh. So here is the fix that worked for me. Seems that the ‘Folder Location’ for the deliver of email was not properly ‘pathed’. Here is how to fix that.

Changing the folder to specify inbox fixed the issue. Apparently the inbox did not get set and the higher level file name was selected.

1. From Outlook 2010 click File>Account Settings>Account Settings (if you have more that one account you will have to do this for each one – just highlight/select them)

image

2. Click Change Folder (Down on the lower left corner)

2

3. Click the + to the left of the folder name to expand the subfolders. Click on ‘New Folder’ and create a new ‘temp’ folder; call it 01 or what ever, and select it. Click OK then you should now see a Folder location in the ‘Change Folder button on the lower left.

4. Now let’s go back Click on Change Folder and now Select the ‘Inbox’ instead of that ‘01’ folder and click OK. The change should now ‘stick’ for you. Click Inbox.
Click OK.

image

image

5. Close Account Settings and click send/receive. And you should be good to go.

It’s an obvious bug that the settings won’t ‘stick’. But this works!

Hope that helps some. I’m sure I’ll be referring back to it.

Security Update release for Java

Looks like Oracle has quickly released a patch to the serious Java security whole. But it also looks like they ‘poorly packaged’ it. So it may not install correctly on all Operating Systems.
First, verify you have the latest version of Java installed; go here.

If not, then get the latest version here.

The Linux and OS X versions seem to install without error. But…
For Windows users you may get an error “Error 1714. The older version of Java cannot be removed…”
This can be fixed by first ‘trying’ to uninstall all the Java applications you find.

Go to Control Panel>Programs and Features>Java.. then pressing uninstall for each Java application listed.

If that fails (and it has for me on two Windows systems) Grab Microsoft’s Uninstall Utility here, run it and choose ‘having problems uninstalling..’ and let it do it’s thing. You’ll be presented with a window showing what applications you wish to remove; choose Java 7 or what ever was giving the error.
Then after finished again try to install the latest Java again (the one you downloaded previously. (source)

Be safe out here. Peace

Fix Virtual Box Expanding Files disk; stuck at 99%

Just wanted to add some good information on using Virtual Box to install Windows 7 or Windows 8 (see my post here about installing Windows 8 into a virtual machine using Virtual Box.) Or any other OS for that matter. For more information about using Virtualization check out this post.

OK so the fix for the issue.

While installing Windows 8 (or 7) or other Operating System you may run into the issue where you are booting from a virtual or real CD/DVD and during the installation process it just ‘hangs’ at the ‘Expanding files…’ part of the install at the beginning. It will usually get to somewhere around 98%-99% and just hang there. Very aggravating. The solution is really simple!

Shut down the machine. Then On the settings tab, go to storage and then under SATA Controller you’ll see you virtual hard drive. Remove that using the button remove attachment. Then on the IDE Controller there is a small button “Add Hard drive” click that and locate you virtual hard drive you created earlier.

By doing this your hard drive will come under the IDE Controller. This fix worked for me on a Windows 8 and Windows 7 installation, I kept getting stuck on expanding files but this worked. No fuss no muss and all installed and worked well and very fast!

I hope this helps some.

How to Block Your Wall on Facebook From a Friend, Friend of Friend or everyone. And How to Block a Wall Post on Facebook

So far these are the simplest instructions I’ve come up with for How to Block Your Wall on Facebook From a Friend, Friend of Friend or everyone. And How to Block a Wall Post on Facebook

1 Click “Account” at the top right of your profile screen.

2 Click “Privacy Settings.” Click the “Custom” button and then click “Customize settings.”

3 Click the current privacy settings next to “Posts by me.” Your current privacy setting is either “Everyone,” “Friends of friends” or “Friends only.” Click “Customize.”

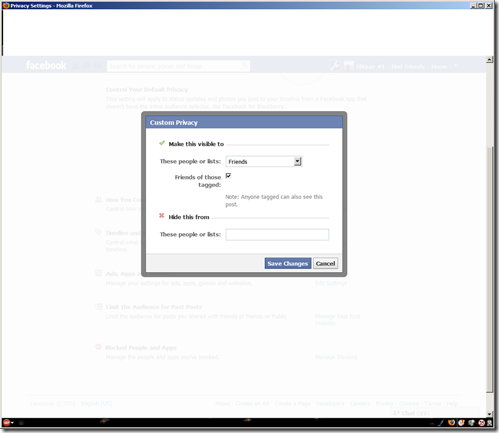
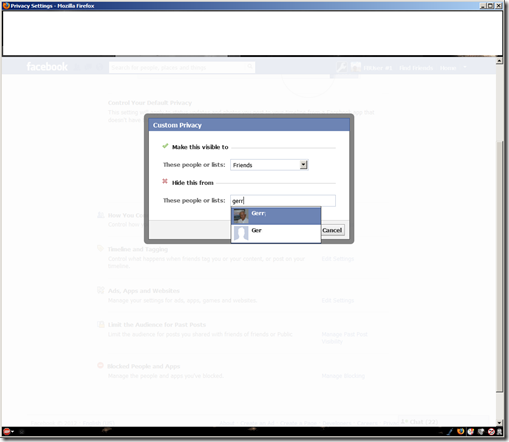
4 Type the name of the person you wish to block from setting your wall in the “These people” text box under “Hide from.” Click “Save Setting.”

Then Check this too

1 Log into Facebook and click “Edit My Profile” at the upper left.

2 Click the “Privacy Preferences” link in the left column.

3 Select the “Edit Settings” link from the “How You Connect” area.

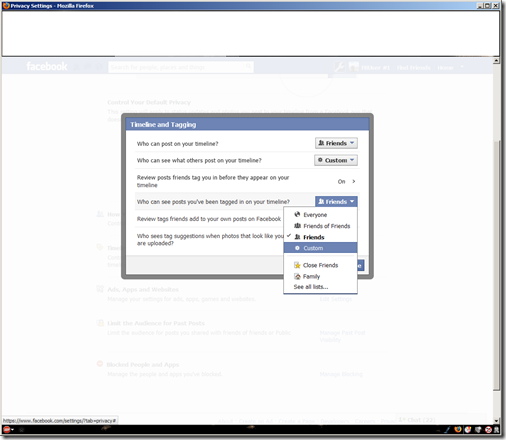
4 Select the gray menu box positioned to the right of “Who Can See Wall Posts.” A menu appears.

5 Click “Custom.”

6 Click the “These People” text field in the Hide This From section.

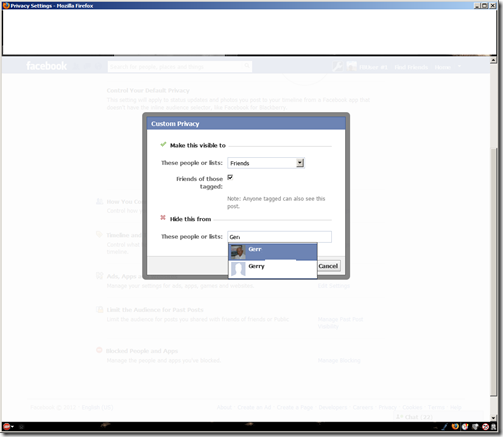
7 Type the name of the person you want to block from posting on your wall. Names appear below the These People field while you type.

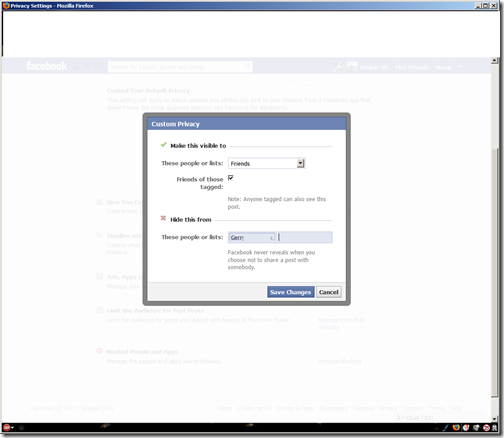
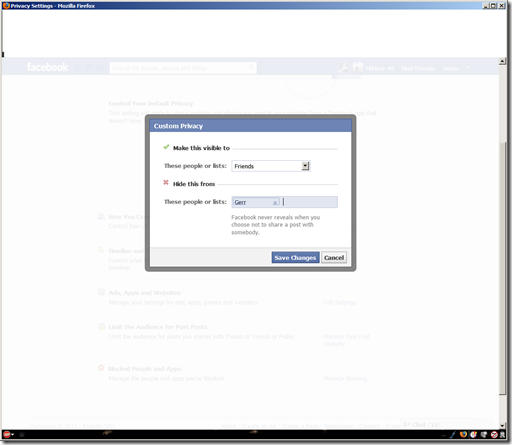
8 Click the person’s name. His name appears in the “These People” field. Repeat Steps 7-8 to add more people.

9 Select “Save Changes.”

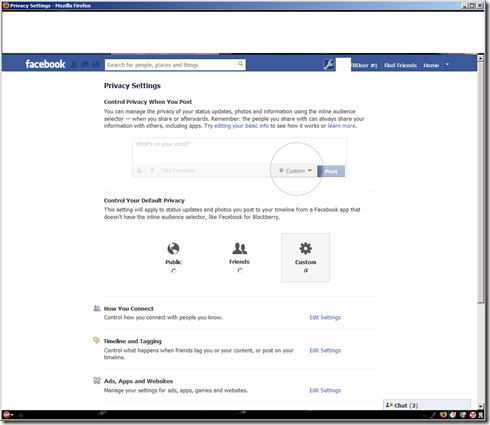
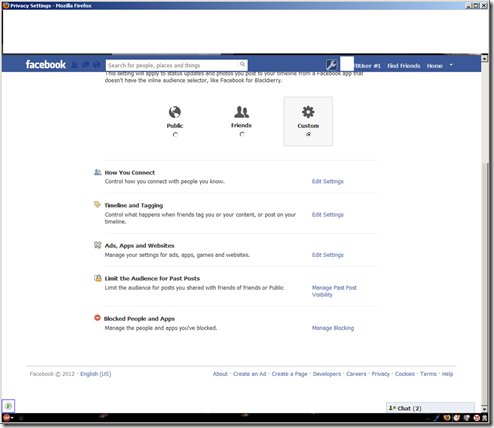
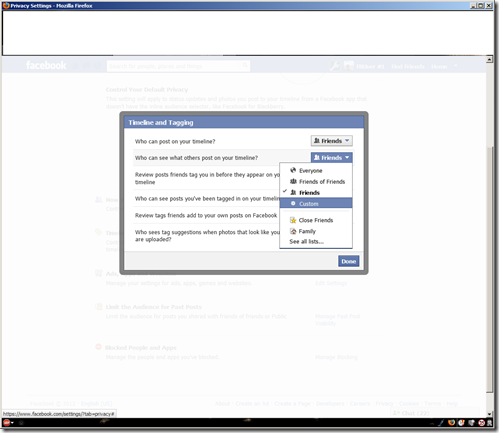
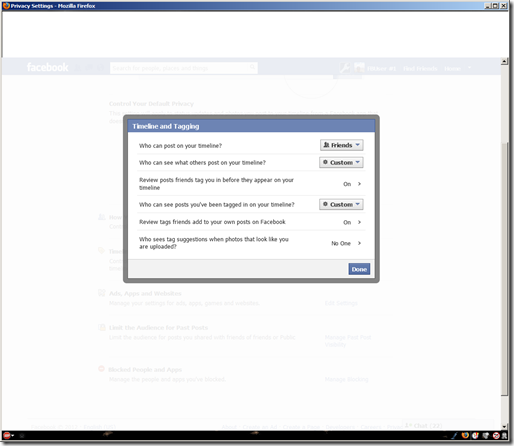
In your PRIVACY SETTINGS, if you want to change how your wall appears to others you need to go to TIMELINE & TAGGING and change your settings there. I have this feeling that most of you are going to CONTROL YOUR DEFAULT PRIVACY and making your changes there. Control your default privacy only changes your future post, until you change it again. So, if you make sure that you set those first (TIMELINE & TAGGING). Keep in mind this does not change settings for your posts, not photo Album.

Here’s another little secret. On your wall underneath your wall banner is ACTIVITY LOG and right next to it is a GEAR icon. If you click that icon, select VIEW AS. A search bar will appear on the top left corner of your page . Select a name of one of your friend and it will show you exactly how your page appears to that friends and if you read the description you’ll notice the word PUBLIC in blue and it will show you how the page appears to the public. This is how you can view your settings! [if you do this make sure you clear your internet cache settings first!] 🙂

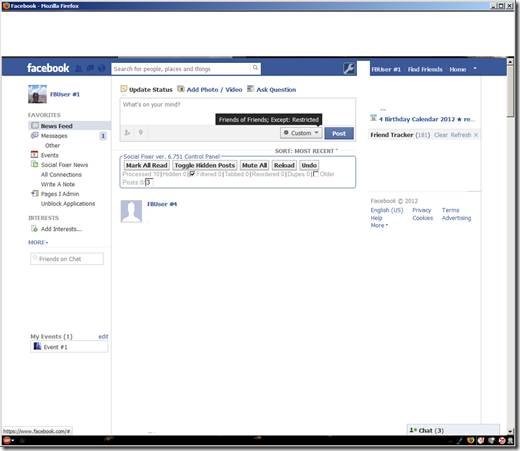
I’d also like to put in another recommendation for the use of ‘Social Fixer’ a Browser Plugin to dramatically improve your ability to control the layout and functionality of Facebook.

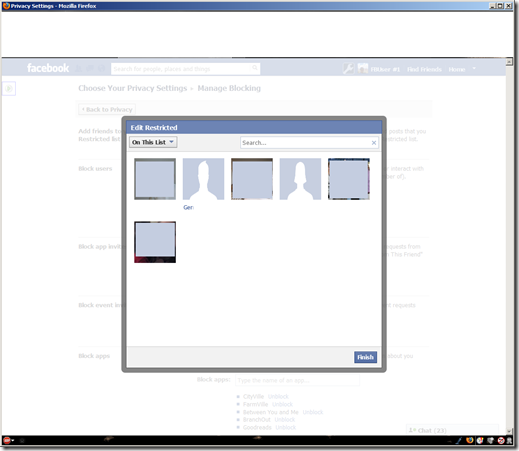
Below are some screen captures of the above procedures for you if you care.

Hope this helps some who’ve been asking me.

123456789101112

For your future post make sure your settings are defined correctly as you do them.

13

How to install Windows 8 Consumer Preview using VirtualBox

Here I am going to show you how to install Windows 8 Consumer Preview into a Virtual Machine using VirtualBox. I will be showing the method for Check out my previous article on ‘Getting Started with Virtualization’ first for a good primer.Make sure you have plenty of free hard drive space – probably 30GB should be sufficient.

Make sure your processor supports virtualization AND 64bit processing.

To do that download ‘SecureAble’ from GRC.com and run it (after downloading it righ-click and choose ‘run as administrator’. Download is here.

You should see a screen like this screen

image

if your system will let you use Hardware Virtualization and has 64bit processing capabilities. IF it doesn’t there is NO need to continue. You will NOT be able to do anything mentioned here.

So let’s get started

Download the latest version of VirtualBox

Download Vbox Extensions Pack [To install you need to first install VirtualBox then double-click the extensions pack and it should be added to the VirtualBox installation]

Download Windows 8 Consumer Preview (64bit) (copy the Product Key to a text file too!)

Install all of these ‘as administrator’.

After installation:

1. Launch Virtual Box. (Make sure you’ve installed the Extensions pack) Click New to create a new virtual machine and type a name for it.

image

2. For Operating System version, select "Win8 64-bit"

image

3. For memory size, enter 3090MB, more or less. Microsoft recommends 2GB at least for the 64-bit version. Click next/continue through the next screen to create a startup disk.

image

4. Click next/continue again to create a VDI file.

image

Then

image

5. Use a Fixed size disk, for better performance (especially since this is just a test virtual machine).

image

6. A 25GB disk size is probably fine; that’s the minimum Microsoft recommends for the 64-bit version.

image

7. Click Create and your virtual disk file will be created.image

image

And then..

image

Now you will have a new Virtual Machine – Windows8Preview, that we will need to make a few more edits to before we can start it.

image

You’ll notice I have some other Virtual Machines here. [But we are only concerned with the Windows8Preview one for this article.]

So right-click on the Windows8Preview VM and click on ‘Settings’

image

Under the ‘System’ options make sure to set the options to look like this:

image

Click to the Processor tab and then check ‘Enable PAE/NX’

image

Under Acceleration: Enable VT-x/AMD-V and Enable Nested Paging

image

Next click on the Storage Options

image

Click the CD icon next to CD/DVD Drive, then choose the virtual CD/DVD disk file to browse to the Windows 8 ISO file you downloaded.image

Then navigate to the directory where you downloaded the Windows 8 ISO file, click open.

image

image

Finally click Start to begin the installation and walk through the Windows 8 installation.

image

TAKE NOTE THAT TO ‘REGAIN’ CONTROL OF YOU MOUSE OUTSIDE OF THE VIRTUAL MACHINE YOU’LL HAVE TO USE THE ‘RIGHT Ctrl’ TO FREE IT UP!image

image

Press install and then you will have to enter the preview Key:

image

image

Choose Custom (New)install and then Next to select the drive (virtual Hard Drive we created)

image

The install will then start

image

image

Then walk through the setup:

image

Continue to walk through Setup, I chose to ‘Sign in without Microsoft account’ you can however if you wish use a hotmail or live mail account:

image

The important thing to know that with the mouse the ‘corners’ of the screen are where most stuff happens in the ‘Metro’ GUI. You can use your mouse to click and ‘scroll’ around the metro applications or move it over to a corner to pull up the ‘Charms’ on the lower right corner, recent applications on the upper right corner and the ‘faux start menu at the lower left.

The new Metro GUI will take a whole lot of getting used to.

It would be good to watch video first to get a little understanding of the system. (don’t fall asleep thoughSmile ).

For me I doubt I will ever use Metro much except when I’m doing support for end users on their system. I have WAY too many applications for this type of interface and prefer the old Windows 7 Style Start Menu.

Thankfully that can easily be enabled in Windows 8. To do so – in Windows 8 Consumer Preview open Internet Explorer and go to this site, [here is the address so you can enter it manually if you need to http://www.stardock.com/products/start8/ ]

Enter an email address (hint – ANY will do) and download the application. Then once downloaded ‘right-click’ and choose ‘run as administrator’. And you will now have the old Start Menu and some new ‘right-click’ options such as ‘run’ shutdown’ and more.

Well, there is a start for you to mess around with Windows 8 and get a feel for the future of Windows Operating Systems. By using VirtualBox you don’t have to worry about  messing up you current system. You can always delete your VM and start over or just get rid of it. Winking smile

I’m going to be adding a whole load more posts as time goes on on how to use Windows 8. This is such a big step for end users I foresee a whole lot of confused, frustrated and aggravated users.

Keep checking back for more.

Flash update kills Firefox causing hanging and crashing

Starting with the latest Adobe Flash version, some browsers, particularly Firefox, will hang or crash.

After the last Adobe Flash update my Firefox Browser became completely unusable. Chrome and Internet Explorer (IE) still worked but they too were markedly slower.

I am a huge fan of Firefox and use it as my primary browser because it enables me to use a plethora of extensions that greatly increase my productivity and the usefulness of the pages and sites I visit. [I’ll list my plug-ins at the end]

To get Firefox to even work at all I had to started it in Safe Mode –
in the ‘Run’ dialog type “Firefox -safe-mode” (minus quotes) – Then choose to continue in safe mode. Then go to ‘Tools>Add-ons>Plug-ins and then disable Shockwave Flash. That would then allow Firefox to work but obviously that is not a solution.  Without Flash you can hardly view some websites and of course could not watch most videos or multi-media files.

So I set off on a solution like an angry rhino.

I tried uninstalling Adobe Flash (using Windows Uninstall AND Adobe’s own ‘Flash Removal Tool) and re-installing it several times; that didn’t work.
You can get the official Adobe Flash ‘uninstaller’ here. [download/save and then ‘run as administrator’ to use it.]

For all of Adobe’s Flash Player downloads (the FULL Offline installers) you can go here
Make sure you download all the players you will need – if on Windows download the one for Internet Explorer AND the ‘Plugin-based browsers’ versions.

I tried using older versions of Firefox; that didn’t work.
Re-installed the latest version of Firefox, with Flash Player 11.3.300.257,
I tried the latest Beta/Developer versions of Firefox ; that didn’t work.
I tried reverting to older versions of Flash; that too didn’t work.

I finally found the reason for this behavior AND a solution after MUCH searching and LOADS of aggravation.

According to Adobe, “Starting with Flash Player 11.3, a protected mode was added as a new security enhancement for Firefox 4.0 and greater on Windows Vista and higher.  This security enhancement is designed to limit the impact of attacks launched from malicious Flash content (SWF files).”

They are trying to ‘sandbox’ Flash files to limit their susceptibility to being used as vectors for more serious virus/Trojan attacks.
Problem is I believe their developers FAILED. While the idea of sandboxing is sound (Chrome and the latest IE browsers use it extensively) this implementation is obviously poorly written and implemented in Flash for Firefox.
You would think that Adobe, with it’s truckloads of cash, could hire decent security coders and engineers and then thoroughly test their software. But judging by that fact that Adobe’s products have been the primary vector for serious security wholes over the last 7 years I guess not. But I digress.

Ok so now to the solution
To disable this newer ‘protected mode’:
add the following line to your ‘mms.cfg’ file located in:

On Windows 32bit: C:\windows\system32\macromed\flash
Or
On Windows 64bit: C:\windows\syswow64\macromed\flash

“ProtectedMode = 0”  (without the quotes)

If the mms.cfg file does not exist, create one using any standard text editor (e.g.. notepad).

Make sure if you create the file that the file ‘extension – is NOT a .txt but is the .cfg.
If you don’t see or know how to see the file name extensions you can read how to do that here. Depending on your operating system, you might need to first create and or save the mms.cfg file to a writable location (such as your documents or desktop folder) and then copy the file into the destination folder using Windows Explorer.

Here is a link to a zipped mms.cfg file version with Protected Mode disabled (directly from Adobe).

Download, unzip the file and copy it to the needed location.
One note:
I did not find the mms.cfg file in my “C:\windows\system32\macromed\flash” so I copied that file to there.

I did however also find an mms.cfg file in my “C:\windows\syswow64\macromed\flash” directory.

There I simply opened the mms.cfg file (with notepad) and just added the line ProtectedMode = 0

below the last line there.

Then I started Firefox normally. Went to Tools>Add-Ons>Plugins and made sure Shockwave Flash was ‘Enabled’

Now all is working very well. And since I’m using version 14 (beta) of Firefox things are even faster.

That ends two days of aggravation.
I hope that helps some of you.

For those that care here are the Firefox Extensions/Add-ons I use:

Adblock Plus
http://adblockplus.org/en/

After the Deadline
http://atdfirefox.wordpress.com/

Better Gmail 2
https://addons.mozilla.org/en-US/firefox/addon/better-gmail-2/?src=userprofile

Video Download Helper
https://addons.mozilla.org/en-US/firefox/addon/video-downloadhelper/

Downloads Context Menu
http://www.bm-productions.tk/

https://addons.mozilla.org/firefox/downloads/file/128500/downloads_context_menu-1.5-fx-windows.xpi

Ghostery
http://www.ghostery.com/

Google Redesigned
http://www.globexdesigns.com/#!products/gr
https://addons.mozilla.org/firefox/downloads/latest/8434/addon-8434-latest.xpi?src=addondetail

FireFTP
http://fireftp.mozdev.org/

IE Tab V2
https://addons.mozilla.org/en-US/firefox/addon/ie-tab-2-ff-36/

PDF Download
http://www.pdfdownload.org/

Redirect Remover
https://addons.mozilla.org/en-US/firefox/downloads/latest/537/addon-537-latest.xpi

RightToClick
https://addons.mozilla.org/en-US/firefox/addon/righttoclick/

Social Fixer for Facebook
http://socialfixer.com/

Stop Autoplay
http://neticat.ath.cx/forum/index.php

TinEye Reverse Image Search
https://addons.mozilla.org/en-US/firefox/addon/tineye-reverse-image-search/

Vacuum Places Improved
https://addons.mozilla.org/en-US/firefox/addon/vacuum-places-improved/?src=api

Greasemonkey
https://addons.mozilla.org/en-US/firefox/addon/greasemonkey/

Greasemonkey Scripts:
Search here http://userscripts.org/
Google Maps Zoom
http://jeffpalm.com/gzoom/

YouTube Enhancer
http://userscripts.org/scripts/show/33042