Windows 7 Demo and Trials

If you haven’t yet tried or missed the initial public beta of Windows 7 you can still try this fantastic new Operating System in two distinct ways. One is an ‘online demo’ the other is and actual installation of a time limited trial.

I you are still using XP I highly recommend getting familiar with Windows 7 – your next computer WILL have it [or maybe OS X ;)] installed. If you have been using XP for the nearly entire decade that it has been out there are some adjustments to make; though most things are still very easy to find. If you are already using Vista you will see a lot of similarities and a great deal of improvements.

The online demo route:
Microsoft has Virtual Labs that are great for tech students, or those of you who want to get a first-hand trial of the new features with out having to actually install the OS. Also, if you’re not sure on how to deploy something and want to practice in a virtual environment, these labs are quite valuable.While these labs are geared toward IT professionals, it’s a good way for anyone to try out Windows 7 features from the comfort of your current computer.
[Please note that the online version is not nearly as responsive as a full standard install of Windows 7. It also does not run the full Aero interface or desktop effects, and may refresh slowly depending on your Internet connection. So don’t judge Windows 7’s performance based on this virtual lab, but use it as a way to learn more about Windows 7 without installing it.]

Visit this page and click on the TestDrive to ‘Try It Now’.
Microsoft has some very good tutorials there on getting accuainted with the function and features of the operating system.
The folks over at the How To Geek site have a superb walkthrough too.

Install route:
If you wish to actually install a full working 90 day trial/evaluation copy of Windows 7 Enterprise you can.
Visit the MS Technet site here.
From here you can choose the version 64 or 32 bit and download the ISO. Then burn it to a DVD for installation.

Alternatively you could ‘mount’ the ISO and do an install that way but that is not recommended.
See my posts on freeware that I use to mount and/or burn ISO images.

If you are going to use the trial version (installing to hard drive) I would HIGHLY suggest you back up your current system completely – see my posts on imaging.
http://mycraniumdrain.blogspot.com/2009/11/back-ups-and-system-restores.html

http://mycraniumdrain.blogspot.com/2009/05/device-driversmanager-and-disk-tools.html

If things don’t work out it is always nice to have a complete system image to return to!
Also make sure that your hardware meets the minium requirements (preferable much more) for an optimum experience.
I hope this helps some take the proverbial ‘look’ before the leap.

Easy file transers with iGoogle/Google Talk

Over at the Google Blog today they’ve announced new file transfer capabilities in iGoogle and orkut. That’s fun! But what I’m most excited about is their promise of file transfer in Gmail Chat.

For now, file transfer only works directly in the browser for iGoogle and orkut, allowing you to send files without saving them as attachments in email. It’s also compatible with Google Talk software client, so you can share with desktop users as well.
It seems easy enough to use: once you’ve started a chat, just click on “Send a file…” in the “Actions” menu. The person on the other end of the line can then either accept or decline, depending on how they feel about you and the types of files you’re inclined to send.

I have sent a few large test files (30MB and 45MB) and the transfer is quite fast. Seems to work on both Windows and OS X. Haven’t tried it on Linux yet. Of course a lot would depend on your Internet connection speeds. For ‘one off’ transfers of large files I think this is a really neat tool to add to your file management box of tricks.

Managing Passwords – Using KeePass

In the digital age remembering your usernames and passwords can be very difficult. You need a password for the Windows network logon, your e-mail account, your homepage’s FTP password, online passwords (like website member account), etc. etc. etc. The list is endless. Also, you should use different passwords for each account. Because if you use only one password everywhere and someone gets this password you have a problem… A serious problem. The thief would have access to ALL your e-mail accounts, banking, mortgage, homepage, etc.

Here is a list of what I have to manage.
My corporate accounts: 64, my logmein accounts: 22,Personal Internet sites and services: 38, my internet email accounts(gmail, hotmail, yahoo): 14,personal banking/credit: 9.
That is a total of 147! And there are probably some I can’t remember!
As you can see having to manage these could be a nightmare without some kind of password management system.

To that end I use KeePass.
KeePass is a free open source password manager, which helps you to manage your passwords in a secure way. You can put all your passwords in one database, which is locked with one master key or a key file. So you only have to remember one single master password or select the key file to unlock the whole database. The databases are encrypted using the best and most secure encryption algorithms currently known (AES and Twofish). I also use KeePass to store my non-digital passwords such as ‘PINs’ for banking and credit cards. Because the database is digital and can be exported it can be copied to many locations for back up purposes – such as USB drives, CDROMs, place in a save deposit box and/or to an Internet storage solution.

http://keepass.info/features.html

There are versions for Windows, Linux, OSX and portable devices such as Blackberrys, iPhones and Windows Mobile (PPC).

There are also ‘Portable Versions’ that can be installed on a USB drive with your Key database for use on other non-secure machines.

Here is a good video how to:
[youtube=http://www.youtube.com/watch?v=hqOe03s9SCs]
Here is another pretty good video on how to setup and use KeePass. It is a little ‘slow’ and it is covering the portable version but the instruction is right on.
http://showmedo.com/static/flowplayer/flowplayer-3.1.5.swf

Windows 7 Media Center HTPC

I have been using some of my home PC’s as Media Centers for a long time. Watching recording, scheduling and converting live TV for some time.[since 1998 actually].
To this end I have, for the most part, relied on third party software to do this.

You do need to have a TV Tuner Card to watch live TV.  There are many available but I am partial to Hauppauge and ATI. Both seem to have no issues if the correct Operating System drivers are used. And you will need a Video card with an output that can connect to your TV [HDMI is preferable] if you wish to watch your shows on your television and not just your PC. There are plenty reasonable priced options available.
I have used ATI’s Media Center(included with the ALL-In-Wonder and TV Cards), Hauppauge’s WinTV(included with their TV cards), Beyond TV (a great software solution), GBPVR, and I’ve tried many others.
However with the advent of Microsoft’s Vista Media Center Microsoft really improved the ability to do this ‘natively’ within Windows.
With Windows 7, Microsoft has really hit it out of the park for anyone wishing to create an HTPC (Home Theater PC). The integration, ease of use, available plug-ins and native functionality are amazing! Nearly anyone can install a TV card and be recording and watching TV through their PC very quickly and just as easily using their PC as a PVR for the TV shows, watching them on their TV. There is so much that can be done with  the media center including; streaming movies and music to other machines on your local network (or even the internet!), copying or moving your recorded movies or music to other devices and more.

I have sent out a number of Windows Media Center how to’s in the past and helped many others to build their system. Many of the tips and instructions including information I put together from various sites and my own experiences and insights. Trouble is most people will not take the time to do any research and to learn something new and will instead contact someone else to ‘set it up for them’. Granted I have and sometimes still do earn some decent money from these people but usually it is family and close friends who insist on not learning for themselves. If you take the time and learn you will be far ahead of the game and have a great deal more enjoyment from your technology.

What I am going to do here is try and put together one of the most complete set of links to information on how to setup, configure and tweak a Windows 7 Media Center.

The 1st place to start is Microsoft’s site. Microsoft has what I believe to be some of the best tutorials and how to’s available anywhere! There loads of videos on how to do just about everything.
Start with the ‘Do I have it?’ video
http://www.microsoft.com/windows/windows-media-center/get-started/default.aspx
and work your way through the whole batch of videos. VERY well done.

In my very long history in supporting Microsoft Products I have watched as their training/tutorials for end users has become nothing less than spectacular.

Next stop would be the folks at the How To Geek site. They have put together some very good tutorials and walkthroughs. Many much like the ones I have sent out myself in the past only some of theirs are a little more thorough.

From the HowToGeek site:
Stream Music and Video Over the Internet with Windows Media Player 12
Share and Stream Digital Media Between Windows 7 Machines On Your Home Network
Learning Windows 7: Setup Live TV in Windows Media Center.
Automatically Start Windows 7 Media Center in Live TV Mode.
How To Skip Commercials in Windows 7 Media Center.
Increase Live TV Pause Buffer in Windows 7 Media Center.
Increase Skip and Replay Intervals in Windows 7 Media Center.
Learning Windows 7: Manage Your Music with Windows Media Player.
Share Digital Media With Other Computers on a Home Network with Windows 7.
View Weather Conditions in Windows 7 Media Center.

Some other plug-ins:
Media Center Plug-Ins you should get.
http://www.hack7mc.com/2009/04/5-plug-ins-every-windows-7-media-center-install-should-be-using.html
Copy TV to iPod or other Media player:
http://lifehacker.com/software/ipod/alpha-geek-copy-tv-shows-to-your-ipod-241398.php
You will need:
DVRMSToolbox
http://babgvant.com/files/folders/8659/download.aspx
and
iPodifier
http://ipodifier.com/
My Movies
http://www.mymovies.dk/products/windows-media-center.aspx

Android on Windows Mobile Touch Pro 2

For the techies here is something I found kinda cool. You can actually run the newer Adroid Phone OS from within Windows Mobile:
Below, a video demonstrates Android running successfully on the HTC Touch Pro2.

http://www.youtube.com/watch?v=fa1Eu_hzX8Q&feature;=player_embedded

This android version is on Micro SD not on the ROM which means that you will have some lags here and there.
It doesnt replace the WnMo Operating system. In fact you have to run Haret.exe from within WinMobile.

Android runs from HARET, it is just an exe file, no modifications or flashes are needed for the OS to run. So your warranty is just fine!!! Also there is really zero possibilities to brick your phone as a single soft-reset (power off and on) will reset back to Windows mobile. [HaRET = Handheld Reverse Engineering Tool; It is a Linux bootloader which works from Windows CE environment (a-la loadlin for DOS or older Linexec tool for Windows CE). It is a tool for accessing the hardware internals of a Windows CE handheld to help get Linux up and running on it.]

It’s fun to mess around with Android, but it has some lag. Also not all of the phone features are functioning – but most do. And, it cuts your battery life beyond belief for now.

This is just something to mess around with if you have a TouchPro2 (Verizon or Sprint) and I don’t make any gaurantees as to how well it will work for you. My usual ‘don’t call me’ if you mess something up warnings apply. 🙂

Instructions, FAQ and Tips:
Here at the PPC Geeks Forum

Download the files and more info:
http://forum.ppcgeeks.com/showpost.php?p=1614791&postcount;=69

It is really simple thanks to these guys.
1. Grab the actual download Here It contains all the files in zip format. Then just extract the folder contents on the root of the SD card.

2. Run Haret.exe, and wait about five to ten minutes. Takes time to load.

3. Make sure to watch the video to learn about the functioning of the phone keys if you have never used an Android phone before!

To exit and return to your Windows Mobile OS simply ‘soft reset’ the phone – restart/power off and on.
Have fun, I will.

Windows Mobile ROM upgrade

Recent phone OS adventure:
I have had and or used just about every smart phone and been with virtually every US carrier there is since they came out in the late 90’s. Yes I have used custom carrier OS’s, Symbian, Blackberry, iPhone and Palm. But have always come back to Window Mobile. I have even demoed an Android for a few days and was NOT happy with it. I think the newer versions coming this year may prove better, but I still doubt I will have all my Windows applications available.
My reasons for choosing the Windows Mobile platform have primarily to do with my position as a network administrator. I require applications and functionalities only available in a Windows operating systems.
I have also learned how absolutely amazingly configurable the Windows Mobile platform is. Much like the Windows Operating system on the Desktop. And nearly all of the worthwhile applications and tweaks are free for the taking and searching or at very low cost. And the ability to ‘tweak’ and adjust the OS is unmatched. [Don’t bring Linux into the equation as it does not have the user, application or development base of the Windows platform as of yet and for most users is WAY to difficult to administer. And yes I do have a few Linux servers and desktops I use, but as I said I am a network admin and have been working with all kinds of OS’s for over two decades.]
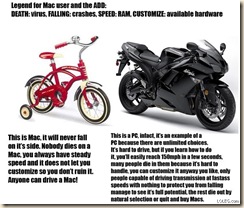
   mac-vs-pc Chuckle, chuckle.

With my previous HTC Touch Pro (ver. 1) I flashed my ROM to give me access to features that were ‘disabled’ by my carrier. Most important to me was the ‘tethering/internet sharing’ abilities.
I found a ROM (OS upgrade) on the PPC Geeks and XDA sites and had no issues updating the phone and was very happy until my phone died and had to be replaced. I can’t stress enough the assistance and knoweldge I have gained through these two sites! I wish to thank them and their users for all the support.
That was nearly a year and a half ago and I have since moved to the latest version of the Touch Pro2 from Sprint.
I was more that a little disappointed upon learning that my new phone would not contain Windows Mobile 6.5 and would NOT be able to be upgraded!

So I set about searching for an upgrade.
The ROM (Operating system for Phone) I chose was created by the folks at MightROM (with Windows Mobile 6.5).
Good video showing it’s use:
http://www.youtube.com/watch?v=fplCcb4zU-4
From extensive reading over the last year this ROM appears to be the most stable and quickest of the bunch while at the same time containing loads more functionality that the stock carrier(s) WinMo 6.1 version. Also being Windows Mobile 6.5 it allows access to the Windows Mobile Marketplace. http://marketplace.windowsphone.com/Default.aspx
So on to how.
I started Here:
http://ppcgeeks.com/
and
http://www.xda-developers.com/

Most importantly, it was the forums section of each where I gained an unbelievable amount of information over the past few years. From simple applications and tweaks to more complex configurations and ROM updates.
Though often hard to sift through so many posts doing prodigious searching and more importantly – actually reading each and every post COMPLETELY, I was able to find the proper techniques and tools needed for my ROM upgrades.
Registration is free for both forums and is often required for access to ‘downloads’ (.cabs) posted in threads.
XDA forum:
http://forum.xda-developers.com/
PPC Geeks Forum:
http://forum.ppcgeeks.com/
Here is the actual ROM information.
http://www.mightyrom.com/
The forum concerning most things about this ROM is here:
http://forum.ppcgeeks.com/showthread.php?t=79579
AND
I recommend reading as many posts as possible! I can’t stress that enough. The people at the forums are incredibly helpful but will NOT tolerate someone who asks questions that have been answered already numerous times. Spend a great deal of time reading posts, links and searching for question and answers you may have as you contemplate/plan an update. Asking questions that have already been asked will quickly get you flamed and not provide you any answers.

The actual download is here:
http://www.mightyrom.com/mightyrom/touch-pro-2/?did=6
The process involves first ‘unlocking’ the phone 1st and then ‘flashing the ROM’.
There are two ways to do that.
One is the ‘free’ way and use the ‘Hard-SSPLunlocker’ method. This should enable you to then flash your ROM.
http://rhodiumw.htc-unlocks.com/hard-spl.php
and
http://forum.xda-developers.com/archive/index.php/t-578660.html
and more info
http://forum.xda-developers.com/showthread.php?p=5731732&posted;=1#post5731732
[note the disable antivirus warnings!]

The second is the ‘Full’ way to unlock your CID (enable you to flash) AND it also unlocks your SIM (allowing you to unlock the CID AND unlock your ‘Radio’ – Carrier if you wish.)
For those that wish to use a phone from another carrier on a different network (complete unlock) you need to unlock the SIM too.  This is NOT required to flash the ROM if you are staying with your current carrier.
I did not wish to change carriers so I really only needed the hard-spl unlocker.

However I was having troubles getting the unlocker to actually ‘unlock’ my phone. You cannot update/flash your ROM until your phone is ‘unlocked’.
So I sprung for the ‘Full CID/SIM unlocker from the Rhodium-htcunlock guys. Made a small ‘donation’ and received the complete unlocker tailored to my phone. Well worth it for me. It actually worked and unlocked my phone and also allows me to switch the carrier should I desire to later (if I sell the phone).

The ‘Full unlocker’ which lets you unlock your phone and also the SIM and to update your ROM is here:
http://rhodium.htc-unlocks.com/
The actual download is here:
http://www.mightyrom.com/mightyrom/touch-pro-2/?did=6

After unlocking my phone I ran the MightROM upgrade with out a hitch.
I then did the ‘carrier provisioning’ on the phone (provided by MightROM in the ‘Systems’ folder.) then installed the ‘carrier cabs’ from Sprint (my provider).  And was good to go! It literally only took 15 minutes to be able to use my phone again!!
My phone has never been faster and more functional!!

There are many other applications that I installed after the upgrade and all went without a hitch.
If your phone is any type of Windows Mobile phone (not just a Touch Pro/Tilt) there are loads of ROMs and upgrade available.

I have loaded a crap load of productivity and media applications(there is NO media format I can’t watch or listen to!). I may list them later or you can post and request them if you
like.

Remember when doing upgrades to your phone you risk the chance of ‘bricking’ it. So proceed with caution and great deals of due diligence. [see picture above :)]. One ‘skin/theme’ I downloaded and installed ‘torqued’ my new system. So I had to ‘re-flash’. No big deal after already having done it. But just a warning.
Here are some good links to applications:
Frequently asked questions:
http://forum.ppcgeeks.com/showthread.php?t=91619
User recommended softwares:
http://forum.xda-developers.com/showthread.php?t=550973
and
http://forum.ppcgeeks.com/showthread.php?t=111190
Just thought I’d pass on some information some of you may use.

I know many of you have iPhones too. I have written previously on how to do upgrades on those too so I won’t go into great detail here. But I will provide the links to two of the top places for information on ‘Jailbreaking’ your phone. If you have one and would like to be free of the ‘lockdown’s’ imposed by AT&T; and Apple I would look at these:
http://wikee.iphwn.org/howto:rs9

http://www.quickpwn.com/category/phones/iphone/jailbreak

Confronting the lies of man made global warming

I’ve sent out comments and links on this before and was going to take the time and put them all in one spot here.

However looks like Robert A. Hall on his blog “The Old Jarhead” put together one of the best posts I’ve seen in a while.
He has loads of links with facts and commnetary.

I recently had a discussion with someone who was trying to tell me that even though ALL the data underlying the whole ‘theory of man made global warming’ was has been proven to be lies and fabrications at the very least completely incorrect, it did not change the ‘fact’ as he put it that all this ‘bad’ stuff would happen if humans didn’t stop blah, blah blah.

I had to try and get him to understand that if the basis for his theory, the underlying structure and underpinnings, were false, then EVERY thing drawn from them is also false!
He could not understand that! It seems most of our country has lost the ability to reason based on facts.

Even with undeniable facts and science it is hard to overcome a dogma that has been brainwashed into the minds of nearly an entire generation. And unbelievably, is still preached by the media and ruling elite in an effort to assert more control over us and reduce our freedoms and liberties.

When I get the chance I will also add some other good info but for now many thanks to Sgt. Hall.
Well have a read, gather some ammo (facts) for the fight for truth:
http://tartanmarine.blogspot.com/2010/03/global-warming-articles.html

Convert Dynamic Disk back to Basic Disk WITHOUT data loss

Here is the story.

I had a Windows 7 machine that I was using as a test bed for various applications and settings.
I was trying to recover some files from an old hard drive. I attached the drive via a usb dock. And I was able to grab most of the files I wanted via a rescue start up disk.

I then wanted to delete the partitions on that old drive and format it. Simple enough. But the damaged drive was still giving me problems. I should have used the boot CD to kill it there. But instead, like a maroon, I booted into Windows & and tried to just ‘add’ the disk in the disk manager.
But somewhere in my sleepiness after a 16+ hour day I converted my Windows 7 drive to a dynamic volume that included the messed up drive!
Before I realized what I had done it was too late.

What to do?

With the damaged drive not working my ‘dynamic volume’ was now in accessable after restarting the machine!
So on with the searching for a solution.
I read over and over how a Dynamic Disk could NOT be converted back to a Basic Disk.
Even Microsoft say this is so!

But I knew I had read somewhere about editing the MBR and setting the drive back to basic year ago. I may have even done it.
And after many days and many hours I found a simple elegant solution in an old post that WORKED!

I simply pulled out the affected Windows 7 drive and used my HDD dock to attach it to one of my main machines and edit the MBR sector to change the disk back to a Basic Disk.

Basically it involves using a freeware hex disk editor to open the MBR and just change one sector(sector 0 location 1C2) value from ’42’ to ’07’ saving the change. Then running a check disk and fix (chkdsk x: /f).
I put the drive back in booted and after a few moments of ‘recovery’ at start up my entire OS was back!
Here is the post.

It is very detailed and easy to follow.
I hope no one needs it but if you do this is good to have in your tech notes file.

Windows XP Mode for Windows 7

Ok so here is the reason for this post.
After nearly a year of trying to get a legacy application to work in Windows 7 I had just about given up.
The application in question may be a purpose built company application (proprietary) that is absolutely necessary for your business or simply something you would rather not do without. I am sure many enterprise and even home users have applications they need to, or would like to, continue using but that simply will not work in Windows 7 (or even Vista for most).
I have such an application. It was built with an old version of Visual Studio. The application utilizes Microsoft IIS (6) web services, MS SQL 2000 databases, and an old version of Crystal Reports for report generation.
It is our business application! I have no option to not run it.
It is in the process of being prepared to be upgraded, but that will take a considerable amount of time and capitol.
To attempt to get this application to run natively under Windows 7 I have done the following and probably more.
I have spent nearly a year trying to get our application to work on Windows 7. I have read hundreds if not thousands of pages on blogs, support sites, news groups and other reference sites and materials.
I have adjusted permissions on dozens of directories to allow for certain machine service accounts, users and read/write access.
I have edited config and ini files.
I have applied patches and fixes to the underlying applications, operating system and services.
I have tried installing other legacy applications in the hope they might contain components needed to run this application (access runtimes, older .Net versions, old Crystal Reports apps, etc.)
I have registered and unregistered dlls.
I have changed permissions on Component services.
I have gone so far as to fire up one of my old machines (with Visual Studio) and do some dll work (mergemodule type stuff) on my local dll files. [note here: I suck at programming and have not done any in a long long time!].
After all this I still could not get this application to work right – Crystal Reporting would not work.
As some of you know I absolutely hate to give up on a problem. I may put stuff on the ‘back burner’ for a while to let my mind work on it. But I just don’t give up. Character flaw maybe.
So what is one to do?
One solution that sometimes works on ‘simple’ applications is to you the ‘compatibility mode’ to run said application.
Compatibility mode has been available since the release of Windows Vista and Windows 2003 Server
To use the ‘compatibility mode’. simply right click on the executable of that application and go to the ‘Compatibility Tab’
Click on the Compatibility mode check box and choose the operating system you wish to run that application in then click apply and try and running the application.
clip_image002
I do use this on many applications that ‘say’ they won’t run on a particular version of Windows fairly often. And many times it works.
However there are applications that are ‘built’ around many other applications and components. Many of which will simply not run this way.
But what happens when just about everything else fails? How can you get that application to run fully and correctly?

The solution is Windows XP Mode for Windows 7. I have written on creating Virtual Machines before and I have been using them for years; as test beds and to run wholly cloned machines that had since died. But I didn’t think there would be such a seamless VM solution that nearly anyone could implement to just run a few applications!

I was wrong. Windows XP Mode for Windows 7 is freaking awesome!! The process is dead simple and fast! I am surprised this has not gotten much more attention and that the articles are scarce and outdated. Had it got more press I would certainly have tried it long ago and saved a few white hairs. The only caveat is that running XP Mode requires Windows 7 Professional or higher (Ultimate or Enterprise).

Following is a simple explanation and how to I cobbled together from various sources. Most of which were very incomplete or out of date so I had to add/edit the information.

Windows XP Mode for Windows 7 makes it easy to install and run many Windows XP productivity applications directly from your Windows 7-based PC. It utilizes virtualization technology, such as Windows Virtual PC, to provide a virtual Windows XP environment for Windows 7.
Users can access USB devices attached to the host directly from virtual Windows XP.
These devices include printers and scanners, flash memory/sticks and external hard disks, digital cameras, and more.
Once you installed applications in the virtual XP you can ‘Publish it’ and launch applications installed on virtual Windows XP directly from the Windows 7 desktop, as if they were installed on the Windows 7 host itself.
You can access your Windows 7 Known Folders: My Documents, Pictures, Desktop, Music, and Video, from inside the virtual Windows environment, such as Windows XP Mode.
You can cut and paste between your Windows 7 host and any virtual machine.
You can print directly to your attached printer from your seamless application or virtual machine.
OK, let’s get started.
1st. Check that your PC hardware works with Windows XP Mode by downloading and running this tool 1st:
http://go.microsoft.com/fwlink/?LinkId=163321

Then go to:
http://www.microsoft.com/windows/virtual-pc/download.aspx
Under Download and install Windows XP Mode, click Windows XP Mode.
Select the Operating System you have and download BOTH files – Windows XP Mode AND Windows Virtual PC.
I recommend clicking Save and keeping the file on your computer in case you ever need to reinstall Windows XP Mode. Note: Name each individual file so you will know which is which XP Mode and VirtualPC (the Virtual PC app will be named something like ‘Windows6.1-KB958559-x…)
Install XP Mode 1st
Then install Windows Virtual PC.
After installation is complete, click Restart Now to restart your computer.
Windows Virtual PC and Windows XP will now be in the list of programs.
clip_image004

To set up Windows XP Mode for first use.
Click the Start button Picture of the Start button, click All Programs, click Windows Virtual PC, and then click Windows XP Mode to start/run the Virtual XP.
Accept the license terms, and then click Next.
Accept the default location where Windows XP Mode files will be stored.
Type a password, type it again to confirm it,
AND make sure to choose to remember the credentials if you want the integration features to work smoothly and then click Next.
clip_image006
Protect your computer by turning on automatic updates, and then click Next.
Click Start Setup.
clip_image008
After setup is complete, Windows XP Mode opens in a separate window.
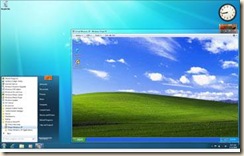
clip_image010
At this point you will need to install your applications in Windows XP.
You can install applications in Windows XP Mode just as you normally would on a physical PC. For example, you can install applications via web, from storage devices, or from physical media such as CD/DVD.
Inside Windows XP Mode, insert the program’s installation disc into your computer’s CD/DVD drive; or browse to the program’s installation file, open the file, and follow the instructions to install the program.
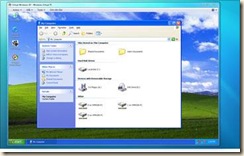
clip_image012
Make sure to choose “All Users” anytime you are asked who to install the software for—the integration features won’t work with software that installs just for your user account.
If you can’t install for everybody, you can simply choose “Open All Users” on the start menu, and copy a shortcut to the application into the start menu’s programs folder.
Once your applications are installed and shortcuts are in the All Users start menu, they will magically show up in the Windows 7 start menu under the Windows Virtual PC andWindows XP Applications folder!

Windows XP Mode works in two ways—both as a virtual operating system and as a way to open programs within Windows 7. Windows XP Mode runs in a separate window on the Windows 7 desktop, much like a program, except it’s a fully functional version of Windows XP. In Windows XP Mode, you can access your physical computer’s CD/DVD drive, install programs, save files, and perform other tasks as if you were using a computer running Windows XP.
When you install a program in Windows XP Mode, the program appears in both the Windows XP Mode list of programs and in the Windows 7 list of programs, so you can open the program directly from Windows 7.
Programs installed in Windows XP in the Windows 7 Start menu
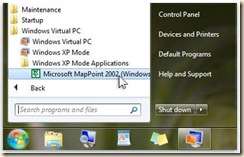
clip_image014
You can now launch these applications from Windows 7!
Simply launch the application you need and you are good to go.
If you go here you can find some very good videos on the installation and configuration toward the bottom left hand of the page. I highly recommend checking them out.
Well that’s it. A years worth of aggrevation solved in about an hour!

Security Threat News

I have mentioned many times before of the need to update your computer Operating Systems, Anti-Virus and Anti-Spyware applications.

But I also must mention again to please update your applications as well – ESPECIALLY ADOBE PRODUCTS.

A 2009 Global Threat Report from ScanSafe, a Cisco company, shows that in the 4th quarter of 2009 80% of all web-based exploits were malicious PDFs! It’s not surprising that the PDF number is large, but this number is so large it’s hard to believe, especially in as much as Flash exploits were 18%!
Those are some frightening numbers!

PDFs and Flash are ground zero for malware on the web these days. Just by keeping up to date on your client software you can protect yourself against almost all of it.
Here is the advisory from Adobe.

Users should update to versions 9.3.1 or 8.2.1, the links to which are in the advisory. Alternatively, you can “Check for Updates” in the Help menu.