Java update April 2013

If you haven’t installed Oracle’s most recent Java patch, you should do so now!

Nefarious folks are hacking those that have not patched their systems.
You can find the latest Java here for Mac OSX, Windows or Linux.

I know many folks have taken to removing or disabling Java all together over security concerns. While that may be a solution to some, it is not for all of us. Especially those of us in IT that rely on application/tools that require Java.

There are also a whole lot of interactive and multimedia Internet applications that also require Java.

So IF you have Java installed on your PC – be it Mac, Linux or Window, PLEASE update your system.

One thing I’d like to warn you about while doing this update.

WHILE GOING THROUGH THE INSTALL PROCESS – DO NOT INSTALL ANY TOOLBARS (LIKE ‘ASK TOOLBAR’ ETC.) OR ADDITIONAL SOFTWARE (FREE VIRUS SCANS, BROWSERS ETC.)!!

This whole SCAM of installing crapware, and worse, while simply trying to update plug-ins is getting WAY out of hand. I wish there were some way to stop it but it seems impossible. Seems virtually every plugin-addon tries to install more stuff than you need and should want. Very frustrating.

But if you’re diligent and careful you can keep yourself from being essentially tricked into installing crapware.

So be safe out there folks.

Google Reader replacement RSS/Feed Reader

With the demise of Google Reader fast approaching I went on a search for a good ‘Feed Reader’. And it turns out there are plenty. In this article I’m going to concentrate on Windows and Android platforms and support for what is called ‘OPML’ supported readers/structure. You can read more if you wish here about that. The beauty of using OPML is that you can export and import you feeds/subscriptions to multiple platforms and devices.

I’ll have to fire up the Mountain Lion box and see what works best there; but that is for another article or addition to this one at a later date. Suffice it to say that whatever I end up with on my Macs must also support OPML.

In my searches and trials I found that most of the supposed ‘top rated’ readers actually relied on Google Reader feeds! What? If that is going to be shuttered it would seem moronic to recommend a feed reader based on an extension/application that is going to be shuttered. To be fair most of those using Google Reader’s API said they were going to ‘adjust’ and get around this but I thinks it’s just stupid to invest effort and time or worse even money into ‘vaporware’. Others were Browser ‘Plug-ins’ that wouldn’t allow for importing and exporting of feeds across platforms. AND I chose mine based on the fact that I’m not required to enter ANY account or password infomation such as Facebook login, E-mail Login, Twitter Login etc. I just want access to the information that I could readily get if I was searching the web.
I do NOT use ANY service that uses another service to access their service – this is just one more vector to be hacked and have my information stolen, used, sold or worse. (so sorry Spotify and all you other folks keeping tabs on me..)

I found a simple to use, and pretty powerful RSS reader to get most of my stuff in one spot. It’s a great tool. I use to get all my current news articles in one spot and at a quick glance can read article headlines and summaries and then decide on what I’ll dig into. It’s called FeedDemon.  I use the freeware version – here is the window free application. With it I can read the articles right in the application’s browser or open them up in a full Web Browser.

Install is simple; download and run then walk through the process. I didn’t subscribe to ‘News Gator’ option and skipped that step. I already have way too much info to process and I am capable of searching and finding content on my own though you may find it quite useful.

Subscribing to a new feed is very easy by hitting the Subscribe button which pulls up a window to enter in the feed URL.  You can also enter in keywords and do a search for a topic.
image

You can also preview the feed to make sure it is what you’re looking for.

image

Sometimes there are options as to additional separate ‘feeds’ within that website. You can select them for a more refined feed. Then just click finish and you’ll have a newly subscribed feed.

On thing I am asked is about the unread/read posts. How come my articles are ‘disappearing/being deleted’. Well that’s just an option in the ‘view’ settings. Go Here and read about that.

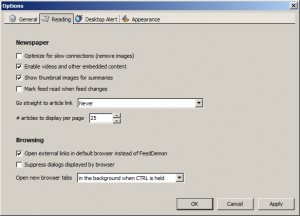
Another thing I do is to change the ‘default external Browser’ option for security reasons – I use Firefox with high security plug-ins, but you’re just as safe if use Chrome too instead of the default of IE.

Go to Tools>Options>Feedemon Options and select the second tab and click on the ‘Open external links in default browser instead of FeedDemon’

Untitled

Once I had all my feeds subscribed and set up on my main workstation I exported them all to an OPML file. That can be used to import my feeds onto another system or device with ease.

I then used that to import all my feeds into my laptop and Android phone RSS Reader – On my phone I use RssDemon News & Podcast Reader.

Tip: How to get an RSS feed from a Facebook page

I also found a good trick to generate an RSS feed from any Facebook page. Facebook, being the closed arena that it is. may soon figure out how to disable this, but for now it works.

First you need to identify the numeric ID of your page or the ‘front page of the profile you want to follow.

To find the public/front page just go to Google(or Bing or whatever) and search for what you’re looking for. Here I searched “Rush band Facebook” (no quotes by the way)

Then you can use this service: http://findmyfacebookid.com/ to find the actual ID number. [There are other services too. You can search for those if you wish; this was just dead simple]

Once you’ve copied the number, just add it at the end of this string

http://www.facebook.com/feeds/page.php?format=atom10&id=YOURID/PROFILEID

Eg: this URL generates the RSS feed of one of my all time favorite bands.

http://www.facebook.com/feeds/page.php?format=atom10&id=53385812061

Now it’s possible to subscribe the feed of interesting pages, without a Facebook login. Smile

Hope this helps. Peace.

Install/Downgrade to Windows 7 from Windows 8 – HP laptop adventures

I’ve been without a good working portable/laptop computer for some time (had a couple liberated and another fail) and decided the time was nigh to purchase a very good one for my needs.

I did loads of research on specs and ratings etc. of course, that’s part of what I’ve been doing for a few decades. So I might have a pretty good idea of what I want and need.
For me I am primarily concerned with a system that can match or exceed the computing abilities of my workstation. That means a fast 64bit multi-core processor with Hyper Virtualization Technology built in – an i7, loads of fast RAM, a large fast HDD, dedicated video card and ample ports for devices and connections.

I found some good Dell’s, Asus’, and HPs. I am a huge fan of Amazon, New Egg and Costco and looked extensively on their sites too. I finally settled on an HP that Costco had for sale with bang up specs and a great price. In fact the price was way better than I could get configuring the device on HPs site or a comparable one on Dell’s site.

This, and most new systems; desktops and laptops now come with Windows 8 pre-installed. Windows 8 is a nice operating system and brings some nice ‘under the hood’ improvements in security and performance. AND it’s User Interface (UI) is very easy to navigate for those not that familiar with a Windows Operating system. All the ‘simple things’ – web, email, social media, games etc., are quickly accessed and controlled on the Metro ‘front page’. For those that are very familiar with older versions however it will definitely take some getting used to.

HOWEVER, I’m an IT guy. I use dozens of applications on a regular basis, usually daily. AND there are many network/system management applications that will not run on Windows 8 (yet, or ever). So I needed to be sure that whatever hardware I got that I would be able to downgrade/install Windows 7 Enterprise.

I made several calls to HP over the past couple months speaking with sales and tech people alike. I was finally assured by a level III tech manager that I would be able to install Windows 7 onto my machine with out ‘much’ difficulty. That the Windows 8 (and maybe some of the Windows 7 drivers from the just previous models) would/should work.

So I broke down and ordered a new laptop over a month ago. WELL… I finally got it. It had to be made in China exported to the U.S.A., clear customs in Alaska and finally make it to me.

That’s when things got even more fun. <sarcasm>

You see, most newer systems are now shipping with UEFI type of ‘bios’. UEFI allows for some great flexibility in hardware and configuration that wasn’t possible with the old style of BIOS. Here’s Microsoft’s take on it:

In addition to better interoperability, UEFI firmware provides several technical advantages:

  • Compatibility with operating systems that support only BIOS
  • Ability to boot from large disks
  • CPU-independent architecture
  • CPU-independent drivers
  • Flexible pre-OS environment
  • Modular design

Two of the most notable Windows features for UEFI systems are the following:

  • Multicast deployment, which enables large scale network-based image deployment in manufacturing and enterprise settings.
  • Fast boot and resume from hibernation, which improves user experience.

The rich UEFI interface provides ample room for innovation in the development of operating system features. Along with the other members of the Unified EFI Forum, Microsoft is investigating the following:

  • Rootkit prevention (theoretically)
  • Network authentication at the ‘BIOS/FIRMWARE’ level

But many Operating systems will not work – at all with this firmware. AND.. This also allows the manufacture to possibly ‘secure’ – read LOCK, the ability to install ANY drivers or Operating Systems that are not ‘properly signed’ or specifically ‘allowed’ by said manufacturer. Sounds great for ‘security’ but that fails when you wish to work on/configure your own hardware! [Wow sounds like an Apple product huh!] Thank goodness I was able to enter the System Setup/Bios (unlock/disable secure mode) and enable ‘legacy bios support. But then came some other issues…

HP is now throwing the PC enthusiasts under the bus. Computerworld  has said that they have again changed their support for ‘downgrading’ Operating System – specifically Window 8 down to Windows 7. What a bunch of crap! Users in the past always could downgrade, assuming they had the appropriate licenses — Windows 8 Pro — and media for Windows 7 Professional or Vista Business. The question was whether their machines would work after a downgrade. “The company retained its warning that if customers downgraded to Windows 7 and reached out to HP for support, they may have to restore the original Windows 8 OS to get help from the company.” Oh well, I’ve got a solution for that I’ll get to later.
Well I’ve already got my system so I might as well give it a go!

My solution was two fold. First I removed the original HDD before I even powered up the laptop and just put it aside in case I had to send the whole thing back as it was when I received it. I could just reset the BIOS to default, install my original Hard Disk and bam, just like new. Yes I know most wouldn’t go through this much trouble, and that is OK. You can just skip this part and wipe the drive that came with the system and move on from there. But me, I’m a tad extra careful and conservative and always make sure I have a complete ‘escape’ plan. I purchased a brand new Hard Disk Drive. I Picked up a 1 terabyte (1TB) 7200RPM HGST/Western Digital drive from Fry’s for just under $100. Being a Western Digital I know that the HP HDD drivers should work with it. And this drive was faster than what came stock – 7200 RPM vs. 5400RPM!

Second part of my plan was the actual installation of Window 7 (Enterprise in my case) to the laptop.

Some pre-requisites: Make sure you have a Windows 7-64 bit WITH SP1 install DVD. You can only use a 64 bit version of Windows AND it must have SP1 already incorporated (sometimes called ‘slipstreamed’) or you will not be able to install this on UEFI hardware. Also go to the manufacture’s web site and download ALL the Windows 8 64bit drivers for you model of system (for me it was HPs DV6t-7200) AND see if you can find the Windows 7 64 bit drivers for the model ‘just preceding’ the Windows 8 model you have – for me that was the DV6t-7000. After you’ve downloaded all the drivers extract each one to its own folder. If you use 7-zip (which you already should be) you can just right-click on the drivers self-extracting  ‘.exe’ file and then choose 7-Zip option to ‘Extract to “\drivername” folder\’ . Then copy all these to a DVD or USB drive you’ll need them once you get Windows booted to the point that you are booted to the desktop. Probably the most important ones are the Network Adapter drivers. You will certainly need to get online quickly to ‘Activate’ your Windows installation, Update you Windows installation and hopefully update your drivers automatically.

So now the semi easy part.

Boot into you bios/setup – usually it’s the ‘Esc’ key and then enter ‘Setup’ or System Setup. On some machines it might be F1, F2 or the like. But you need to get to the BIOS/Firmware options. You may even be prompted to enter a password! Thankfully as of now most manufacturers actually present that password – usually a number, right on the screen; enter it and then you will be in.

In the setup options use the arrow keys and enter to navigate (as described on the help window at the bottom of the screens.) and make sure you do NOT have ‘Secure Boot’ enabled. Usually you can use the  arrow keys to select this option and then once high-lighted press either F6, F5 or + or – to change the value. It must not be Enabled or you can not install Windows 7.

Then you have to to change Boot mode to LAGACY in BIOS. (Sometimes it is Legacy mode:Enabled). And in the Legacy section of the bios boot order make sure that the 1st boot device is UEFI DVD drive. Then Save Changes and exit.

The system will reboot. And hopefully if you’ve enabled legacy boot mode, made sure that the 1st boot device is UEFI DVD drive (And of course put your Windows 7 64SP1 installation DVD in the drive!), you should be able to install Windows 7!

Yay!! Then comes another fun part. After Windows is installed you will surely have to install a whole load for drivers. Open Device Manager (see all the yellow exclamation marks!), right-click on the devices and choose update driver. Then put in your DVD with all your drivers you made earlier and start finding the updated drivers.

OK, so that is a short version of an even longer winded version I originally had written about this project. I’ll be adding more articles as I can. Some will be how to dual boot Window 7 and Windows 8 – on separate partitions, how to decide I you can/should upgrade to Windows 8 and how to properly do it. I’ll also, from time to time put up more tips on navigating through Windows 8.

Hope this helps some. Peace out.

Update 05/09/2013: Costco is again offering this laptop I updated the link above or you can go here. And if you’re looking for a good HDD here is one.

Add Gmail Contacts to iOS 5

Though many don’t realize it the process for importing your contacts to your iPhone from Gmail Address Book is quite simple. Getting them OUT of your iPhone can, depending on how their configured, be much more complicated. But that is for another post. I know that many supposed Mac techs and BigBox retailers will want to charge you plenty for this simple procedure, please don’t let them.

So here we are going to assume that your entire address book is connected to your Gmail account. To import/sync them we are going to use iPhone’s Microsoft Exchange configuration. So let’s go:

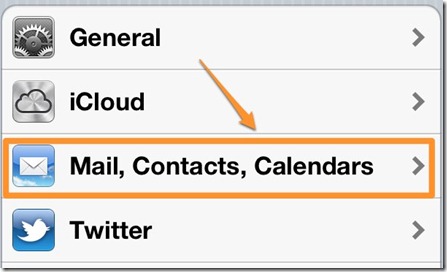
  • On your iPhone or iPad, open the Settings app.
  • Scroll down to Mail, Contacts, Calendars and select it.

Mail-Settings-iPhone

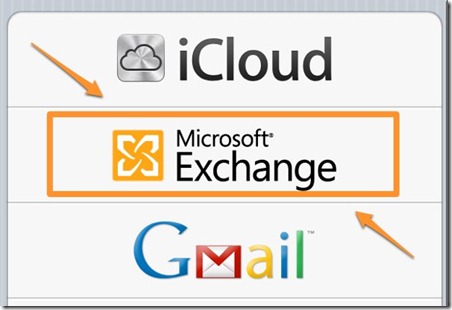
  • Next, add a new account
  • At the add account screen you’re going to want to select the Microsoft Exchange option. This is how we are going to import your Gmail contacts.

Exchange-Gmail-Contacts

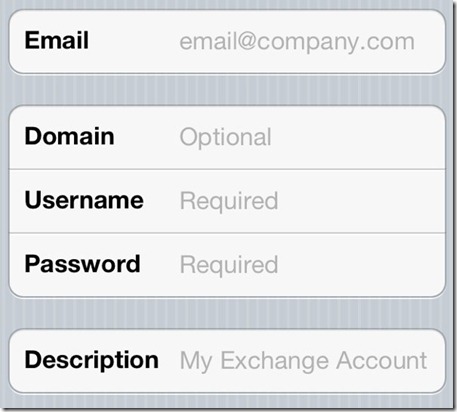
  • Enter your Gmail address in the email field. Leave the Domain field as “Optional” and fill in your Gmail username (without the @gmail.com) and your password. You can leave the description but remember it so you know what it is later.

Form

  • Click next, the form will update and now include a Server field. In the server field enter m.google.com. Click Next or Done.

server-gmail-iphone

  • It will confirm that you want to sync your mail, contacts, and calendars. Slide these to On for Contacts and Off for the others.  Here we were only concerned with Contacts, BUT you can also synchronize your mail and Calendar too!

Happy computing!


Edit: after doing this many times for clients and others I’ve found a guy who created a great video on the above steps! You can watch that here:

Sync Gmail Contacts to iPhone

Critical February Security Patches

Microsoft’s Patch Tuesday is next week. And it’s going to be VERY important

Microsoft’s security patches are due to be released at 1:00pm EST on Tuesday 12th February. [Read more here from MS  ]

The longer you take to update the security patches on your computer, the greater potential risk you could find yourself in!!

In all, 57 separate security flaws are waiting to be fixed.

According to Microsoft, every single version of Internet Explorer – from version 6 to version 10 – needs to be patched, as they are vulnerable to exploitation by drive-by attacks.

That means that simply visiting a booby-trapped webpage could silently infect your computer with malware – hijacking your PC for a hacker’s own ends.

According to an advisory from the software giant, five of the 12 security updates have been given Microsoft’s highest severity rating of “critical”.

Also note that Adobe has again released critical security patches to it’s Flash Player software. [read here]

Even if you are not on a Windows/Microsoft Operating System you should still make sure your Adobe Flash, Adobe Shockwave  and Oracle’s Java software  and Browser Plug-ins are up to date!

Be safe out there! MMm K.

Disable UPnP to Protect Yourself from New Security Hole Found in Wi-Fi Routers.

If you don’t know. And most of you probably don’t. There is a major security flaw that has been recently aggressively exploited. It could allow people with malicious intent access your system(s). Mac, Windows PC and Linux, all are vulnerable because this is NOT a OS flaw, but a router flaw! So please don’t think you are safe just because you by into the belief (very wrong by the way) that ‘your’ type of Operating System ‘doesn’t get infected…’.  Scans from security companies have shown about 50 MILLION vulnerable access points already.

It is strongly suggest that end users, companies, and ISPs take immediate action to identify and disable any internet-exposed UPnP endpoints in their environments.
UPnP is pervasive – it is enabled by default on many home gateways, nearly all network printers, and devices ranging from IP cameras to network storage servers.

Rapid7.com has an online tool here  that can check the external interface of your router and let you know if you are vulnerable.

To fix/resolve this issue all you need to disable UPnP on your wireless router.
Since each router is different, you’ll need to login to your wireless router’s admin panel (use the manual to figure that out), and then find the UPnP setting. This may require someone with more skills (like your teenager) or an IT professional (preferred method) to turn this off for you you. But however you do it, please do it.

Be safe. Smile

iDevice updates and backups 04

Just thought I’d bump this post. I just had another person tell me about their iDevice backup woes once again.. I was able to recover some stuff thank goodness. But come one people, for your own sanity, backup your data…..

I’ve written previously about backing up and restoring your iDevice.   I’d like to add a short update to that. Having recently dealt with a few people who have ‘lost’ their data (either just photos or all their settings) after updating to iOS 6. I thought I should re-iterate a few things.

First use iTunes to backup your device (including ‘synching purchases) and make SURE you back up to your computer (and then iCloud if you choose) regularly; I’d recommend at least once a week. Read my previous post on how to use Apple’s iTunes method for that.

Second. As I mentioned before, I HIGHLY recommend using a third party application to copy off all your data; photos, contacts, phone logs, messages etc..

My choice to do that is DiskAid. With this application you can copy off all your data AND remove/delete older data such as photos taking up space. You can also copy all your contacts off (they are exported to a vCard format) that will then let import them into other applications like Outlook or other contact management software! I am always amazed that people will spend hundreds of dollars on a device and not spend any money on backing that data up. Folks most of you will spend more on dinner for two that the cost of this application.

I just got done freeing up 4GB of data on a iDevice that would not update because of ‘not enough available space’. There were hundreds if not thousands of pictures on it. To selectively delete them individually would have taken a very long time. Using DiskAid we just copied the entire Camera Roll off to the PC and removed all of them from the device. By default this user has their pictures already uploading to Instagram too.

After freeing up that space we were successfully able to upgrade to the latest version of iOS. BAM dead simple. And now those pictures and files can be backed up from the computer to an external drive for REAL backup and peace of mind.

UPDATE: DiskAid is now iMazing and works even better! So glad to have access to my iDevice!! I can now do most of the ‘stuff’ Apple doesn’t want me to do – delete whole groups of photos, copy off my call and text logs and update my contacts as I see fit. Yay!

Have fun. Peace out.

Tech power and input deals.

For those with laptop/portable computers you know what it’s like to always have to pack everything in your bag for each trip.

Why not keep have an extra power supply so that you can have one at home AND the office (or in your bag) always waiting? No constantly having to reach and dig behind the desk to unplug the power supply. And then do the same when you get to the office.

Here is a super solution. And right now this is on sale for only $19.99 w/free shipping at Newegg.com.
Rosewill RMNA-11001 Universal automatic Notebook Power Adapter 90W
http://bit.ly/KSUOpD

And while your at it how about an additional mouse? I use this one on PCs and Macs. Works great. I have a few of these too – home, office and travel bag.
http://bit.ly/UBT2ib

Just thought I’d pass this on.

Moving Virtual Machines in ESXi from older hardware to new server.

If you have outgrown you current ESXi hardware and need to move to another physical machine and you don’t have vSphere you can still easily move all your VMs to the new server. Without additional software costs.

First install the ESXi Host software on the machine and configure it for access via the management console.

Take note of the IP address and credentials you used for you new installation.

Then login to your existing VMware installation via your management computer/console. And you can then do one of the following.

Simple way?

Use the outstanding free product(s) by VEEAM!
Veeam Backup Free Edition. The free version that will let you backup, replicate/move and restore entire machines from one ESX server to another on the same subnet. The free version limits the backup/migrate tasks to one machine at a time but it works! If you have a VMware environment I highly recommend their product(s) for backup and disaster recovery. You can automate just about everything you need for backing up and restoration. Check out more here http://www.veeam.com .

Older not so quick but still simple old fashioned way.

Open the management console. Connect to the original server/Host. Navigate to the Server (vCenter) containing the VMs you wish to move.
Commit any snapshots in the VM you are going to move.
Power off the VM.
Click the Configuration tab.
Click Storage.
Open/Browser to the Datastore where the VMs are located and find the folder containing the entire Virtual Machine (the one with the disks (vmdk), .vmx file, nvram, .log files etc.).
Copy that entire machine to a drive (a folder on the management station or other attached/network available storage)

Connect to the new host via the management console.
Open the Datastore where you wish to place your new machine(s)
Upload (import) the entire folder – containing the Virtual Machine, you previously copied/downloaded.
Then open the that new folder and right-click on the .vmx file and select ‘Add to Inventory’.
It will then show up in the list of machines in your selected Server/Cluster. Then power off all the old machines and shut down that Host.

When you power on the machines on the new Host you will be walked through a process that will ask you if the machine was copied or cloned. Since you are moving the VM choose that –  move and NOT clone or it will generate a new machine ID/SID and jack up the VMs usability.

Do that for any and all that you moved and test connectivity from workstations.

I’ve done this with virtualized Domain Controllers, SQL servers and even an Exchange server!

That’s it.

Peace out.