Thoughts on Privacy, Anonymity and Security

One thing I deal with a great deal in the information/technology  and security field are the very separate concepts of privacy, anonymity and personal security.

Do you think that anonymity and privacy are the same things? Wrong. Do you think that because you are anonymous your information is secure? Wrong There are differences that are important when we want to distinguish what methods you need to protect yourself from attackers and surveillance. Let’s define anonymity,privacy and security. First the definitions:

Anonymity typically refers to the state of an individual’s personal identity, or personally identifiable information; being publicly unknown. Or a condition in which an individual’s true identity is unknown. Read more here

Privacy is usually thought of a person’s right and or ability to control access to his or her personal information. Read more here.

Computer (and ‘information) security primarily means the collective processes and mechanisms by which sensitive and valuable information and services are protected from publication, tampering or collapse by unauthorized activities or untrustworthy individuals and unplanned events respectively. Read more here

So anonymity does not equal privacy or security. Let’s see two examples:

In the first example say you are using a proxy server, a VPN service or Tor to surf anonymously (these offer different levels of anonymity). Your true (or should I say ‘originating’) IP address and therefore your identity (computer/network wise) is hidden. Someone who watches the traffic between your computer and the network cannot see your true identity. However, he can see the traffic and therefore gain access to your personal information. In this case your anonymity is safe but your privacy is not. Worse still, your personal data can contain information to identify you so that both your anonymity and privacy are undermined.

In the second example you protect your data using both data encryption and a secure protocol such as SSL. You control who has access to your personal information. The actual packets of digital information are hidden/encrypted and the information therein cannot be accessed. However, if you don’t protect your anonymity an attacker will know who you are. This might help him in password and social engineering attacks or allow a law enforcement agency to force you to reveal your passwords and lose your privacy.

For true online safety, both privacy and anonymity must be secured.

There are literally thousands of more detailed articles available to you by doing a simple search on Google, Bing or Yahoo or whatever on “privacy vs anonymity”. There are guys who’ve written their PhD thesis’ on this subject, so there is obviously loads of information available if you want some greater depth than my simple explanations.

But I just wanted to remind you to do some of the simple things that can mean a great deal.

  • 1st. And foremost get some kind of security software or suite (Symantec, McAfee, Trend Micro, MalewareBytes, Eset, MS Security Essentials etc.) AND KEEP IT UPDATED AUTOMATICALLY!!.
  • 2nd. Keep your Operating System updated.
  • 3rd. Keep your browsers and especially the plug-ins (like Adobe Flash and Acrobat) updated.
  • 4th. Use ‘HTTPS’ on ALL your important communications like email, Twitter, Facebook etc. For Facebook look here. You should also use something like ‘no script’ to ensure https connections.
  • 5th. Clear out your internet cache every time you close your browser. You can set all the common browsers to do this automatically or use one of my favorite tools – CCleaner. There is even a Mac version which I wrote about recently.

It is nearly impossible to be truly anonymous and completely private. BUT you can have some security in both of these with a little diligence and common sense. Read some of my other posts on security for other more detailed information.

Please practice safe and secure computing.

Backups, system failures and peace of mind

Another week in the trenches. I had a primary server at our organization have a major failure. The SAS controller (which provides access to SAS type HDDs) died OR the motherboard to the server itself has an issue. Either way without another ‘like’ system that I can put the SAS card into to see if the issues is just the card or the motherboard I cannot access my drives – and they too may be very corrupted. The only machine I have capable of putting the card into is in production. And the cost of a replacement Dell Perc5i SAS card is nearly $200.00 US and could take days to get here. Plus I needed to have this system back up and running very quickly – the server in question runs all or our company financial, shipping and reporting software applications!

Since I have all my ‘data’ backed up to a server drive every night I was secure in the knowledge that we at least had the financial databases and ‘files’ available. But how to get a system back into production? Disk Imaging to the rescue!! I had a fairly recent full system image, created with my favorite backup software – Acronis, available. Yay! Just need a place to restore it to.

Since my organization now has a VMware ESXi/vSphere SAN and cluster running I was easily able to create/import a new ‘Virtual Machine’ from the Acronis disk image very quickly and then just copy over the backed up data files from the night/early morning before. WORKED LIKE A CHARM! If I’d had an available server (Hardware wise) I could also have restored that image to it too.

I’m telling this to you to remind you – I believe in Images(Clones) for my backups, alone with periodic ‘file backups’. That way I’m protected against full drive failures/loses AND stupidity – accidentally erasing or overwriting files. :)
[Imaging or cloning is the procedure by which you create a backup that is identical to a bootable system either to another internal or external drive. This is the ultimate backup! Should your drive fail you can just ‘pop in’ your cloned drive or ‘restore’ that clone to a new drive and your are up and running.]

If you are not regularly creating full image backups you WILL be sorry! I have written numerous articles about cloning and back up.

PLEASE read here if you any kind of concern for you data.

For Mac images and cloning go here.

So of course this weekend I created two new images on separate drives for my home system(s). I can’t tell you the peace of mind you will get from knowing that the worst that could happen to your system is that you might lose a couple of days or a weeks worth of information. If your drive gets corrupted or fails or you get trashed by some virus, you could be back up and running within a very short period of time! No re-installing your Operating System and programs and ‘trying’ to find you data files. Just restore the image and BAM, you up!

What prompted me to start on this rant is that Apple has finally acknowledged it is having some major issues with some of the hard drives in some of their newer systems they have been selling. Looks like some of the drives just ‘fail’. OUCH! You can read about that here.

And although you can have your drive replaced – YOU WILL LOSE YOUR DATA! The Apple folk and/or kids the the ‘Genius’ bar will NOT re-install your system software or clone your drive for you!! Unless you have an image to restore you will have to re-install you System and applications. And unless you had at least some kind of backup to another drive (Time Machine type) your data (read pictures and music!) will be gone!

So folks, backup, backup and then backup again.

The cost of a couple of extra external drives and a little program setup is minuscule to the cost of losing you ‘digital life’. Right now Acronis has a special – only $29.00 US for their home product!! With Apple’s you can even get a way with out purchasing any software!

Be safe, be secure and gain some peace of mind.

Get your Cloud Data down to your machine

Here are some ways to get your ‘cloud data’ backed up locally.

I know most people look to the ‘cloud’ for their secondary backups (if they even have a primary one) but few people ponder what will happen if their information is lost or compromised in the cloud or the terms of service of the provider that holds that information changes to your detriment.

I am going to provide some information on how to get your data out of your web email, Facebook and some other services.

One thing I see quite often is that people cannot access their online/web mail service at an important time to find information or they lose or have deleted the information they need and have no way of retrieving it.

So let’s start with web mail services. Today most people have very important information stored in their email; from plane reservations, business communications all the way to payment receipts. So in my opinion this is the first and most important place to start.

Get your mail downloaded locally.
For GMail. [My personal favorite!]:
Before you do anything, you’ll need to enable POP3 and/or IMAP in Gmail, which will let you access your accounts on the desktop. To do this, head into Gmail’s Settings and go to the Forwarding and POP/IMAP tab. Scroll down to the IMAP section and enable IMAP. Then save your changes, and open up your desktop email client of choice to set it up using the following instructions.

I use Outlook 2007/2010.

If you don’t have Outlook you can also use Thunderbird (an open source application by the Mozilla folks)

There are also a number of other mail applications you can use to get your information – Apple Mail, Thunderbird, Outlook Express, LiveMail etc..

I like using the POP3 connections over IMAP for most of my connections.
POP mail service has been available MANY times when IMAP has NOT – for my Gmail, Hotmail and Yahoo. If the ‘webmail’ is not available online because of a service interruption then IMAP will most certainly too. This is not usually the case with POP. HOWEVER there is a big caveat with POP – you must make sure in the advanced settings or your mail client that you choose "to leave a copy of the message on the server"!!

But IMAP does have its advantages too.
So pick what will provide you with the most features you feel you will need – I suspect that would be IMAP probably be best for most people.

To set up POP with Gmail look here,  and find your client and follow the steps.
For IMAP go here.  and find your client or device on the list and follow the instructions.

If you’d like to read further about the differences between IMAP and POP you can read this here.

For Yahoo mail it is a little harder if you live in the U.S..
Yahoo wants you upgrade to a "Mail Plus" paid account to get POP and IMAP access directly. But you don’t have to! The best option is to use an application called YPOPs. I’ve used it in the past to get my Yahoo mail connected to Thunderbird and Outlook with out any issues.

If you have Window Live Mail or Apple Mail the client itself downloads your Hotmail/.Live or MacMail/MobileMe data to your machine by default. BUT remember this is an IMAP connection so if you delete something from you Live Mail client on the desktop it will be deleted on the server!

One important thin that may people miss is to get their CONTACT data out/backed-up from their mail clients. Something I also feel is very important.
For virtually all web mail clients that is as simple as going to the ‘Contact’ section and finding and choosing the ‘Export’ option. Those can then be exported into a format that virtually any Email client can import.
That should get you going with your mail.

Now to Picasa.
Simplest way is to install the latest version Mac or PC and then simply go up to the menu and use File ==> Import from Picasa Web Albums ==> Select All.
And Flickr
You can use Flickr’s Flash based web app here  just click on the ‘start now’ and follow the instructions.
Or you can use the open source application Downloadr . Downloadr is a photo downloader for Microsoft Windows. It provides a simple interface to download large sized images from Flickr to your computer.

Now to Facebook.
If you have Yahoo you can easily download/copy all of your contact out. You can follow this tutorial here.  One tip is that I would suggest setting up a ‘temporary’ Yahoo alias with NO contacts in it so that you do not end up with duplicates or mismatched merges. Then export those and import them into any application you choose.

Also Facebook now allows you to actually export YOUR data to a file! Following this VERY well written walk-through right here. I’ve done it and it works great! You may have to wait a while before you receive your ‘confirmation email’ and link but you will be able to get your stuff.

Finally there is an open source application Called MyCube Vault. MyCube Vault Backs Up Your Facebook and Google Data Regularly
Once installed, the app requires you to authorize it to each of the services you want to back up. From there you can tell the service where to store your backups and how often to save your data. If you’re concerned about downtime or just wary of keeping your data in the cloud, it’s worth a look.

I checked it out and it works well.
Windows version here

Mac version here

Well that is a long winded post and I hope some people will put it to use. Like backing up your local data don’t be the person who loses precious information because you were too lazy or couldn’t be bothered to learn something new.

Peace.

Mac Maintenance and HDD updates/upgrade

[Updated 06-26-2011]

I just spent a few days doing lots of maintenance on a few Mac’s.
Cleaning up, optimizing and replacing one HDD for a new larger one.
So I thought I’d share what I do with my Mac’s to keep them running happy and having my data safe should there be problems to those of you ‘Mac-ites’ out there.
1st. Let’s clean up.
I install and use Onyx on all my Macs and those I maintain. It makes maintenance a BREEZE.
With Onyx you can do just about everything you need to do on a regular basis to keep clutter down and errors away.
Get it here.

Check out the AppCleaner application to completely remove applications – often installs put files into many other directories than just the applications folder! A great tool for removing leftover ‘gunk’.

I was going to go into some of the other steps I do such as removing unnecessary start-up items and removing unused apps but it looks like the folks at LifeHacker.com have put together a very good article on just that.
So to save the time of me just re-stating what Gina Trapani, founder of LifeHacker, has already said just go here.
The folks at Tested.com also have a good in depth article on how to manually do nearly everything you can do in Onyx. But I find Onyx to be fantastic.
As always make sure you have a good backup before you start messing with system settings!

2nd. Let’s clone/copy.

For backups most know I believe in Images(Clones), alone with periodic ‘file backups’. That way I’m protected against full drive failures/loses AND stupidity – accidentally erasing or overwriting files. 🙂
Imaging or cloning is the procedure by which you create a backup that is identical to a bootable system either to another internal or external drive. This is the ultimate backup! Should your drive fail you can just ‘pop in’ your cloned drive or ‘restore’ that clone to a new drive and your are up and running.
Good description here

Now to backing up and/or updating of a hard drive. By cloning the drive to a new (or back up one) you are creating an exact bootable copy of the original.

This is actually a very simple process that can be done without any 3rd party software on OSX!
I’ll explain how to do that in a moment, but there are some 3rd party tools that make it a little easier for the novice

Whether you are installing a brand new larger hard rive like I just did or making a clone to and external drive the directions are the same. [except of course if it is just a back up clone you won’t be ‘changing the start up disk’]

For the two Easiest ways to Clone (and also backup – remember images rule!):
Use SuperDuper Mac Drive Cloner. Get it here,
The application is freeware/shareware. Meaning to use the clone function it’s free but to use the advance scheduling features you will have to purchase a license. The call is yours.
I have always found it very worthwhile to own and support great utility software.

Or use Carbon Copy Cloner. Get that here. Read about it here. The latest version is fantastic. It’s now my go to OS X disk tool.

Now the no 3rd party software route.
You can do as I have done many times use OS X’s own clone/restore utility!

You insert the MacOS X 10.x install disk, boot from it, select Disk Utility from the Start menu, and choose the volume of the new Mac.
Then use the Restore tab, drag and drop the old drive as the source, and the new one as the target, and press the button.
Et voila!
After copying, just make sure that your new hdd (the clone) is set to be the start up disk.

You can then boot the new Mac with an exact clone of the old one.

Here’s how to use Disk Utility to clone and backup your hard drive in a little more detail using an install disk:
* Fire the Mac OS X disk that came along with your Mac.
To do this, insert the CD or DVD into your Mac, and hold down the C key while your Mac restarts.

[if that doesn’t work try these options:
# Restart your computer and immediately press the Option key. Icons for all available startup volumes will appear. Click the one you want to boot from, and then click the right arrow button to complete the startup process.
# Restart your computer and immediately press Cmd-Option-Shift-Delete. You must press all the keys at once. The computer will start to boot from the CD or DVD drive. If there isn’t a bootable disc inside the drive when you begin the reboot, the computer will attempt to boot from another partition or drive. ]

* Go ahead select your language. Don’t worry: You’re not installing Mac OS X again – this is just what you have to do to get to Disk Utility. When the menu bar appears, select Disk Utility from the Utilities menu.
* When Disk Utility opens, you’ll want to select your source. This is the hard drive you want to clone and/or backup. After you have a source, select the Destination. This is the hard drive you want to save the backup image to. * Click Restore and you’ll end up with a perfect copy of your hard drive.


Restart your computer and you’re good to go!

That’s it……

For backups there is also the included Time Machine application that ships with the latest versions of OS X. It is much improved from previous versions. It allows the user to restore the whole system, multiple files, or a single file. It works within iWork, iLife, and several other compatible programs, making it possible to restore individual objects (e.g.: photos, contacts, calendar events) without leaving the application. Time Machine is a backup utility, not an archival utility, it is not intended as offline storage. Time Machine captures the most recent state of your data on your disk. As snapshots age, they are prioritized progressively lower compared to your more recent ones.

Carbon Copy Cloner, SuperDuper and Time Machine are complimentary. Think of SuperDuper or CCC as your backup against catastrophe (drive-failure or theft) while your TM volume is a hedge against stupidity (deleting/overwriting important files, contacts, etc.).

One last utility that I’d like to mention is AppleJack.

AppleJack is a user friendly troubleshooting assistant for Mac OS X. With AppleJack you can troubleshoot a computer even if you can’t load the GUI, or don’t have a startup CD handy. AppleJack runs in Single User Mode and is menu-based for ease of use. Their main page is here.

The AppleJack download is here.

Peace and happy computing…..

Blacksheep add-on to protect against WiFi session Hijacking

This is a Firefox add-on everyone should use if you use public WiFi anywhere anytime.
It’s called ‘Blacksheep’.

Blacksheep will find and block ‘Firesheep’ – a highly popular new hacking tool used to ‘sniff out and steal your sensitive information on WiFi networks.

What Firesheep is:
Firesheep is the Firefox extension that makes it easier to steal logins and take over social media and email accounts after users log in from a WiFi hotspot or even their own unprotected network. It is designed to sniff out weak security and hijack web site credentials on open Wi-Fi networks. This technique is technically called ‘Session Hijacking’.

Session hijacking is nothing new. Web sites typically use SSL connections for initial login pages, but revert to non-encrypted traffic for all subsequent communication. As such, while a user’s username and password may be protected, once they are authenticated, any user on the same network can simply sniff network traffic, obtain a user’s session ID and then hijack their session for a given website. Although this has always been a serious risk, especially on insecure networks such as public WiFi hot spots, some degree of technical knowledge was required to accomplish the attack. Firesheep, opens such attacks to the masses as it turns session hijacking into a point and click exercise. Unless websites mandate SSL for all traffic on the site, session hijacking will always remain a threat.

Fortunately, BlackSheep can be used to let you know if someone is running Firesheep on the same network and protect you.

Read some more here.

and here

or just add the extension to Firefox by going here!

Be safe folks!

Apple Security news end of June 2011

Apple has released Mac OS X v10.6.8 and Security Update 2011-004 addressing a total of 39 vulnerabilities in OS X 10.5.x and 10.6.x.

Many are critical errors which could allow an attacker to take control of the system!

Please use the System Update. You can read the notice here:

And get the direct download here:

As usual I would remind you to also make sure you also update your Web Browser(s) and plug ins – ESPECIALLY Adobe Flash and Adobe Acrobat!

Firefox 5 news

Today Mozilla released the Final version of Firefox 5 ahead of its scheduled date. It has been slated for official release next Tuesday June 21. If you’d like, you can get it now here:
Windows

Mac

Linux

Before installing I HIGHLY recommend backing up your complete profile. For that I use MozBackup on Windows. You can get the Windows install here

For other OS’s you can use FEBE
To install FEBE download the .zip file then rename it with a .xpi extension and open it with Firefox.

I would also recommend that you install the "Firefox Add-on Compatibility Reporter" to Firefox 1st too. Get that here.  This will keep unsupported or updated plugins/add-ins from crashing the browser and may let some of them work even if they are ‘not supported’.

So what’s new in Firefox 5?

  • Added support for CSS animations
  • The Do-Not-Track header preference has been moved to increase discoverability
  • Improved canvas, JavaScript, memory, and networking performance
  • Improved standards support for HTML5, XHR, MathML, SMIL, and canvas
  • Improved spell checking for some locales
  • Improved desktop environment integration for Linux users
  • WebGL content can no longer load cross-domain textures
  • Background tabs have setTimeout and setInterval clamped to 1000ms to improve performance
  • The Firefox development channel switcher introduced in previous Firefox Beta updates has been removed.

As with any new software be aware that some items may have changed locations and some Extensions/Add-ons may not function correctly or at all. So once again let me re-iterate – MAKE A BACK UP OF YOUR SETTINGS/PROFILE before installing!! You may also with to download the version prior to version 5 incase you have to uninstall version 5 and re-install your old version.
Windows:
http://releases.mozilla.org/pub/mozilla.org/firefox/releases/latest-4.0/win32/en-US/Firefox%20Setup%204.0.1.exe
Mac:
http://releases.mozilla.org/pub/mozilla.org/firefox/releases/latest-4.0/mac/en-US/Firefox%204.0.1.dmg
Linux:
http://releases.mozilla.org/pub/mozilla.org/firefox/releases/latest-4.0/linux-x86_64/en-US/firefox-4.0.1.tar.bz2
For other versions and languages go here:
http://releases.mozilla.org/pub/mozilla.org/firefox/releases/latest-4.0/

Here’s to hoping that it proves to be a worthwhile upgrade!

Virtualization 101 – Getting started

It’s no secret I like Virtualization technologies a lot. I have written several other articles on some of my tips and tricks mostly involving creating Virtual Machines of OS X. You can read some of those here, here, here or simply just search my blog.

For those who support multiple operating systems or simply have a desire to learn about them, Virtualization is a fantastic way to just that. Virtualization, in computing, is the creation of a virtual (rather than actual) version of something, such as a hardware platform, operating system, a storage device or network resources. Here is a good description tailored to the IT professional or CEO http://youtu.be/MnNX13yBzAU but you can get a good grasp of the concepts.

At my organization I have installed and manage a VMware ESXi clustered installation on a SAN (Storage Area Network) with hardware and software that starts in the six figures. This is obviously way out of reach of the home user or enthusiast. But Virtualization can be inexpensive and or downright free for the taking. Microsoft, VMware and Virtual Box all have freeware solutions!

For this article I am going to concentrate on the hardware required and the simplest to use application for the novice or even intermediate user – VirtualBox a freeware application by Oracle. So on to the hardware:

Virtualization product or solution such as VMWare Workstation (and the ‘industrial ESXi), VirtualBox and Windows Virtual PC often require Hardware Assisted Virtualization (HAV) CPU feature in order to function properly as it allows a virtual machine hypervisor to run an unmodified operating system without incurring significant emulation performance penalties. The largest chip makers, Intel and AMD implement hardware assisted virtualization in their processors as Intel VT (VT-x) and AMD-V respectively. However, not all modern CPU has hardware-assisted virtualization capability built-in though; you will want to make sure. The VT capability in the processor on the computer is built onto the tiny piece of chip, and cannot be added or removed using any manual process. And even if the CPU features VT, it must be enabled in BIOS.

Most newer CPUs include VT operation by default. However, some older or even current processors available for purchase for DIY or operating on OEM computers may not support VT. When there is no VT support, Virtual Machine Technologies based on VT may fail to install or cannot be powered up and started.

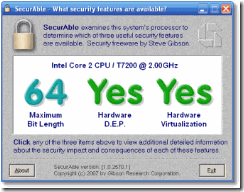
If you are going to create or use virtual machines you should verify, check, determine or get to know whether his or her PC computer supports hardware-assisted virtualization. There are a few software utilities you can use to quickly determine whether there is hardware virtualization system on the system CPU. One is name named SecurAble which is able to display hardware virtualization support status as Yes, No, Locked On and Locked Off. The other is Microsoft’s HAV Detection tool.

SecurAble Detects CPU Processor Security Features (Bit Length, DEP and Virtualization)

Most users who buy computer are just paying notice to the speed (how fast) and size of RAM memory (how big) of the PC. In fact, most modern CPU microprocessors have great lots of features and capabilities other than constantly higher clock rate. With the evolving of software development, some of these features are now required. With SecurAble, user can easily check and determine if the system is x86 or x64 architecture, support hardware DEP and/or hardware virtualization.
SecurAble probes the system’s processor, determine the presence, absence and operational status and displays the status of the three most significant security-related processor features:

  • 64-bit instruction extensions
  • Hardware support for detecting and preventing the execution of code in program data areas
  • Hardware support for system resource “virtualization”

clip_image001

All these features are deemed to be security-important by developer of SecurAble, GRC. 64-bit capable CPUs have the ability to run the 64-bit versions of Microsoft’s substantially more secure Windows XP, Windows Server 2003, Windows Vista, Windows Server 2008 and Windows 7 operating systems, which has the operating system kernel locked down. Hardware-enforced DEP can stop exploitation of buffer overflow attacks, while virtualization technology (VT) can be used to create fully contained environments that can be used to insulate the real hosting operating system from any actions taken by software running within the “virtual” environment.

SecurAble is free to use, and no installation require.

I use SecurAble the most for checking for Hardware-Assisted Virtualization.

Download SecurAble.

http://www.grc.com/securable.htm

Microsoft has also released a application tool that able to detect status of Hardware-Assisted Virtualization (HAV) support on the computer system’s CPU microprocessor. Aptly named as Hardware-Assisted Virtualization Detection Tool or simply as HAV Detection Tool, the utility can detect and check if the computer meets the processor requirements to run Windows Virtual PC, i.e. hardware-assisted virtualization.

clip_image002

Download HAV Detection Tool: havdetectiontool.exe

Using HAV Detection Tool is easy, just run the executable, and the results of whether hardware virtualization support is existed on the system or not (together with ability to install Windows Virtual PC) will be displayed on result dialog. It’s standalone program, thus no installation or un-installation required

So after you’ve determined you can run virtual machines with HAV you’ll want to try some VM’s out.

As I mentioned for home use I’ve found Virtual Box to be the easiest to use and configure. You can get it here and get the ‘Extension Pack’ here. Install the application first (get the right one for you platform – Windows, Mac, Linux) Then install the Extension pack; it will install automatically IF you’ve already installed the base application first.

Once installed you are ready to start working with just about any operating system you want to within your current system!

Here is a fantastic walk through of how to simply create a VM from a downloaded Linux installation disk (ISO)

This method can be used for installing Windows VMs too! If you have a Windows installation CD/DVD and you wish to install it as a VM you can. [For OS X you will have to follow some of the very specific tutorials I have put together – Apple does not like you to install OS X on non Apple hardware]

VirtualBox.org has a very detailed description and walkthroughs too, you can find that here.

The easiest way to get started with VirtualBox is to import an already made image/appliance. Virtualbox.org has many already made Linux installations you can get them here. And with a little diligent searching you can find LOADS of them.

I hope this helps some to get started and have a better understanding of these technologies. More knowledge and experience can only be good.

Here is an image of some of the VM’s on one of my home machines in Virtual box.

clip_image004

As I noted if you are interested in OS X VMs you can go here and read the second half on using Virtual Box. Here are two walkthroughs from other tech sites worth checking out too.

http://thetechjournal.com/electronics/computer/steps-to-install-mac-os-x-snow-leopard-in-virtualbox-on-windows-7.xhtml

and here: http://www.sysprobs.com/mac-os-guest-virtualbox-326-snow-leopard-1064-windows-7-32-bit