Another serious Web Browser hole

Contexis Security has found a BIG problem with WebGL implementations on Windows, Mac and Linux have numerous vulnerabilities which allow malicious web pages to capture any window on the system or crash the computer, according to research from Context Information Security. They actually demonstrate how to steal user data through web browsers using this vulnerability!

The report comes right on the heels of Microsoft’s denunciation yesterday of the security architecture of WebGL and announcement that it wouldn’t be seen in Microsoft products any time soon see here .

Sheesh! IE 9 is proving to be WAY more secure that FireFox and even Chrome! But until I can get the Firefox Extensions I use (or comparable) in IE I’m still a FireFox guy.

So let’s fix that:
To Disabe WebGL in Firefox 4

1. Type about:config in Firefox address bar and continue on through past the warning dialog.

2. Type "webgl.disabled" (no quotes) into the Filter box then Double click Webgl.disabled entry and turn its value into “True”.

3. Restart Firefox browser, WebGL is now disabled in Firefox 4.

To disable WebGL in Google Chrome you will need to:

1. Rright-click your Google Chrome shortcut or from your Windows menu on your desktop, click ‘properties’ and add “-disable-webgl” to the Target Shortcut box

2. Restart Chrome

As always please keep your systems, Web Browses and their plug-ins, Anti-virus/Antispyware software, and applications (especially Adobe products!!) up to date and fully patched.

And try and be vigilant about security and always ‘on guard’.

Latest Mac Malware news 06-04-2011

The Mac Trojan/Malware ‘MacDefender’ now calls itself ‘Mac Shield’.

The malware keeps changing names and looks but still is relatively the same as before. However it is still infecting loads of machines and is, in my opinion very dangerous; it lures users into providing sensitive financial information to thieves.

Sophos for Mac will remove it. (free) Get it here.

So will Virus Barrier Express from the Apple App Store; here. also free.

Here is my previous article too.

More on backups and archiving

“UPDATE!”

After a few weeks of removing loads of nasties from Windows and Mac machines and recovering data from dead or corrupted drives from both types of systems because of malware/viruses and hardware failures, I thought I would republish this.

I must ask you – in this digital age what price will you put on your data?! You family pictures, you financial documents and communications – everything? I don’t ask this lightly. For only a couple of hundred dollars you can KNOW that you will be safe!

People PLEASE HAVE A SYSTEM BACKUP – COMPLETE AND TESTED!!

I have been asked again to explain in more detail with examples of how I personally backup/archive my data. My previous article is here and should be read first.


So here it is in a simple, I hope, form.

I have two external HDDs (actually many but for example this will work) I use Acronis as my primary imaging software. If you use OS X you can use Time Machine, Carbon Copy or Apple’s built in disk image utility. I covered these in the post above.

To create my images I use an external HDD mount, like this.  with drives something like this or this. You can mount the drives in your system if you like or use any other external type of drive. I just like the ease and economy of this set up. It also makes it easy to just take the drives, place them back in the protective bags they come in and put them( rotate) into a safe deposit box.

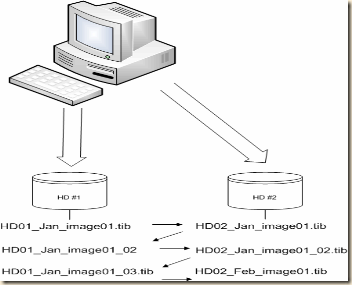
I create a full image of my system on external HD #1 on Jan 1st  – HD01_Jan_image01.tib
On Jan 2nd I create a full image of my system on external HD #2 – HD02_Jan_image01.tib

I now have two images on two separate drives.

At the end of week one for the month I create an incremental backup to external HD #1 – HD01_Jan_image01_02.tib (or whatever Acronis auto names it.)

At the end of week two for the month I create an incremental backup to external HD #2 – HD02_Jan_image01_02.tib

At the end of week three for the month I create an incremental backup to external HD #1 – HD01_Jan_image01_03.tib

On the 1st of the next month I create a new FULL image to HD #2 – HD02_Feb_image01.tib. Once that image is created I can then delete the previous months images ON THAT drive.

On the 2nd of the month I create a full image to HD #1 – HD01_Feb_image01.tib. Once that image is created I can then delete the previous months images ON THAT drive.

This assures me that if my system were to die AND one of my external drives failed I would lose no more that two weeks of data – usually just one week or less!

You should also copy or store one of the external drives in a fire safe or safe deposit box for true disaster recovery!

As with any good backup plan you should regularly test your backups! Either do a full restore (highly recommended) or at least validate and mount your images to insure they are fully readable.

If you wish to, or have to, for compliance issues (corporations) you can archive your monthly images to additional external drives. I do. I have images of machines that are long gone (some over ten years!) and I have been able to retrieve data I needed very easily and quickly. In fact I needed a Photoshop file recently that I was able to retrieve from one of my images of an old Mac G3!!
Archive3

I hope this helps. Please don’t be the person who loses important personal, family or business data because you couldn’t take a little time and effort to set up a backup and recovery plan. The costs and time are insignificant when compared to the cost of loss!

More OS X utilities

While this is an early Beta, I am very happy to see one of my favorite tools now available on OS X – CCleaner.

I have been using this for some time on ALL of my Windows machines. In fact I have it scripted for all my users – every time they login CCleaner is run. This helps keep any lurking nasty’s in temp folders from being able to be run – since they are removed.

This early Mac version does not of course have as many features as the Windows version yet but looks real promising. Have a try. I hope you find it useful.

You can get it here

You should also have (if you don’t already from my previous posts – Onyx

You can get that here

Security news – Gmail spear phishing attack

There are some very splashy news stories going around saying ‘Google was Hacked".. Oh no sky is falling.

Let’s be clear. GOOGLE WAS NOT HACKED!
What happened is that many ‘targeted users’ were ‘Phished’ – the users where ‘conned/tricked’ into giving up their security information and passwords. This is called ‘spear phishing’

Essentially Gmail’s login screen was mimicked, and people were tricked in ‘re-entering their information, and hundreds of Gmail accounts, including those of U.S. Officials were then compromised in this very targeted Phishing attack. You have to read a little bit into these articles to actually find the true nature of the supposed ‘attack’.

To be clear – Hacking is done by a very skilled person on whatever his target is, phishing is done by almost anyone to anyone dumb enough to let themselves be tricked!

Here is one headline

and another

Google’s blog page has more details here

The simple thing to take a way from this is to be ever cautious of where, when and how you enter in any information online – to ANYONE.
AND use strong passwords.

The way this attack was carried out can be seen in this analogy I used with someone.

Suppose you went to the bank ATM, put in your card and entered your PIN. You then carried out your transaction; looking up your balance and making a withdrawal. After you are finished you take your cash, receipt and card and prepare to walk away.

At that moment someone comes around the corner wearing a shirt with the bank name – looking ‘all official’ and asks to look at your card because the bank is ‘tightening up security for it’s special clients.

You hand it to him. He then asks for your PIN; you know just to make sure you are who you say you are. He writes down your name, card and PIN number and hands back your card and says, "thanks, we just have to be extra cautious nowdays…"

In this scenario you just handed that person everything they need to know about how to royally screw you.

This is the same thing that happens with these ‘phishing’ and other types of ‘social engineering’ cons and scams.

People – please use extrodinary caution when dealing with personal information.

Google has an awesome security protocol called ‘Two Step Authentication’ and it is well worth the extra time and effort to set up.

You can learn about Two step authentication in this video:

[Remember about Application Specific passwords if you use Gmail on your Smartphone or desktop (Outlook, Thunderbird etc.)]

Apple releases fix for MacDefender Trojan

Ok OS X folks. Looks like Apple finally is releasing a ‘fix/update’ for the MacDefender Trojan.

The update provides a File Quarantine definition for the "OSX.MacDefender.A" malware and Mac OS X 10.6.7 will now automatically update the definitions on a daily basis. The update will also search for and remove MacDefender and its known variants.

The knowledge base article is here 

and the actual download is here

Please update your systems.

My previous article is here.

MacDefender Trojoan Strikes Again!

Apple and Mac folks I’d like to welcome you to the Windows world of malicious and pernicious attacks – even ‘drive bys’. For over two decades I and the rest of the security world have been trying to inform people that NO networked system is safe from attack. Because of the sheer number and percentage of Windows machines vs. Mac and Linux machines, they have been the most easily targeted and exploited target. But that is changing! With the spread of OSX on the desktop and the realization by the malicious software vendors that Mac people are VERY EASILY duped and exploited because of their false sense of security, they are coming on strong and fast!

I recently wrote about the new Mac Trojan out and how to defend against it and remove it – read here. After 25 days Apple finally did put a notice and instructions on how to remove it. BUT only after telling their technicians AND users that 1st it didn’t exist and then that they would not provide help!

Mac malware authors have released a new, much more dangerous version of MacDefender trojan variant:

"Unlike the previous variants of this fake antivirus, no administrator’s password is required to install this program. Since any user with an administrator’s account – the default if there is just one user on a Mac – can install software in the Applications folder, a password is not needed. This package installs an application – the downloader – named avRunner, which then launches automatically. At the same time, the installation package deletes itself from the user’s Mac, so no traces of the original installer are left behind."
Please read this from ZDnet

Apple is promising an update to OS X "in the coming days" that will detect the malware and its known variants, remove it, and remain in order to warn the user if they download it again. But don’t hold your breath!

I’ve spent years worth of time dealing with people who have been ‘sold’ on the false idea that "Macs don’t get viruses or hacked". Wrong wrong wrong! OS X is built on a ‘*nix’ core – one of the oldest operating system architectures in the world. How could you NOT think that there are exploits around that are just waiting to be ported to the newest derivatives? What type of systems do you think the hackers/crackers where getting into in the 70’s and 80’s?
I fault Apple a great deal for this. They have been literally selling the LIE that Macs are not susceptible to hacks for years. AND people believe them!

Again welcome to the world of Windows PC responsible computing. Be careful or get burned.

Please practice safe computing folks.

MacDefender trojan/malware is currently spreading on Mac systems – let’s kill it!

MacDefender, is the rogue antimalware trojan currently spreading on Mac systems. This malware is known by a variety of names, including "Mac Defender", "MacProtector", "Mac Security", "Apple Security", and "Apple Security Center".  It is a great example of how ‘social engineering’ can be used to trick people into harming themselves. Below are clear and easy procedures for removing it, read the quick summary or follow the links at the end for walk-throughs with loads of screen shots

I have written recently about this here, but it appears more people are being ‘snagged’.

Apple support is being of absolutely NO help either! In fact they are telling their people,"Do not attempt to remove malware.." Read about that BS here if you wish. So I thought I’d again provide some tips.

Here is the simple summary of what to do:

  1. In Safari under "Preferences", at the bottom of the "General" tab (the first tab), uncheck "Open safe files". This will prevent Safari from starting threats like MacDefender automatically after downloading them.
  2. Open up "Activity Monitor" (this is in your Utilities folder within Applications)
  3. Find "MacDefender" (or whatever the malware is being called, MacProtector, Mac Security, etc)
  4. Highlight it then click "Quit Process" which looks like a big red stop sign at the top right of the Activity Monitor screen.
  5. Next, open System Preferences, and go to "Accounts". When it appears click on the "Login Items" button, select the program, and then click the "minus" button to remove it from Login Items.
  6. Next, navigate to your Applications folder, find the program, drag it to the trashcan, and then empty the trashcan. Yes. It’s really that simple to remove.

Here are the two best links I could find for simple walk-throughs. I would rather not repeat the tutorials they have already taken the time to do.
Their work is much appreciated.

Now the super links with detailed screen shots and some additional tips:
The HowToGeek.com site has a great walk through here.

VRT-blog has some good information on this also, read that here.

Folks, if you use a Mac and you connect it to any systems – especially the internet, please realize that you are vulnerable to attacks and hacks. NO system is immune to attack! Although Mac’s and Linux systems have benefited by a more secure file system/OS structure (for the most part) than previous Windows systems AND the fact that their numbers were small – about 8% of all network connected desktop machines and presented a ‘low volume’ target they are now increasingly being attacked. This is especially true since many Apple uses have been lied to and told they are invulnerable to attacks.

BE SAFE FOLKS!

The connection to Microsoft Exchange is unavailable. Outlook must be online or connected to complete – Cant add Outlook accounts…

How I recently fixed one hell of an Outlook 2007 to Exchange 2003 connection problem.

This occurred on brand new Windows 7 Enterprise AND brand new Windows XP workstations while trying to configure the Outlook clients to connect to our Exchange 2003 server.

The actual error is:
"The connection to Microsoft Exchange is unavailable. Outlook must be online or connected to complete – Cant add Outlook accounts.."

Worse still is that this problem did not occur one every new workstation! Windows XP or Windows 7 – only some random ones.

I checked all network/connectivity parameters I could – DNS, LDAP, RPC, TCP/IP etc., and otherwise checked routing and name resolution ad nauseum. And all checked out.
I had this problem a year or so ago but could not find any of my notes! Aggravating to no end. So I swore I would make sure to document my fix when I found one.
So Google here I come….

One of the first things I did then was this:
http://support.microsoft.com/kb/913843/en-us

I checked that the ‘Attendant’ service was running on Exchange; it has been for a few years.

And virtually everything mentioned in every article I could find – 5 days of searching and hundreds of pages!!
Like:
http://social.technet.microsoft.com/Forums/en-US/exchangesvrclients/thread/44a24ec6-33b5-4b66-9fdb-2318b4874fbc

and

http://social.technet.microsoft.com/Forums/en-US/exchangesvrclients/thread/1227b956-c533-4c08-b56d-150ad8486b4c

I also tried importing the Outlook registry keys from machines (both Windows 7 and Windows XP) that do work – still no joy.

I literally went 11 pages deep on Google http://goo.gl/EddW9 and many, many more deep from each of those, looking for a fix!

I read deep somewhere in one post that someone mentioned running ‘Outlook rpcdiag’ – I don’t remember that switch. I checked RPC on the machine(s) and it showed no errors already right..

But since this was a specific ‘Outlook’ switch I though what the hell.
So…
I ran:
"outlook /rpcdiag" from the command line.

It tried to ‘find connections error’ but did not report anything. Damn..
Then it just closed after it could not really start.

Then I started Outlook in Safemode (I was prompted to upon launching Outlook, but it can be run "outlook /safe").

I was then able to add and configure the Exchange account and get connected!!
I waited until it updated the mailbox completely.
Then I restarted Outlook normally and IT WORKS NOW on all of the affected boxes!

I am not sure if all of these steps need to be taken but I now have a plan to follow.

I hope this may help someone, because from most of the posts I read it is a MAJOR issue and MS is not doing much about it! At least I’ll have my notes.

How to create a VPN Connection on MAC OS X 10.5 Leopard

How to create a VPN Connection on MAC OS X 10.5 Leopard

This is a step-by-step guide on how to create a VPN Connection on a MAC OS X 10.5 Leopard System.

I recently had to do this again for some of our remote staff, so I thought I’d post it as a reminder to me and maybe help others who have asked in the past.

1. Go to ‘Apple’ –> ‘System Preferences’

clip_image002

2. Select ‘Network‘ from system preferences

clip_image003

3. In ‘Network‘ system preferences, click the ‘+‘ icon on the bottom left cover of window to make a new VPN Conection.

clip_image005

4. As shown in the image below, a new window appears. Click on the ‘Interface’ menu and see the list of choices and select ‘VPN’.

clip_image007

5. Next, Change the ‘VPN type‘ from ‘L2TP over IPSec’ to  ‘PPTP‘. And then In the ‘Service Name’ field, type in ‘VPN Office’ or ‘Company Name VPN’ or make one up. Once you have done, Click on ‘Create’

clip_image009

6. Next, we need to make a configuration. Select the ‘Confguration’ drop menu and select ‘Add Configuration’

clip_image011

7. A window will pop up, asking to name your new configuration. Type you ‘Company Name VPN’ here and then click ‘create’

clip_image013

8. Next, enter in your company’s ‘Server Address’ example; ‘server.domain.com’ or ‘72.14.213.x’ and ‘Username’, for example ‘administrator’ or ‘LarryHolmes’ or what ever

clip_image015

9. Next, Select the ‘Authentication settings’ button

clip_image017

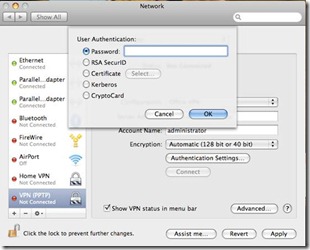
10. Enter in Your ‘password’ and click ‘OK’

clip_image019

11. Next, Click on the ‘Advanced’ Button

clip_image021

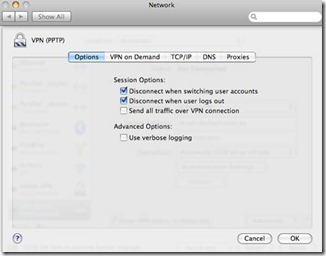
12. Make sure that ‘Send all traffic over VPN Connection’ is unticked. Then Click ‘OK’

clip_image023

14. Once you have done that, click ‘Apply’. And connect to your New Vpn Connection by clicking on ‘Connect’.

There you go…