OS X Virtual Machines Two Methods

I recently had the need to test some ‘fixes’ for a co-workers iMac. Since I don’t like to make system changes on ‘live’ machines I went to my Virtual Machines (VM) and was able to easily test what I needed. I mentioned that to a colleague and they asked me to explain how I was able to create VMs of OS X.  So I thought I would put together some of my older tutorials I’ve created and update and add loads of information for those that want it.

I have three Virtual Machine solutions I use. One is based on the industry leader – VM Ware, another the open source (and much improving) Virtual box and finally Microsoft’s Virtual Server (now HyperVisor). I will not discuss Microsoft’s VM solution here because I have not used it to create OS X VMs.

There is lots of information on how do create an OS X VM on both of these VM platforms but I hope I can give some of you some direction. There are now some greatly improved and easier to use ‘boot loaders’ and patches (kexts) for getting OS X to run in a VM or as a Hackintosh as mentioned in some of my previous posts. For some information on that check out these sites.

Hackintosh.com

OSx86 Project

myHack

Chameleon OSx86

Here is my workhorse server System configuration and specs:
Windows 2003 Server SP2
QuadCore Intel Core 2 Quad Q6600
Abit IP35 Pro
8GB RAM
1.5TB SATA HDD (7200RPM)
GeForce 9600 GT (512 MB)
2 Realtek RTL8169/8110 Gigabit Ethernet NIC
Using VMwave Server Console:
Version 1.0.0 build 28343

First up the solution I have been using the longest – VM Ware. I have included as many screen captures where necessary to show some of the configuration changes I made. The VirtualBox solution is actually really easy now so I will explain that one last.

To get it up and running I followed the steps here:

I followed that fairly closely with some exceptions which are in the screen captures below and I will note later*. These guys are great and should be recognized.

Some other sites that were of great help:

http://wiki.osx86project.org/wiki/index.php/Main_Page

I run an older version of VMware Server and so did not use the freely available VMware Player or the new VMware Server version2.x. Since my version is older, I suspect the newer free version would have worked as well. [After writing this and doing a lot of reading on the new – version 2.x of VMware Server- I now don’t think I would recommend it. Stick with the new free VMplayer/workstation version or VMWare server 1.5x or lower.]

I may try the new VMWare server versions on my other server eventually.  But if it’s not broke don’t futz with it.

VMware products are available here:

http://www.vmware.com/

http://www.vmware.com/download/player/

I own Virtual CD v9, Alcohol 120, and a few other CD emulators but I am sure you can find free ones. Here are a few:

DAEMON Tools lite

MS Virtual CD

MagicDisc

I have a few copies of Mac OS’s around from 9 on up to 10.5 (Legal for my Mac’s – some alive and some put to rest), But I decided to try a version that had already been prepped/patched for running on x86 – it is named the “Mac OS X 10.4.8 [JaS AMD-Intel-SSE2-SSE3 with PPF1 & PPF2].iso distro”. I some others I’m going to try too – “Kalyway_10.5.2_DVD_Intel_Amd.iso” and “JaS.OSx86.10.5.4.Client.Server.Intel.SSE2.SSE3.iso”

If you want those you will have to ‘hunt’ for them (there is a torrent of information available to you hunters our there…). There are continuing updates to some of these builds to include the latest loaders built in.

Also did an ‘upgrade’ with a new Snow Leopard disk I have.

And just so you know;

“Even though Apple suggests Mac users without Leopard buy the $169 Mac box set to get Snow Leopard, anyone can purchase the $29 Snow Leopard disc and install Snow Leopard in its entirety without having already installed Leopard. This means the $29 Snow Leopard DVD isn’t an "upgrade" at all; it’s the full-on Mac OS X operating system for 30 bucks.”

I bought a few upgrade disks here, since I will be upgrading my physical a well as virtual/Hackintosh ones.

Below is a capture of my ‘vmx’ file with the changes I made:

clip_image002

OS X ON VM Ware: Follow these instructions in the link I posted above. Just take note where I changed some options.

Here are some captures of one of my OSX ‘Virtual Machines’ running on my pc.

clip_image002[4]

clip_image004

clip_image006

clip_image008

clip_image010

clip_image012

I have reduced the plethora of VMWare VMs I was running to two for now (OSX and an Ubuntu desktop/client).

But I did have a couple of Vista’s instances, an Ubuntu Desktop, an Ubuntu Server, 2 WinXP, and Windows Server 2008 with Exchange 2007 and SQL2005(time limited) all running and talking to each other!

I use some of my images of existing (real world/live business servers – PDC, Exchange, SQL and other application servers) virtualized to experiment with upgrade/optimization strategies.

I just convert my recent images – (Acronis and Ghost type)together and converted to Virtual Machines [http://www.vmware.com/products/converter/get.html]. Big time and space issue now.

OS X on Virtual Box

First you will need the newest Virtual Box application, get it here. You will also need a ‘patched’ ISO version of OS X Snow Leopard such as one of the latest as mentioned above. Or  The group Hazard has put out a good patched Snow Leopard installer that should do fine (just search for it on Google). Of course, if you feel bad about downloading the ISO of Snow Leopard, you could always go buy a copy to feel a bit better, karmically.

Install VirtualBox.

Then click on New at the top left. At the Create New Virtual Machine window, click Next.

clip_image001

At this window type OSX as the name and it will automatically change the system and version. The next window will let you choose your RAM amount:

clip_image001[4]

If you can spare it, crank it up as far as you can go, but 1024MB should be sufficient.

clip_image001[6]

This is where you’ll make your hard disk. 30GB should be enough so what it comes down to is dynamic or static. Dynamic will expand on use and Static will be a fixed 30GB no matter how much data is actually in it. Dynamic is better for not taking up your hard drive but static will give you better performance. I normally use dynamic. Click next unless you want to change it from dynamic or if you want to increase the disk size or file location.

clip_image001[8]

It will show a summary of your settings. Click Finish, then click Settings at the top.  Make sure you choose only one ‘core’ for processor too.

At this window click on System in the left pane and uncheck Enable EFI

image

image

Now click on the Storage button on the left. From there click on Empty under the OSX.vdi, then click the folder with the green arrow on the right (next to "CD/DVD Device").

clip_image001[12]

clip_image001[14]

At this window click the Add button at the top. Then find and add the OSX86 ISO (Hazard or other) you downloaded earlier. Then highlight it and click Select at the bottom.

image

image

Then click OK, and hit the Start button on the left side of the main VirtualBox window.

image

As it starts up, click inside the window and hit F8. Then at the boot: prompt type –v so you can see what exactly went wrong if something does go wrong. All the services will run and eventually you should come to the language screen. Choose your language then click next.

If you are unable to move your mouse around then hit Right-Ctrl + I.  To ‘free your mouse to move outside of the VM window hit the right ‘Alt’ key.

Click Continue and Agree. Next, start up Disk Utility by going to Utilities in the menu bar.

clip_image001[16]

At this screen highlight 20GB VBOX HARDDISK. Then click the Erase tab, name it what you want in the name box and click the Erase button on the bottom right of the window. It shouldn’t take long. Then click Disk Utility in your menu bar and quit it.

Now you’re back at the installer. Highlight the drive that is now showing up and click Continue.

clip_image001[18]

The next window is important!

Don’t click ANYTHING YET!

Click the Customize button on the bottom left. Expand the options (arrows) and check the necessary boxes for your processor.

AMD Users check:
Any Updates included at the top.
Drop down Kernels and choose Legacy kernel.
AMD option below System support.

Intel Users check:
Any Updates included at the top.
Drop down bootloaders and check the newest Chameleon.
Drop down Kernels and choose Legacy kernel.

Then click Done and hit the Install button. To speed up the process you can click Skip when the disc check pops up.

clip_image001[20]

As soon as it says "installation finished" and starts counting down to restart, press the right Ctrl key. Click on Devices at the top of the VirtualBox window, hit CD/DVD Devices and click Unmount CD/DVD Device.  Remember you will probably have  to hit the right ‘Alt’ key to ‘free’ your mouse! Do that before you get to the end of the install.

Then go to Machine > Reset and click Reset at the prompt. Next you’ll see the Chameleon loader , click inside the VM and hit and hit enter and then OS X will begin to boot.

clip_image001[22]

After it boots you will see the setup screens for OS X! You’re good to go.

On a side note if you use NAT for networking you can control your Virtual Machines from any computer on your network or even remotely using a multitude of remote access solutions.

Emoticons

I was recently asked by a person new to the internet. [Yes there are still some.] “What do the ‘little thingy’s after some of my comments mean?” So I thought I’d put up list of emoticons. This is by no means definitive but it has most of what I know of. Enjoy

Originals:
🙂 smile [colon :and close parentheses ) ]
🙁 frown [colon : and open parentheses ( ]
😉 wink [semi-colon ; close parentheses ) ]
😛 or :Þ tongue sticking out: joke, sarcasm or disgusting [colon : and letter P]
8) has sunglasses: looking cool [number 8 and close parentheses ) ]
:O surprised [colon and letter O]
:S confused
:'( shedding a tear
XD laughing, eyes shut (LOL)
XP Tongue out, eyes shut
^_^ smiley
^.^ see above, but rather than a wide, closed mouth, a small mouth is present
^_~ wink
>_< angry, frustrated
=_= bored
-_- annoyed
-_-‘ or ^_^’ or ^_^;; nervousness, sweatdrop or embarrassed.
¬_¬ or <_< "yeah, right…", looking around suspiciously
;_; crying
o_O Confused
O_O Shocked
O_< Flinch, wink, twiching
._. intimidated, sad, ashamed
$_$ Money Eyes; Thinking about Money
x_x Dead or Knocked Out
9_9 Eye Rolling
*_* Star-Struck
t(-_-t) or ,|,,(-_-),,|, Flipping off
=^_^= blushing, or a cat face
u.u duh, sarcastic "what do you think?" face
\m/>_<\m/ Rockin’ out

——————
Assicons:
(_!_) a regular ass

(__!__) a fat ass

(!) a tight ass

(_._) a flat ass

(_*_) a sore ass loser

(_o_) an ass that’s been around

(_O_) an ass that’s been around even more

(_?_) a dumb ass

(_o^^o_) a wise ass

(_E=mc2_) a smart ass

(_13_) an unlucky ass

( Y ) a butt

(_$_) money coming out of his/her ass

(_#_) taking an ass pounding

(_x_) kiss my ass

—————
Boobiecons:
.Y. flat boobies

(.Y.) curvy boobies

( . Y . ) fat boobies

( o Y o ) boobiecons

(.)(.) little boobies

(o)(o) regular boobies

( O )( O ) big boobies

( ‘ ) ( ‘ ) perky boobies

( , ) ( , ) droopy boobies

{.} {.} cold boobies

( @ ) ( @ ) hairy boobies

[ _ ] [ _ ] android boobies

( $ )( $ ) silicon boobies

——————-
More advance Emoticons:

    * @>–;– A rose
    * 0*-) Angel wink – female
    * :-Z Angry face
    * >:-( Annoyed
    * ~~8-O Bad-Hair Day
    * 🙂 Basic
    * :~-( Bawling
    * (:-{~ Beard – long
    * %-| Been up All Night
    * (:-) Big Face
    * (((H))) Big Hug
    * =|:o} Bill Clinton smiley
    * ?-( Black Eye
    * #-) Blinking
    * I:( Botox smiley
    * %-6 Brain Dead
    * :-E Bucktoothed Vampire
    * :-#| Bushy Mustache
    * })i({ Butterfly – an even prettier one
    * q:-) Catcher
    * ;-( Chin up
    * :-.) Cindy Crawford
    * :-8( Condescending Stare
    * H-) Cross-Eyed
    * :*( Crying softly
    * :-@! Cursing
    * %-} Dizzy
    * :*) Drinking every night
    * :#) Drunk
    * :-6 Eating Something Spicy
    * 5:-) Elvis
    * 0|-) Enjoying the Sun
    * >-) Evil Grin
    * l:-O FlatTop Loudmouth
    * =:-H Football player
    * :^{= Frank Zappa
    * /:-) Frenchman with a beret
    * *:* Fuzzy
    * ~~:-( Getting Rained On
    * :oÞ Grinning and sticking tongue out (type ALT+0222 on righthand number keypad)
    * :-}) Handlebar Mustache
    * :%)% Has Acne
    * :-`| Have a Cold
    * l^o Hepcat
    * (_8^(|) Homer Simpson
    * *^_^* Huge Dazzling Grin – it’s a straight-on smiley
    * :0 Hungry
    * %*} Inebriated
    * (8 { John Lennon
    * :-* Kiss on the cheek
    * >* Kitty doesn’t like taking its pill
    * :p Kitty with tongue hanging out
    * @(*0*)@ Koala – it’s a straight-on smiley
    * (-: Left Hand
    * >;-> Lewd Remark
    * ;-, Like, Duh
    * %+{ Lost a Fight
    * X-( Mad
    * :-(*) Makes Me Sick
    * @@@@:-) Marge Simpson
    * #:-) Messy Hair
    * 🙂 Midget
    * :-3 Mustache (Handlebar Type)
    * :-# My Lips Are Sealed
    * ):-( Nordic
    * 😯 Omigod!
    * 8> Penguin
    * 3:] Pet Dog
    * :—) Pinnochio
    * 3:[ Pitbull
    * +<:-) Pope
    * +:-) Priest
    * ?-) Proud of black eye
    * =:-( Punk Not Smiling
    * :-r Rasberry
    * :-C Real Unhappy
    * :-)) Really Happy
    * [:] Robot
    * 3:*> Rudolph the red nose reindeer
    * 🙁 Sad Turtle
    * :-y Said with a Smile variation
    * *<|:-) Santa Claus
    * :-@ Screaming
    * $__$ Sees Money
    * 8-0 Shocked
    * :-V Shouting
    * ~:-P Single Hair
    * ‘:-/ Skeptical again
    * O-) Smiley After Smoking a Banana
    * :-, Smirk
    * :- i Smoking a cig
    * :-Q Smoking while talking
    * 🙁 <| Standing Firm
    * %-) Staring at a Screen for 15 hours
    * /8^{~ Sunglasses, Mustache, Goatee
    * `:-) Sweating
    * :-0 Talkative
    * -(:)(0)=8 Teletubby
    * :- ? Tongue Sticking Out
    * :-a Tongue Touching Nose
    * }(:-( Toupee Blowing in Wind
    * x:-/ Uncertain
    * 😐 Unfazed
    * |:-| Unyielding
    * :-))) Very Happy
    * (:-( Very Unhappy
    * @:-) Wavy Hair
    * [:-) Wearing a Walkman
    * B-) Wearing Glasses
    * ]-I Wearing Sunglasses
    * :-1 Whatever
    * ;^? Wigged Out
    * ,-) Winking Happy
    * 8<:-) Wizard
    * :~) Wondering
    * l-O Yawning
    * :-(0) Yelling
    * $-) Yuppie

    * O:-) Angel
    * 0;-) Angel wink – male
    * :-{{ Angry Very
    * ~:o Baby
    * d:-) Baseball
    * :-{0 Basic Mustache
    * :-){ Beard
    * : = Beaver
    * :-)^< Big Boy
    * :-)8< Big Girl
    * :-X Big Wet Kiss
    * (:-D Blabber Mouth
    * (:- Blank Expression
    * :-] Blockhead
    * :-}X Bow Tie-Wearing
    * :-(=) Bucktoothed
    * :-F Bucktoothed Vampire with One Tooth Missing
    * }|{ Butterfly
    * }:-X Cat
    * C=:-) Chef
    * *<<<<+ Christmas Tree
    * *<):o) Clown
    * %) Confused
    * :`-( Crying
    * &:-) Curly Hair
    * >:-> Devilish
    * :3-] Dog
    * :-B Drooling out of Both Sides of Mouth
    * <:-l Dunce
    * (:-| Egghead
    * :-} Embarrassed Smile
    * >:) Evil
    * G(-‘.’G) Fighting Kid – it’s a straight-on smiley
    * :-! Foot in Mouth
    * :-W Forked Tongue
    * %*@:-) Freaking Out
    * 8) Frog
    * *:*} Fuzzy With a Mustache
    * 8*) Glasses and a Half Mustache
    * }:-) Hair Parted in the Middle Sticking up on Sides
    * :-‘ Has a Dimple
    * :(#) Has Braces variation
    * /;-) Heavy Eyebrows – Slanted
    * (_8(|) Homer Simpson
    * (^~^~^) Hot Ass Walking Away
    * %*@:-( Hungover with headache
    * o[-<]: I am a skater or I like to skate
    * (|):-)=II= Jewish Blonde
    * @:-} Just Back From Hairdresser
    * >^,,^< Kitty Cat – it’s a straight-on smiley
    * ~*= Kitty running away from you
    * >:-l Klingon
    * %OD Laughing like crazy
    * ?-: Left Handed Tongue Touching Nose
    * :-9 Licking Lips
    * 8:-) Little Girl
    * |-( Lost Contact Lenses
    * &-l Makes Me Cry
    * :-S Makes No Sense
    * @|-) Meditating Smiley
    * 8(:-) Mickey Mouse
    * :-{ Mustache
    * {:-{)} Mustache and Beard
    * (-) Needs Haircut
    * :/) Not Amused
    * :=) Orangutan
    * :^) Personality
    * :8) Pig
    * P-( Pirate
    * }:^#) Pointy Nosed
    * :-t Pouting
    * X:-) Propeller Head
    * =:-) Punk
    * <(-‘.’-)> Puppy dog – it’s a straight-on smiley
    * (((((:-{= Rave Dude
    * ~:-( Really Bummed Out
    * ([( Robocop
    * @};— Rose
    * 🙁 Sad
    * :-d Said with a smile
    * M:-) Saluting
    * :-> Sarcastic
    * )8-) Scuba Diver with Hair
    * :-i Semi-Smile
    * +-( Shot Between the Eyes
    * :O Singing
    * :-/ Skeptical
    * :-7 Skeptical variation
    * ):-) Smiley with Hair
    * ;^) Smirking
    * 😕 Smoking a pipe
    * ~~~~8} Snake
    * =%-O Stared at Computer Way Too Long
    * (8-{)} Sunglasses, Mustache, Beard
    * :0 Surprised
    * ,:-) Sweating on the Other Side
    * &-| Tearful
    * :-)— Thin as a Pin
    * :-& Tongue Tied
    * *!#*!^*&:- Total Head Case
    * <:>== Turkey
    * =):-) Uncle Sam
    * |:-) Unibrow
    * :-[ Vampire
    * %’) Very Tired
    * :-< Walrus
    * {(:-) Wearing a Toupee
    * 😎 Wearing Contacts
    * :-{} Wearing Lipstick
    * {:-) Wears a Toupee
    * :-" Whistling
    * ‘-) Winking
    * 😉 Winking variation
    * :-)8 : Woman
    * ,-} Wry and Winking
    * |^o Yawning or Snoring variation
    * =8-0 Yikes!

Google Voice Tips Tricks and Tutorials

I am a huge fan of Google voice. I use it for both my personal, and professional life. I am able to set up rules for contact groups that define many different scenarios. I like that I can give my Google voice number to my family and close friends and know that I can be reached no matter where I am – I can and do ring multiple phones. For business I can ring my office AND my cell ONLY during business hours and then after business hours only my office line is rung or people are sent right to voice mail. The list of really cool things that can be done is just limited to your imagination.

I am constantly asked for tips on how I do all this so I put together as many good and simple tips as I could find in this post. There are sure to be many many more if you just search for ‘Google Voice Tips’.

BIG TIP: To edit or create forwarding schedules you need to us “Legacy Google Voice” which is the old format.
Under that format, you can forward calls on a schedule (calls, edit, advanced settings).

To get a Google voice number you will of course need a Gmail/Google account.
You can get that here

Then sign up for Google voice here

Find and choose a number locally (or actually in any area code you prefer). I recommend doing a search for something that has a mnemonic – like ‘coffee1’ (263-3331) or some other easy to remember number.

And before you ‘set up’ your Google voice  number check out these articles and walk through’s.

Great Google Voice information:

http://www.google.com/googlevoice/about.html

http://www.youtube.com/watch?v=oFVXAqFNgic&feature=player_embedded

http://www.youtube.com/watch?v=m4Q9MJdT5Ds&feature=player_embedded

http://lifehacker.com/5311254/how-to-ease-your-transition-to-google-voice

http://mycraniumdrain.blogspot.com/2009/08/more-on-google-voice.html

And here are some other excellent video demonstrations and how to’s. They are short, quick and easy to follow:

Call Screening:
Listen In

Block Calls

SMS

Place calls anywhere

Taking/Receiving calls

Phone Routing

Forwarding Phones

Voicemail Transcripts

Listen to voicemail

Notifications

Personalize Greeting

Share voicemail

Conference Calling

Call Record

Call switch

Mobile Site

GOOG-411

Manage Groups

WordPress 500 internal Server Error xmlrpc.php fix part 2

I had this issue previously and it appeared resolved. But it has returned after upgrading my WordPress installation to 3.x.

So I tried the simple thing of just disabling all my plug-ins but that didn’t do it this time.

I had to do that (disable my plug-ins as described here) and all this too!

I hope this helps some of you. Please make sure you have a complete backup of our MYSQL dbase AND your blog in case you hose something! I am a nut about backups and you should be too.

OK so..

Do this:
1. Using either FTP or CPanel, navigate to your WordPress root directory.
2. You should find the file “xmlrpc.php” there. Make a back up copy of it, just in case. Download it and then.
3. Open xmlrpc.php in an editor
4. Go to the end of the file.
5. Put your cursor after the final ?>
6. Delete anything there, including spaces, or blank lines.
7. Save the edited xmlrpc.php back to your WordPress root directory. [I also changed the permissions on this file to allow the Owner to ‘Execute’ too!]

image

Then:

If you don’t have one (php.ini) then create a text file and name it “php.ini” (without the quotes 😉 ) and with a single line of code in it:

memory=20MB

[If you have one just add that line.]
This file has to be placed into the root directory OR /wp-admin/ within your WordPress installation.
It caused me problems being in the /wp-admin/ directory so I deleted it from there and place it in the root of my blog /mysite/blog/
So keep that in mind!
Also if you are creating the file locally and then uploading it make sure you change the file to a .ini and it does not still have the .txt extension on it.

Then you might want to find your .htaccess file
[It is a hidden file! So if you are using an FTP client make sure you set your ‘filter’ with the ‘-a’ option to ‘see hidden files’ and directories.]
Add this line to the beginning of the file:

AddType x-mapp-php5 .php
AddHandler x-mapp-php5 .php
<Files xmlrpc.php>
SecFilterInheritance Off
</Files>

And lastly I did this

Run the following database query to change the data type on the post_parent column:

ALTER TABLE wp_posts CHANGE post_parent post_parent BIGINT;

So after a few hours of aggravation I can now publish posts with loads of content from Window Live Writer again!

UPDATE: This guy here has a new solution for 1&1 users that works well!

Obama’s out of control spending and oil spill response some perspective.

Consider that from Jan. 20, 2001, to Jan. 20, 2009, the debt held by the public grew $3 trillion under Mr. Bush—to $6.3 trillion from $3.3 trillion at a time when the national economy grew as well.

By comparison, from the day Mr. Obama took office last year to the end of the current fiscal year, according to the Office of Management and Budget, the debt held by the public will grow by $3.3 trillion. In 20 months, Mr. Obama will add as much debt as Mr. Bush ran up in eight years! And it is projected that with the ‘health care reform’, additional government programs and funding Obama is asking that number will double by the time his term is up!

Our federal debt vs. our GDP is the highest it’s been since the end of WWII.

usgs_line.php

[source: usgovernmentspenging.com]

And on employment:

A chart of unemployment since 1995

[Source for the unemployment figures: a spreadsheet taken from the Bureau of Labor Statistics website. Republican period: January 1995-December 2006. Democrat period: January 2007-June 2010.]

unemployment-chart-july-7-2010_01

click on image for full size

And now the kicker:

Whose response to disaster was more appropriate and timely?

Oil Spill Timeline from RightChange on Vimeo.

I could go on ad infinitum, but I am just tired. I hope people will get responsible and throw out all of our current politicians. It’s time for our government to get back in the hands of those it’s supposed to be in – ours. Not narcissistic ego maniacs drunk with power and privileged we ‘common folk’ could only dream of.

More on BP Oil Leak Cleanup

Kevin Costner  says he has the solution that will save the Gulf of Mexico from BP’s ruinous oil catastrophe. He’s not kidding. Watch him talk about this machine that, according to him, extracts 97% of oil from the water.

Costner has been funding this project for 15 years (and invested at least 20 million dollars!), which was spearheaded by his brother. They have a model that processes 200 gallons of water per minute. I don’t know how if it will work in open waters, but it won’t hurt to try. And if it works, let’s build a navy of these things now.


Here’s the company:

There is a problem though:
This is well intentioned, but would require huge quantities of these devices and/or much larger ones.

Here is why:
MATH
The most heavy duty of these prototypes is said to handle 200 gallons a minute.
200 / 42 = 4.76 barrels per minute.
It is estimated that 50,000 barrels a day, or 2,100,000 gals per day (34.7 barrels per min), is being leaked.

Apparently BP has already ordered 32 of these. They’ll have to get a whole lot more.

Let’s hope they work.

More on Cloud Storage, Backup, Synchronization and Sharing Using Dropbox, Livesync and now Office Live.

I have written previously about cloud storage and backup solutions and how to use those to synchronize data between your many systems at different locations on differing platforms. Most cloud storage and synchronization services can synchronize between differing operating systems too! You can share and access files from Windows, OS X, Linux and even Smartphones. With this post I’d like to just add update some information on how you can use Windows Live services (OfficeLive, and Skydrive) and Dropbox.

1st. OfficeLive.

There have been some exciting recent announcements regarding Microsoft’s cloud storage and synchronization services that have made their offering even more compelling than ever. If you’ve read my previous post (link above) you already know I am a fan of SkyDrive. You can use SkyDrive to upload, store and share photos, documents and data both privately and publicly -  it offers a whopping 25GB of free cloud storage and it integrates nicely with Office 2010. You can use this free service on both a Windows PC and a Mac computer.

Microsoft’s Office Web Application is now live on SkyDrive! It’s called Office Live. You can access Microsoft’s Office web version on your browser.

Office Live now provides for access to Microsoft’s Office suite of applications even if you don’t have MS Office installed on the system you are on! If you just use the Office Live portion you get a default 5GB of storage, but by using your SkyDrive account you get the full 25GB of storage.

While Goolge Docs has allowed for the sharing and publishing of individual documents to the web for a long time, Office Live(and SkyDrive) and Dropbox provide for true sharing of folders with individual, groups or the public. With Office Live you can create a truly amazing collaborative workspaces. Check out this video!

Instead of going through a long and detailed walk through I’ve put together a bunch of links and videos that YOU can go through. Suffice it to say I believe you should use at least one of these services to backup or synchronize your data across the ‘cloud’.

Here is a good how to on SkyDrive

And another.

You can get started with Office Live here.

Here are some very good Office Live and SkyDrive Links. I would highly recommend spending a few hours and going over these. The future of data storage and retrieval is tightly integrated to web services and the ‘cloud’.  Here are some links:

01, 02, 03, 04, 05, If you do a search for Office Live or SkyDrive you should find many more.

2nd. Dropbox.

I have also found this service highly useful for sharing files with other people with whom I am working.
What is Dropbox?
Dropbox  is a “cloud computing” Web2.0 file hosting service offering both free and paid services. The free version offers 2GB of “shared storage”. The difference between SkyDrive/OfficeLive and Dropbox is that Dropbox requires software to be installed onto your system. Something I am not always fond of but this does work well.

Dropbox is file hosting service which enable users to synchronize files and folders between computers across the internet.
This is done by installing a software and then picking a “shared folder” on your computer. From that moment on, that folder will be synced with any computer you choose to install the software on (for example, your home/work computer, your laptop – and so on).

DropBox also enables users to share some of their folders with other DropBox users. This seamless integration of the service with your OS file system (Windows, Mac or Linux) is what’s making this service so comfortable, by allowing me to work with co-workers and have the same “project tree” of folders, all of which are always synced.
You could also share a file “online”, by getting a link to it which you could share with others.

While I will always believe in ‘hard storage’ especially for highly sensitive and personal information you should also look into ‘cloud storage’. You should always have a rocks solid local backup solution but collaboration and the ability to have your information available nearly everywhere is invaluable. If not to store and backup your data, at least for it’s huge collaborative possibilities. That is what I primarily use it for.

I really hope some of you will use this information to make your life, and possibly jobs easier and more productive. As we head into the second decade of the 21st century it’s exciting to see how we can have our information available nearly everywhere and be able to usefully share that information with anyone in the world.

Speed Up Windows 7 with ReadyBoost and Removable Drives

When your PC and especially a netbook goes low on memory (RAM), it is bound to slow down. It does try to get that extra memory from the hard disk, but that hardly enhances the overall performance.
Most netbooks ship with 1Gb of Ram, and many older netbooks shipped with even less.  Even if you want to add more ram, often they can only be upgraded to a max of 2GB.  With ReadyBoost in Windows 7, it’s easy to boost your system’s performance with flash memory.  If your netbook has an SD card slot, you can insert a memory card into it and just leave it there to always boost your netbook’s memory; otherwise, you can use a standard USB flash drive the same way. Also, you can use ReadyBoost on any desktop or laptop with Windows Vista or Windows 7; ones with limited memory will see the most performance increase from using it.

ReadyBoost is a feature in Windows which helps it make use of the flash memory of an external USB flash drive when it needs it. It can speed up PC when RAM goes over limit, and also works with multiple devices in Windows 7.  You may even notice better battery life when multitasking with ReadyBoost, as it lets you use your hard drive less.

So how much should you use? Microsoft recommends, “a 1:1 ratio of Flash to system memory at the low end and as high as 2.5:1 flash to system memory.” So if you have 4GB of RAM, you should pair it with at least a 4GB USB drive, but a 16GB USB stick would be overkill.

Here’s a step by step process to use this feature.

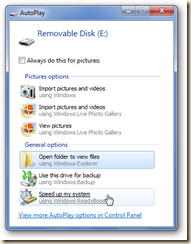
Insert an SD card into your card reader, or connect a USB flash drive to a USB port on your computer.  Windows should automatically ( via AutoPlay) see if your flash memory is ReadyBoost capable, and if so, you can directly choose to speed up your computer with ReadyBoost.

sshot98

If you don’t see that as an option, you may still be in luck.
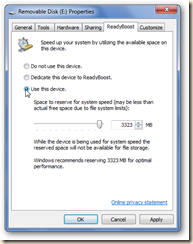
Open Windows Explorer or My Computer and try configuring ReadyBoost by right-clicking the device in Windows Explorer, clicking Properties, and then clicking the ReadyBoost tab. The only configuration option is to configure the space reserved for the cache.

sshot1013

Click Ok, and Windows will setup ReadyBoost and start using it to speed up your computer.  It will automatically use ReadyBoost whenever the card is connected to the computer.

You should choose at least 256MB. But according to Microsoft, for Windows 7 your flash drive should have at least 1 GB free space. For best results you should use flash drive with double the amount of RAM space available in your computer.

You can also click on the option “Dedicate this device to Readyboost”. This option will use maximum available space on the external media for Readyboost process.

If you need to remove your drive to use elsewhere, simply eject as normal. Windows will inform you that the drive is currently being used.  Make sure you have closed any programs or files you had open from the drive, and then press Continue to stop ReadyBoost and eject your drive.

If you remove the drive without ejecting it, the ReadyBoost file may still remain on the drive.  You can delete this to save space on the drive, and the cache will be recreated when you use ReadyBoost next time.

Worried about someone pulling out your USB stick and walking away with the files you’ve been working on for months? Don’t be. Information on ReadyBoost drives or disks is safe from casual hackers. All files on removable drives are encrypted with Advanced Encryption Standard (AES) 128.  In any case, while ReadyBoost stores data and programs as files, and not as raw data, you can’t access these files as if the USB stick was a normal drive.

Here is a short video from MS

Something to consider;

Unfortunately, not all SD and CF cards, or even USB flash drives, work with ReadyBoost. While some storage media advertise that they’re “enhanced for Windows ReadyBoost,” they may not actually be ReadyBoost worthy.

Here is a good list from NewEgg. One of my favorite technology sources.

If you have a netbook or laptop this can do a lot for your performance. I hope this helps.

Windows Live Writer WordPress 500 Internal Server Error

This problem cropped up and recently and really got me pissed.

I absolutely LOVE Windows Live Writer. If you post often to sites or blogs this is probably the best tool I’ve found for easy posting, short of a full fledged website/content management application or system [Dreamweaver, SharePoint or the like]. I will post much more in the future on all you can do with this application or you can just ‘Google’ your time away and look for tips.

But.
Basically what happed when I used Windows Live Writer to upload my blog post to one of my websites that has a WordPress installation I then got the error message with the xmlrpc.php:

image

So I set out to find the solution with the best support tool around – Google

I tried this:
http://affiliate-minder.com/wordpresstutorials/livewriter-500-server-error-xmlrpc/
and this:
http://www.codedifferent.com/2009/01/12/solution-for-500-internal-server-error-after-upgrading-to-wordpress-27-at-1and1-server/
and this:
http://www.mindtweaks.com/wordpress/?p=233
and this:
http://ardentdev.com/fix-for-wordpress-xmlrpc-500-internal-server-error/
and this:
http://wordpress.org/tags/500-internal-server-error/page/2
and this:
http://www.43things.com/things/view/425695/find-out-why-xmlrpcphp-isnt-working-on-my-wordpress-blog
and a whole bunch of others.

I messed with php files, ini’s, mysql tables, and on and on.

NONE WORKED!

Then I found a site that suggested something silly:

“disable/deactivate all your plug-ins, try uploading and see what happens.”

Well dang if that didn’t work!!

I then just re-activated my plug-ins and all was good.

Maybe some of you might use this info one day.

Real Credit Score Answers

Identity theft is all over the TV adds, and internet these days. Making it seem as if everyone will be a victim whereby they lose all their money and have their credit completely ruined.

Truth is this will probably NOT happen to the vast majority of people EVER! Heck, my own brother had his messed up by an illegal alien not 20miles from his home – and the police could do nothing but tell him to ‘start watching’ his credit more and put fraud alerts on his accounts! It does happen, just not that often and the results can usually be resolved fairly easily – not quickly but easily.

Don’t get me wrong you should still be careful.

But remember your bank and credit card company already have some pretty strict identity theft protections in place already–they’re the ones who usually wind up footing the bill, after all. But beyond that there are some pretty simple steps that you can take yourself, such as getting your annual credit report, regularly checking your bank statements for odd charges.

But please don’t get suckered into things like ‘LifeLock’.

This March, LifeLock had to settle with the Federal Trade Commission for $12 million amidst charges that they were lying about what their services could do, mainly because they were. According to the chairman of the FTC, Jon Leibowitz, LifeLock’s protection "left enough holes that you could drive a truck through it,"

The sort of thing LifeLock protects you from is mainly people opening up new credit accounts, which is only 17 percent of existing identity theft. If someone used your identity to get medical care, a new job or even if they just took your credit card for a joyride, you wouldn’t hear a thing until the bank showed up to repossess your new car that you didn’t know you bought.

I admit, your credit score determines some rather important factors in your life, such as how easily you can get a loan, or buy a house. But it is not all that mystical and flowing. And it is very easy to get your current status and learn how to clean up your credit by yourself.

There are hundreds of companies offering to ‘give’ you a ‘free credit report’ if you sign up for their monthly service – usually at an incredibly high right (average of $15/mo).

The amazing thing is, you can get your credit report completely free at AnnualCreditReport.com. You can do this once a year, which may not sound like much, but your credit score really doesn’t change very rapidly. Right Here:

https://www.annualcreditreport.com/cra/index

This central site allows you to request a free credit file disclosure, commonly called a credit report, once every 12 months from each of the nationwide consumer credit reporting companies: Equifax, Experian and TransUnion.

Here is what they are about:

https://www.annualcreditreport.com/cra/helpabout

Ok let’s start.

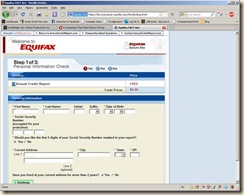
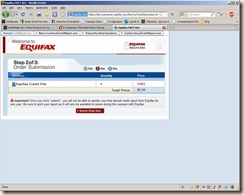
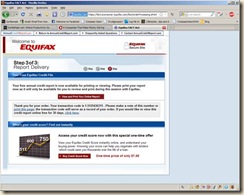
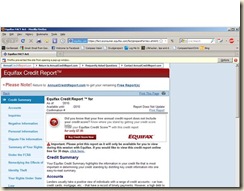
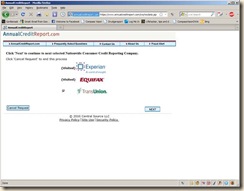
Select your state and start the process. I am going to show most of the process and explain where you should take care to open the reports in a separate window for printing so you won’t ‘lose your place’ on the original web site.

clip_image002

clip_image004

clip_image006

clip_image008

clip_image010

clip_image012

Then ‘Right Click’ on Print your report and choose ‘open in new window’ and then print out the report!

Close the print window and don’t leave this page yet!

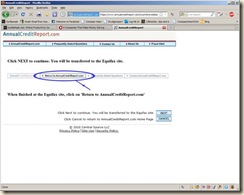
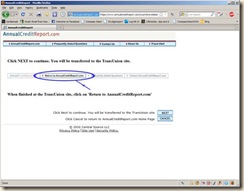
Now go up to the ‘Return to AnnualCreditReport.com’ link at the top of the page to do the same for the other two agencies.

clip_image014

clip_image015

clip_image017

clip_image019

clip_image021

Right-click on the ‘View and Print Your Online Report’ button and choose ‘Open in New Window’

clip_image023

Note there are two items to print here.

Click on the Print This Page and another window will pop up you can then print it out.

Then click on Print Report and print out the entire report page that pops up.

Once again:

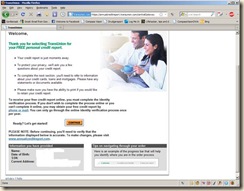
clip_image024Please Note! Click on Return to: AnnualCreditReport.com to get your remaining Free Report(s)

clip_image025

clip_image027

clip_image029

clip_image031

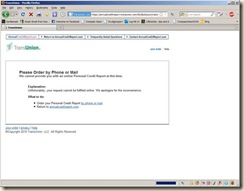
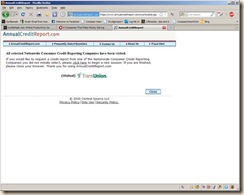
You may get this:

clip_image033

I did.

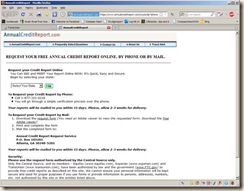
So I right-clicked on ‘by phone or mail’ and got this:

clip_image035

Right-click on ‘the link ‘request form’ and choose ‘save file as’ or ‘save target as’ depending on your browser.

Save the form and print it out and fill it out and mail it

· Print and complete the form

· Mail the completed form to:
Annual Credit Report Request Service
P.O. Box 105281
Atlanta, GA 30348-5281

The you should get this window:

clip_image037

I hope this helps some of you. Keep safe out there.

Peace.