Backing up Android phones

I’ve said this before many times before and I’ll keep on saying it, – back your sh$t up! If you do not have a backup solution for your digital information and devices, it is just a matter of time before you lose it/them and are screwed (or at least severely compromised).
I have written numerous posts on how to back up your Mac or Windows machines – just search my blog for those. Here I wanted to get into backing up your Smartphone.

These days most people have a wealth of information on their cell phones. Particularly the latest smart phones. These are now full featured computers that contain so much information it is truly incredible. Once one has upgraded or purchased a phone, gone through the process of getting it configured to their liking, adjusting all the system settings/functions and installed and configured applications it really sucks to have to do it all over again if you ever lose your phone and have to replace it, have to ‘wipe’ your phone (whether it’s done remotely for security reasons or by a store technician) or have an application issues that causes system crashes. And sometimes you can never seem to get all of your applications and settings back to where they were.

Enter Titanium Backup. This is the must have application for every Android phone. AND the number one reason (in my opinion) to ‘root’ your phone. With the simple ‘One-Click’ root available for most Android phones that Idescribed here it is very simple to gain root access. Once you’ve rooted your phone head over to Android Market and install it. The basic application is free and can do most things you will need. But I would still recommend buying the Pro Key to add a few other VERY powerful features.

The users guide can be found here. And a pretty decent video is here (pay particular attention to the point of ‘freezing apps’ around the 1:43 mark).

Here is another very good (and long/detailed) review and tutorial on the many benefits and functions of the Pro Version. I’d suggest you watch it for some fantastic tips and maybe some other uses for your situation(s).

Take your time and figure out this application and please USE IT. I have mine set up to back up every night locally and to DropBox (only available on the Pro Version). But I’m a back up fiend, you may be OK with weekly backups.

I also have used this to ‘Freeze’ applications and actually uninstall carrier ‘bloatware’ and crap hogging up data and space. SOME CARRIER APPS ARE ROBBING YOU OF YOUR CARRIER DATA LIMITS AND YOU MAY NOT KNOW IT! (more on that in my next post!)

Manage Applications – Freezing and uninstalling with Titanium

clip_image001

List of apps

Tapping the “Backup/Restore” button brings you to the application list – or rather the list of available “items”. Here you can see which applications and settings are available on your phone, and what has already been backed up (the symbols to the right tell you the latter – hit your phones menu button and select “Legend” for details on what they mean).

Tapping an application brings up a popup from which you can select actions to be taken with the selected item: You can e.g. run an application, back it up, and restore it (or its settings). You also may also decide to un-install the application – even if it is a system app! But with the latter, you should be very careful: Remove the wrong thing, and your phone may start malfunctioning; which is why you should first try whether it’s safe to remove that system application. This can be done by “freezing” it.

clip_image003

Properties of a backup

Freezing is only available with the PRO/Donate version. It makes the application unavailable to the system without deleting it. If your phone starts with some strange behavior, you can simply “defrost” the frozen application, and everything should be fine again.
Tapping-and-Holding brings up a different set of choices, but again just concerning the tapped (and held) application: You can search for all files belonging to it, view the app in the market, re-create the market link, if it does no longer appear in your market downloads (or do the opposite, detach it from the market), or move it between internal and SD storage – even if the app does not officially support this.

I’ve added another list of applications I have installed with direct Android Market links and QR codes again for those few who asked here.

I hope this helps some of you who have asked.

Backups, system failures and peace of mind

Another week in the trenches. I had a primary server at our organization have a major failure. The SAS controller (which provides access to SAS type HDDs) died OR the motherboard to the server itself has an issue. Either way without another ‘like’ system that I can put the SAS card into to see if the issues is just the card or the motherboard I cannot access my drives – and they too may be very corrupted. The only machine I have capable of putting the card into is in production. And the cost of a replacement Dell Perc5i SAS card is nearly $200.00 US and could take days to get here. Plus I needed to have this system back up and running very quickly – the server in question runs all or our company financial, shipping and reporting software applications!

Since I have all my ‘data’ backed up to a server drive every night I was secure in the knowledge that we at least had the financial databases and ‘files’ available. But how to get a system back into production? Disk Imaging to the rescue!! I had a fairly recent full system image, created with my favorite backup software – Acronis, available. Yay! Just need a place to restore it to.

Since my organization now has a VMware ESXi/vSphere SAN and cluster running I was easily able to create/import a new ‘Virtual Machine’ from the Acronis disk image very quickly and then just copy over the backed up data files from the night/early morning before. WORKED LIKE A CHARM! If I’d had an available server (Hardware wise) I could also have restored that image to it too.

I’m telling this to you to remind you – I believe in Images(Clones) for my backups, alone with periodic ‘file backups’. That way I’m protected against full drive failures/loses AND stupidity – accidentally erasing or overwriting files. :)
[Imaging or cloning is the procedure by which you create a backup that is identical to a bootable system either to another internal or external drive. This is the ultimate backup! Should your drive fail you can just ‘pop in’ your cloned drive or ‘restore’ that clone to a new drive and your are up and running.]

If you are not regularly creating full image backups you WILL be sorry! I have written numerous articles about cloning and back up.

PLEASE read here if you any kind of concern for you data.

For Mac images and cloning go here.

So of course this weekend I created two new images on separate drives for my home system(s). I can’t tell you the peace of mind you will get from knowing that the worst that could happen to your system is that you might lose a couple of days or a weeks worth of information. If your drive gets corrupted or fails or you get trashed by some virus, you could be back up and running within a very short period of time! No re-installing your Operating System and programs and ‘trying’ to find you data files. Just restore the image and BAM, you up!

What prompted me to start on this rant is that Apple has finally acknowledged it is having some major issues with some of the hard drives in some of their newer systems they have been selling. Looks like some of the drives just ‘fail’. OUCH! You can read about that here.

And although you can have your drive replaced – YOU WILL LOSE YOUR DATA! The Apple folk and/or kids the the ‘Genius’ bar will NOT re-install your system software or clone your drive for you!! Unless you have an image to restore you will have to re-install you System and applications. And unless you had at least some kind of backup to another drive (Time Machine type) your data (read pictures and music!) will be gone!

So folks, backup, backup and then backup again.

The cost of a couple of extra external drives and a little program setup is minuscule to the cost of losing you ‘digital life’. Right now Acronis has a special – only $29.00 US for their home product!! With Apple’s you can even get a way with out purchasing any software!

Be safe, be secure and gain some peace of mind.

More on backups and archiving

“UPDATE!”

After a few weeks of removing loads of nasties from Windows and Mac machines and recovering data from dead or corrupted drives from both types of systems because of malware/viruses and hardware failures, I thought I would republish this.

I must ask you – in this digital age what price will you put on your data?! You family pictures, you financial documents and communications – everything? I don’t ask this lightly. For only a couple of hundred dollars you can KNOW that you will be safe!

People PLEASE HAVE A SYSTEM BACKUP – COMPLETE AND TESTED!!

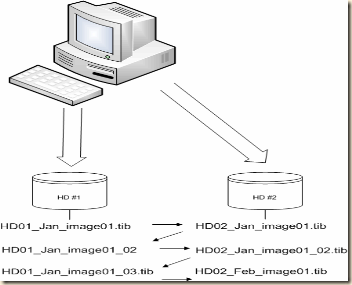
I have been asked again to explain in more detail with examples of how I personally backup/archive my data. My previous article is here and should be read first.


So here it is in a simple, I hope, form.

I have two external HDDs (actually many but for example this will work) I use Acronis as my primary imaging software. If you use OS X you can use Time Machine, Carbon Copy or Apple’s built in disk image utility. I covered these in the post above.

To create my images I use an external HDD mount, like this.  with drives something like this or this. You can mount the drives in your system if you like or use any other external type of drive. I just like the ease and economy of this set up. It also makes it easy to just take the drives, place them back in the protective bags they come in and put them( rotate) into a safe deposit box.

I create a full image of my system on external HD #1 on Jan 1st  – HD01_Jan_image01.tib
On Jan 2nd I create a full image of my system on external HD #2 – HD02_Jan_image01.tib

I now have two images on two separate drives.

At the end of week one for the month I create an incremental backup to external HD #1 – HD01_Jan_image01_02.tib (or whatever Acronis auto names it.)

At the end of week two for the month I create an incremental backup to external HD #2 – HD02_Jan_image01_02.tib

At the end of week three for the month I create an incremental backup to external HD #1 – HD01_Jan_image01_03.tib

On the 1st of the next month I create a new FULL image to HD #2 – HD02_Feb_image01.tib. Once that image is created I can then delete the previous months images ON THAT drive.

On the 2nd of the month I create a full image to HD #1 – HD01_Feb_image01.tib. Once that image is created I can then delete the previous months images ON THAT drive.

This assures me that if my system were to die AND one of my external drives failed I would lose no more that two weeks of data – usually just one week or less!

You should also copy or store one of the external drives in a fire safe or safe deposit box for true disaster recovery!

As with any good backup plan you should regularly test your backups! Either do a full restore (highly recommended) or at least validate and mount your images to insure they are fully readable.

If you wish to, or have to, for compliance issues (corporations) you can archive your monthly images to additional external drives. I do. I have images of machines that are long gone (some over ten years!) and I have been able to retrieve data I needed very easily and quickly. In fact I needed a Photoshop file recently that I was able to retrieve from one of my images of an old Mac G3!!

Archive3

I hope this helps. Please don’t be the person who loses important personal, family or business data because you couldn’t take a little time and effort to set up a backup and recovery plan. The costs and time are insignificant when compared to the cost of loss!

More on Cloud Storage, Backup, Synchronization and Sharing Using Dropbox, Livesync and now Office Live.

I have written previously about cloud storage and backup solutions and how to use those to synchronize data between your many systems at different locations on differing platforms. Most cloud storage and synchronization services can synchronize between differing operating systems too! You can share and access files from Windows, OS X, Linux and even Smartphones. With this post I’d like to just add update some information on how you can use Windows Live services (OfficeLive, and Skydrive) and Dropbox.

1st. OfficeLive.

There have been some exciting recent announcements regarding Microsoft’s cloud storage and synchronization services that have made their offering even more compelling than ever. If you’ve read my previous post (link above) you already know I am a fan of SkyDrive. You can use SkyDrive to upload, store and share photos, documents and data both privately and publicly -  it offers a whopping 25GB of free cloud storage and it integrates nicely with Office 2010. You can use this free service on both a Windows PC and a Mac computer.

Microsoft’s Office Web Application is now live on SkyDrive! It’s called Office Live. You can access Microsoft’s Office web version on your browser.

Office Live now provides for access to Microsoft’s Office suite of applications even if you don’t have MS Office installed on the system you are on! If you just use the Office Live portion you get a default 5GB of storage, but by using your SkyDrive account you get the full 25GB of storage.

While Goolge Docs has allowed for the sharing and publishing of individual documents to the web for a long time, Office Live(and SkyDrive) and Dropbox provide for true sharing of folders with individual, groups or the public. With Office Live you can create a truly amazing collaborative workspaces. Check out this video!

Instead of going through a long and detailed walk through I’ve put together a bunch of links and videos that YOU can go through. Suffice it to say I believe you should use at least one of these services to backup or synchronize your data across the ‘cloud’.

Here is a good how to on SkyDrive

And another.

You can get started with Office Live here.

Here are some very good Office Live and SkyDrive Links. I would highly recommend spending a few hours and going over these. The future of data storage and retrieval is tightly integrated to web services and the ‘cloud’.  Here are some links:

01, 02, 03, 04, 05, If you do a search for Office Live or SkyDrive you should find many more.

2nd. Dropbox.

I have also found this service highly useful for sharing files with other people with whom I am working.
What is Dropbox?
Dropbox  is a “cloud computing” Web2.0 file hosting service offering both free and paid services. The free version offers 2GB of “shared storage”. The difference between SkyDrive/OfficeLive and Dropbox is that Dropbox requires software to be installed onto your system. Something I am not always fond of but this does work well.

Dropbox is file hosting service which enable users to synchronize files and folders between computers across the internet.
This is done by installing a software and then picking a “shared folder” on your computer. From that moment on, that folder will be synced with any computer you choose to install the software on (for example, your home/work computer, your laptop – and so on).

DropBox also enables users to share some of their folders with other DropBox users. This seamless integration of the service with your OS file system (Windows, Mac or Linux) is what’s making this service so comfortable, by allowing me to work with co-workers and have the same “project tree” of folders, all of which are always synced.
You could also share a file “online”, by getting a link to it which you could share with others.

While I will always believe in ‘hard storage’ especially for highly sensitive and personal information you should also look into ‘cloud storage’. You should always have a rocks solid local backup solution but collaboration and the ability to have your information available nearly everywhere is invaluable. If not to store and backup your data, at least for it’s huge collaborative possibilities. That is what I primarily use it for.

I really hope some of you will use this information to make your life, and possibly jobs easier and more productive. As we head into the second decade of the 21st century it’s exciting to see how we can have our information available nearly everywhere and be able to usefully share that information with anyone in the world.

McAfee fix for killed XP machines

I am not a fan of McAfee security and AV products and haven’t been for years. Their software has become a huge drain on system resources and worse, seems to get more false positives than actually stoping malicious software. I highly recommend Microsoft Security Essentials. But if you are one of those that have had this issue I hope this helps.

McAfee recently put out an update that literally killed many machines.

If you are one of those people here is a possible solution.

1. If your computer is forcing you to shutdown (you are getting an error with a countdown), go to Start – Run and type cmd. At the command prompt type ‘shutdown -a’ without the quotes. [This will abort the Windows shutdown.]

2. Open up the McAfee console (Start -> Programs -> McAfee)

3. Disable Access Protection and On-Access Scanner

4. Double click your Quarantine Manager in that window, and restore the files there (right click on it and select restore).

5. Go to your services console (right click on My Computer, select ‘Manage’, and click on the services in the left pane). Make sure both RPC (Remote Proceedure Call) services are running.

6. Start (or restart if already running) the McAfee Framework service.

7. Back in the McAfee console, select Tools -> Rollback DATs.

8. Reboot and you should be all set.

Here is McAfee’s own solution:

http://vil.nai.com/vil/5958_false.htm

How to fix the “Cannot attach the virtual hard disk …

Little backround.
I use Acronis to create images for true disaster recovery ability. With Acronis I can also mount back up images and retrieve any needed files in minutes! The newer versions of Acronis also allow you to convert your Acronis images (.tib) into Microsoft Virtual Hard Drives (VHDs).
[Acronis has solutions for home and enterprise users and is worth every penny! Personal edition is under $50.00 and for corporations it is well worth the price for true peace of mind.]
So back to my VHD issue.
Virtual hard drives can be used to create full blown Virtual Machines (VM)and are ready to use with MS Virtual PC or MS Virtual Server. I am a long time VMWare user too, but I am working on getting much more profecient with MS’s solutions since they are my primary support calls
Another cool tool is the Microsoft Sysinternals Disk2vhd tool. This can create VHDs from any MS Windows version from XP forward.
I’ve been able to mount the VHDs created with this tool and been able to retrieve files with ease.
So after creating a few VHDs with the Disk2vhd tool I decided I wanted to use one of those VHDs to create a full blown VM and run it with Virtual PC on my Windows 7 laptop.
With Windows 7 and 2008 Server you can very easily ‘mount’ VHDs right from the Disk Management console. They can also be very easily converted to other image formats that can also be ‘mounted’ so you can retrieve your files.

However after trying to create the VM and ‘attach existing VHD’ I keept running into a very frustrating problems.
I kept getting this message “Cannot attach the virtual hard disk …”
What does it mean? Not much info in the error, arrrg.

It means you have a Virtual Hard Disk file larger than 127.5GB. Which Virtual PC does not support.
After lot’s of searching I found this article:
How to fix the “Cannot attach the virtual hard disk …” wisefaq.com

This very well presented article is great. It helped me to solve the problem fairly easily!
But I have something to add to this fix that make it so much easier!
You can simply ‘attach’ the drive in Windows 7 (Windows 2008 Server too) Computer Management Console>Disk Management, then right click and ‘shrink it’. Once that is done ‘un mount’ and then use VHD Resizer!
That’s it. Skipping the use of DiskPart. Very easy and quick.
Just thought I’d pass that on for any of you other techies who have run into that or may in the future.

Managing Passwords – Using KeePass

In the digital age remembering your usernames and passwords can be very difficult. You need a password for the Windows network logon, your e-mail account, your homepage’s FTP password, online passwords (like website member account), etc. etc. etc. The list is endless. Also, you should use different passwords for each account. Because if you use only one password everywhere and someone gets this password you have a problem… A serious problem. The thief would have access to ALL your e-mail accounts, banking, mortgage, homepage, etc.

Here is a list of what I have to manage.
My corporate accounts: 64, my logmein accounts: 22,Personal Internet sites and services: 38, my internet email accounts(gmail, hotmail, yahoo): 14,personal banking/credit: 9.
That is a total of 147! And there are probably some I can’t remember!
As you can see having to manage these could be a nightmare without some kind of password management system.

To that end I use KeePass.
KeePass is a free open source password manager, which helps you to manage your passwords in a secure way. You can put all your passwords in one database, which is locked with one master key or a key file. So you only have to remember one single master password or select the key file to unlock the whole database. The databases are encrypted using the best and most secure encryption algorithms currently known (AES and Twofish). I also use KeePass to store my non-digital passwords such as ‘PINs’ for banking and credit cards. Because the database is digital and can be exported it can be copied to many locations for back up purposes – such as USB drives, CDROMs, place in a save deposit box and/or to an Internet storage solution.

http://keepass.info/features.html

There are versions for Windows, Linux, OSX and portable devices such as Blackberrys, iPhones and Windows Mobile (PPC).

There are also ‘Portable Versions’ that can be installed on a USB drive with your Key database for use on other non-secure machines.

Here is a good video how to:
[youtube=http://www.youtube.com/watch?v=hqOe03s9SCs]
Here is another pretty good video on how to setup and use KeePass. It is a little ‘slow’ and it is covering the portable version but the instruction is right on.
http://showmedo.com/static/flowplayer/flowplayer-3.1.5.swf

Windows Utilites and Tools

After cleaning up a friends system recently and dramatically improving it’s performance, appearance and usability I was asked again, nay begged, to recommend as many of the applications and or utilities I use(d) to install or put onto an existing or new installation of Windows to ‘protect it’ and to help keep it running optimally and take full control of your applications, system preferences and resources.

The list below contains most of the things I install on, or use, on all of my machines.
There are also ‘portable’ or ‘non-install’ versions of nearly all of these applications which I carry on my thumb drives too. But I will not provide the links for them as they can be easily found the same place as the full installs of these applications.
There are of course many others I use for network administration but I won’t include all of those here now.
I just wanted to put this up so that those of you looking for some very good freeware applications to enhance and improve your computing experience could find them in one place. And to keep it as secure and trouble free as possible.

Firefox:
Download here
[see list at end for Firefox extensions and add ons I use too]

7-Zip opensource file archiver:
http://download.mozilla.org/?product=firefox-3.0.10&os;=win⟨=en-US
App:
http://superb-west.dl.sourceforge.net/sourceforge/sevenzip/7z465.exe

Notepad++ Opensource notepad on steroids:
http://notepad-plus.sourceforge.net/uk/about.php
Appinstall:
http://superb-west.dl.sourceforge.net/sourceforge/notepad-plus/npp.5.4.2.Installer.exe

Windows PowerToys:
http://www.microsoft.com/windowsxp/downloads/powertoys/xppowertoys.mspx

ClearType Tuner PowerToy:
http://download.microsoft.com/download/b/7/0/b7019730-0fa3-47a9-a159-98b80c185aad/setup.exe

Alt-Tab Replacement:
http://download.microsoft.com/download/whistler/Install/2/WXP/EN-US/TaskswitchPowertoySetup.

Open Command Window Here:
http://download.microsoft.com/download/whistler/Install/2/WXP/EN-US/CmdHerePowertoySetup.exe

Tweak UI:
http://download.microsoft.com/download/f/c/a/fca6767b-9ed9-45a6-b352-839afb2a2679/TweakUiPowTweakUiPowertoySetup.exe

The entire Syinternals Suite:
http://technet.microsoft.com/en-us/sysinternals/bb842062.aspx

Complete tool set:
http://download.sysinternals.com/Files/SysinternalsSuite.zip

Of those I use most are:
Process Explorer and AutoRuns

Revo Uninstaller – freeware:
http://www.revouninstaller.com/
App:
http://www.revouninstaller.com/download/revosetup.exe

JKdefrag:
http://www.kessels.com/Jkdefrag/
App:
http://www.kessels.com/JkDefrag/JkDefrag-3.36.zip

Mike Lin’s Startup Control Panel:
http://mlin.net/
App:
http://www.mlin.net/files/StartupCPL.zip

Unlocker
http://ccollomb.free.fr/unlocker/

Wholockme
http://www.dr-hoiby.com/WhoLockMe/

File assassin
http://www.malwarebytes.org/fileassassin.php

A great spyware finder:

Spybot Search And Destroy
http://www.safer-networking.org/en/spybotsd/index.html

Don’t confuse this application with other that are trading on the ‘Spybot’ name and are in
and of themselves ACTUALLY spyware. The one and only original FREEWARE application is here.

http://www.spybotupdates.biz/files/spybotsd162.exe

CCleaner:
http://www.ccleaner.com/
http://www.filehippo.com/download_ccleaner/download/d1565b7fb77b48a3692a199d871845fd/

Taskbar Shuffle – a simple, small, free utility that lets you drag and drop your Windows
taskbar buttons to rearrange them:
http://nerdcave.webs.com/
download:
http://nerdcave.webs.com/downloads/ts2.5_setup.exe

Another program much like Tweak XP:
http://xenomorph.net/?page_id=336
installer:
http://xenomorph.net/files/xdn_tweaker_setup.exe

ImageBurn CD/DVD burner:
http://www.imgburn.com/
App:
http://download.imgburn.com/SetupImgBurn_2.4.4.0.exe

VLC Media Player:
http://www.videolan.org/vlc/
App:
http://www.videolan.org/mirror-geo.php?file=vlc/0.9.9/win32/vlc-0.9.9-win32.exe

KeyPass:
http://keepass.info/
http://downloads.sourceforge.net/keepass/KeePass-2.07-Beta-Setup.exe

ANTI VIRUS APPS:
I have used both of these and they are fine freeware applications.
I also am quite happy with corporate versions of McAfee and Symantec despite the idiot rantings of people who don’t do this for a living.

AVG free AV:
http://free.avg.com/
App Download:
Freeware download

Clamwin Free AV:
http://www.clamwin.com/
http://downloads.sourceforge.net/clamwin/clamwin-0.95.1-setup.exe

FIREFOX EXTENSIONS I use:
Better Gmail
https://addons.mozilla.org/en-US/firefox/addon/4866

Google toolbar:
https://addons.mozilla.org/en-US/firefox/addon/6249

pdf download:
https://addons.mozilla.org/en-US/firefox/addon/636

stop autoplay:
https://addons.mozilla.org/en-US/firefox/addon/1765

FoxyTunes
https://addons.mozilla.org/en-US/firefox/addon/219

Video DownloadHelper
https://addons.mozilla.org/en-US/firefox/addon/3006

Adblock Plus
https://addons.mozilla.org/en-US/firefox/addon/1865

Redirect Remover
https://addons.mozilla.org/en-US/firefox/addon/537

Grease Monkey for firefox – allows of additional script functionalities in firefox:
https://addons.mozilla.org/en-US/firefox/addon/748

GreaseMonkey Scripts:

Remove Facebook Ads:
http://userscripts.org/scripts/show/46560

YouTube HD Ultimate:
http://userscripts.org/scripts/show/31864

GZoom:
http://userscripts.org/scripts/show/7840