Exchange 2003 P2V and drive expansion fix

It’s been a long few weeks.

I Had an Exchange 2003 server whose physical hardware was failing – drive and drive controller errors and the physical disk was running out of space on the system drive. Which happened to be the ONLY drive in the server. Yes I know that the system, log and dbase files should all be on separate drives, but I did not build this machine. And it has been the only Exchange server in the organization for almost six years! So I can’t just shut it down.

I did a P2V (physical to Virtual) conversion using and Acronis Image (VMware kicks as at this by the way) and moved it to my ESX Cluster on my SAN, with the hope of being able to at least add some more space to the existing drive and then add additional hard drives (virtual of course) to split up the log and dbase files onto drives other than the %system’% drive.

The P2V went OK with some minor issues with ‘hidden network’ cards and such causing problems. But I got past that. Following ‘Method 1’ here http://support.microsoft.com/kb/269155 (note that you must not close the command line window after step 2 or you will not see the devices!!).

I also had to re-run the Exchange adprep/domainprep on the Domain controller to fix some messed up AD containers/connectors. I also found that after the adprep that was a reference to on old SBS2000 Exchange server that was no longer on the network (fax service too) and I manually removed those via the ADSIedit.msc. So finally it was at least working again! We, as do most organizations that have been around for a while, have a huge spam/malicious email flood that is continually taxing the server. But that is for another post.

So on to the next MAJOR issue. When I moved the machine to a VM I expanded the one and only drive – C: from 32GB to 40GB before starting and connecting it. This sounds all well and good but that extra 8GB of space just shows up as ‘unallocated’ space in the Windows 2003 Server Disk Manager.
I also did create two other volumes on the datastore that houses that machine for the future moving of the logs and dbase files and attached them to the Server.

So now my Exchange 2003 server has three disks (drives) listed in Disk Manager a C: drive still running out of space (but showing 8GB of ‘unallocated space) and two additional large (30GB) drives (F & G); which I will eventually move my log and dbase files to.

So how to expand the system drive to it’s full available size?! I need to have enough room just to be able to move the dbase and log files.

There are LOADS of articles out there ranging from using DiskPart, using Acronis DiskDirector, using gparted and many others. But all seem extremely complex and with poor success rates according to the very long responses on the posts.

I finally found a SUPER blog post By JJ Clements here that looked VERY promising!

So I gave it a try. My first issue was that (as noted in some of the comments) that I had to run the Dell EXTPART utility in safemode. Kind of a bitch to get into in VMware – you have to be VERY quick with the F8 key!

But I was able to expand the drive to the full 40GB. All would be good and well if this wasn’t an Exchange server.

BUT THEN MY INFORMATION STORES WOULDN’T MOUNT!! ARRGGG!!!

The solution – run a repair on the information stores (as per MS’s article here). I could not however run the offline defrag (step 3 in the MS article) to the local system – I’m still out of space! But I will run that to another drive later. I then restart all services.

BAM!! THE F$*ker works!

Well that’s all in a 15hour day I’m done.
Re-Installing Windows 7 if you don’t have original installation media.

Many people who purchased a computer with Windows 7 installed have found that nearly every manufacturer no longer provides you with the Operating System Media (DVDs). You will only be provided with a ‘restore to factory settings option’. Which will only work if the system ‘restore’ partition has not also been corrupted. And if like a recent case I had (you can read that here)you have ‘dual booted’ or otherwise changed your partitions configurations you may not be able to get to the ‘Factory Restore’ option. And if, when you purchased your system you didn’t immediately create the ‘restore media/DVD’s disc(s) you may be hosed if you have to re-install your your Windows 7 Operating system because it died, became corrupted or was otherwise compromised.
Well fear not!
As long as you have your installation Key – contained on your COA (Certificate of Authenticity) you can download and re-install your system! COA is that sicker put on by the manufacturer somewhere on your system

If you cant read it or it has been rubbed off, you can also use one of these tools to find out your installation Keys. [You must use your legally obtained key on the same hardware by the way, or you are breaking the law!]

LicenseCrawler (Excellent tool by Martin Klinzmann!)
Download here

More information

Or you can try Aporah KeyFinder:

Or Majic JellyBean (I’ve used this one many times too)

[note – these applications will be flagged by 90+% of all virus scanners as a ‘key finder/logger’ IT IS A KEY FINDER OBVIOUSLY. So often you must disable you AV protection for the brief moment you download and use this. Get your key information. then Copy the information to paper and TURN YOUR AV SOFTWARE BACK ON!]

Windows 7 comes in various editions like Ultimate, Professional, Home Premium, Home Basic and Starter. Now there might be many cases when you would like to choose the edition during setup. But in reality they are pretty much the same except for one configuration file!

Here are the individual downloads:

Windows 7 Home Premium x86 SP1 (bootable) download

Windows 7 Home Premium x64 SP1 (bootable) download

Windows 7 Professional x86 SP1 (bootable) download

Windows 7 Professional x64 SP1 (bootable) download

Windows 7 Ultimate x86 SP1 (bootable) download

Windows 7 Ultimate X64 SP1 (bootable) download

BUT I recommend downloading the ‘Ultimate version’ (either 64bit or x86) and then deleting the configuration file that ‘tells’ the installation program which version it is. This way you will have ALL options available and then should be able to use YOUR LEGITIMATE installation Key.
I also recommend that you make a bootable USB installation. It will make things much quicker and easier in the long run. If you have multiple Windows 7 Systems (netbooks especially, as most don’t have DVD drives etc.) you can use the single USB with your valid installation keys on every one. [Again you must have valid/legal keys for each installation.]

Simplest way to make you installation ‘version free’ is to delete the file ‘ei.cfg’ from the sources directory of the installation media. Doing this step is what makes the USB memory stick allow you to install any version of Windows 7 as it no longer has a default version configured.

I wrote about the simplest way(s) to do that (create Bootable USB) using Microsoft’s USB tool here. You can run “del F:\sources\ei.cfg” (replace ‘F’ with whatever drive you’re USB is) from the command prompt and you Windows 7 Bootable USB memory stick is ready to go.

You can now either boot from the USB memory stick or just run setup.exe from the drive to start the install process. Either way you will now prompted for the version of Windows 7 you want to install!

If you are going to burn the ISO directly to DVD then you can can also use a free tool "ei.cfg Removal Utility" to delete "ei.cfg" file so that you can choose the desired version at the time of installation.

OR you can use another free tool "Windows 7 ISO Image Edition Switcher" to modify "ei.cfg" file so that you can convert a specific Windows 7 edition setup ISO file (e.g. Windows 7 Ultimate) to another one (e.g. Windows 7 Professional).

I hope this helps for those who asked.

Backups, system failures and peace of mind

Another week in the trenches. I had a primary server at our organization have a major failure. The SAS controller (which provides access to SAS type HDDs) died OR the motherboard to the server itself has an issue. Either way without another ‘like’ system that I can put the SAS card into to see if the issues is just the card or the motherboard I cannot access my drives – and they too may be very corrupted. The only machine I have capable of putting the card into is in production. And the cost of a replacement Dell Perc5i SAS card is nearly $200.00 US and could take days to get here. Plus I needed to have this system back up and running very quickly – the server in question runs all or our company financial, shipping and reporting software applications!

Since I have all my ‘data’ backed up to a server drive every night I was secure in the knowledge that we at least had the financial databases and ‘files’ available. But how to get a system back into production? Disk Imaging to the rescue!! I had a fairly recent full system image, created with my favorite backup software – Acronis, available. Yay! Just need a place to restore it to.

Since my organization now has a VMware ESXi/vSphere SAN and cluster running I was easily able to create/import a new ‘Virtual Machine’ from the Acronis disk image very quickly and then just copy over the backed up data files from the night/early morning before. WORKED LIKE A CHARM! If I’d had an available server (Hardware wise) I could also have restored that image to it too.

I’m telling this to you to remind you – I believe in Images(Clones) for my backups, alone with periodic ‘file backups’. That way I’m protected against full drive failures/loses AND stupidity – accidentally erasing or overwriting files. :)
[Imaging or cloning is the procedure by which you create a backup that is identical to a bootable system either to another internal or external drive. This is the ultimate backup! Should your drive fail you can just ‘pop in’ your cloned drive or ‘restore’ that clone to a new drive and your are up and running.]

If you are not regularly creating full image backups you WILL be sorry! I have written numerous articles about cloning and back up.

PLEASE read here if you any kind of concern for you data.

For Mac images and cloning go here.

So of course this weekend I created two new images on separate drives for my home system(s). I can’t tell you the peace of mind you will get from knowing that the worst that could happen to your system is that you might lose a couple of days or a weeks worth of information. If your drive gets corrupted or fails or you get trashed by some virus, you could be back up and running within a very short period of time! No re-installing your Operating System and programs and ‘trying’ to find you data files. Just restore the image and BAM, you up!

What prompted me to start on this rant is that Apple has finally acknowledged it is having some major issues with some of the hard drives in some of their newer systems they have been selling. Looks like some of the drives just ‘fail’. OUCH! You can read about that here.

And although you can have your drive replaced – YOU WILL LOSE YOUR DATA! The Apple folk and/or kids the the ‘Genius’ bar will NOT re-install your system software or clone your drive for you!! Unless you have an image to restore you will have to re-install you System and applications. And unless you had at least some kind of backup to another drive (Time Machine type) your data (read pictures and music!) will be gone!

So folks, backup, backup and then backup again.

The cost of a couple of extra external drives and a little program setup is minuscule to the cost of losing you ‘digital life’. Right now Acronis has a special – only $29.00 US for their home product!! With Apple’s you can even get a way with out purchasing any software!

Be safe, be secure and gain some peace of mind.

Get your Cloud Data down to your machine

Here are some ways to get your ‘cloud data’ backed up locally.

I know most people look to the ‘cloud’ for their secondary backups (if they even have a primary one) but few people ponder what will happen if their information is lost or compromised in the cloud or the terms of service of the provider that holds that information changes to your detriment.

I am going to provide some information on how to get your data out of your web email, Facebook and some other services.

One thing I see quite often is that people cannot access their online/web mail service at an important time to find information or they lose or have deleted the information they need and have no way of retrieving it.

So let’s start with web mail services. Today most people have very important information stored in their email; from plane reservations, business communications all the way to payment receipts. So in my opinion this is the first and most important place to start.

Get your mail downloaded locally.
For GMail. [My personal favorite!]:
Before you do anything, you’ll need to enable POP3 and/or IMAP in Gmail, which will let you access your accounts on the desktop. To do this, head into Gmail’s Settings and go to the Forwarding and POP/IMAP tab. Scroll down to the IMAP section and enable IMAP. Then save your changes, and open up your desktop email client of choice to set it up using the following instructions.

I use Outlook 2007/2010.

If you don’t have Outlook you can also use Thunderbird (an open source application by the Mozilla folks)

There are also a number of other mail applications you can use to get your information – Apple Mail, Thunderbird, Outlook Express, LiveMail etc..

I like using the POP3 connections over IMAP for most of my connections.
POP mail service has been available MANY times when IMAP has NOT – for my Gmail, Hotmail and Yahoo. If the ‘webmail’ is not available online because of a service interruption then IMAP will most certainly too. This is not usually the case with POP. HOWEVER there is a big caveat with POP – you must make sure in the advanced settings or your mail client that you choose "to leave a copy of the message on the server"!!

But IMAP does have its advantages too.
So pick what will provide you with the most features you feel you will need – I suspect that would be IMAP probably be best for most people.

To set up POP with Gmail look here,  and find your client and follow the steps.
For IMAP go here.  and find your client or device on the list and follow the instructions.

If you’d like to read further about the differences between IMAP and POP you can read this here.

For Yahoo mail it is a little harder if you live in the U.S..
Yahoo wants you upgrade to a "Mail Plus" paid account to get POP and IMAP access directly. But you don’t have to! The best option is to use an application called YPOPs. I’ve used it in the past to get my Yahoo mail connected to Thunderbird and Outlook with out any issues.

If you have Window Live Mail or Apple Mail the client itself downloads your Hotmail/.Live or MacMail/MobileMe data to your machine by default. BUT remember this is an IMAP connection so if you delete something from you Live Mail client on the desktop it will be deleted on the server!

One important thin that may people miss is to get their CONTACT data out/backed-up from their mail clients. Something I also feel is very important.
For virtually all web mail clients that is as simple as going to the ‘Contact’ section and finding and choosing the ‘Export’ option. Those can then be exported into a format that virtually any Email client can import.
That should get you going with your mail.

Now to Picasa.
Simplest way is to install the latest version Mac or PC and then simply go up to the menu and use File ==> Import from Picasa Web Albums ==> Select All.
And Flickr
You can use Flickr’s Flash based web app here  just click on the ‘start now’ and follow the instructions.
Or you can use the open source application Downloadr . Downloadr is a photo downloader for Microsoft Windows. It provides a simple interface to download large sized images from Flickr to your computer.

Now to Facebook.
If you have Yahoo you can easily download/copy all of your contact out. You can follow this tutorial here.  One tip is that I would suggest setting up a ‘temporary’ Yahoo alias with NO contacts in it so that you do not end up with duplicates or mismatched merges. Then export those and import them into any application you choose.

Also Facebook now allows you to actually export YOUR data to a file! Following this VERY well written walk-through right here. I’ve done it and it works great! You may have to wait a while before you receive your ‘confirmation email’ and link but you will be able to get your stuff.

Finally there is an open source application Called MyCube Vault. MyCube Vault Backs Up Your Facebook and Google Data Regularly
Once installed, the app requires you to authorize it to each of the services you want to back up. From there you can tell the service where to store your backups and how often to save your data. If you’re concerned about downtime or just wary of keeping your data in the cloud, it’s worth a look.

I checked it out and it works well.
Windows version here

Mac version here

Well that is a long winded post and I hope some people will put it to use. Like backing up your local data don’t be the person who loses precious information because you were too lazy or couldn’t be bothered to learn something new.

Peace.

Firefox 5 news

Today Mozilla released the Final version of Firefox 5 ahead of its scheduled date. It has been slated for official release next Tuesday June 21. If you’d like, you can get it now here:
Windows

Mac

Linux

Before installing I HIGHLY recommend backing up your complete profile. For that I use MozBackup on Windows. You can get the Windows install here

For other OS’s you can use FEBE
To install FEBE download the .zip file then rename it with a .xpi extension and open it with Firefox.

I would also recommend that you install the "Firefox Add-on Compatibility Reporter" to Firefox 1st too. Get that here.  This will keep unsupported or updated plugins/add-ins from crashing the browser and may let some of them work even if they are ‘not supported’.

So what’s new in Firefox 5?

  • Added support for CSS animations
  • The Do-Not-Track header preference has been moved to increase discoverability
  • Improved canvas, JavaScript, memory, and networking performance
  • Improved standards support for HTML5, XHR, MathML, SMIL, and canvas
  • Improved spell checking for some locales
  • Improved desktop environment integration for Linux users
  • WebGL content can no longer load cross-domain textures
  • Background tabs have setTimeout and setInterval clamped to 1000ms to improve performance
  • The Firefox development channel switcher introduced in previous Firefox Beta updates has been removed.

As with any new software be aware that some items may have changed locations and some Extensions/Add-ons may not function correctly or at all. So once again let me re-iterate – MAKE A BACK UP OF YOUR SETTINGS/PROFILE before installing!! You may also with to download the version prior to version 5 incase you have to uninstall version 5 and re-install your old version.
Windows:
http://releases.mozilla.org/pub/mozilla.org/firefox/releases/latest-4.0/win32/en-US/Firefox%20Setup%204.0.1.exe
Mac:
http://releases.mozilla.org/pub/mozilla.org/firefox/releases/latest-4.0/mac/en-US/Firefox%204.0.1.dmg
Linux:
http://releases.mozilla.org/pub/mozilla.org/firefox/releases/latest-4.0/linux-x86_64/en-US/firefox-4.0.1.tar.bz2
For other versions and languages go here:
http://releases.mozilla.org/pub/mozilla.org/firefox/releases/latest-4.0/

Here’s to hoping that it proves to be a worthwhile upgrade!

Another serious Web Browser hole

Contexis Security has found a BIG problem with WebGL implementations on Windows, Mac and Linux have numerous vulnerabilities which allow malicious web pages to capture any window on the system or crash the computer, according to research from Context Information Security. They actually demonstrate how to steal user data through web browsers using this vulnerability!

The report comes right on the heels of Microsoft’s denunciation yesterday of the security architecture of WebGL and announcement that it wouldn’t be seen in Microsoft products any time soon see here .

Sheesh! IE 9 is proving to be WAY more secure that FireFox and even Chrome! But until I can get the Firefox Extensions I use (or comparable) in IE I’m still a FireFox guy.

So let’s fix that:
To Disabe WebGL in Firefox 4

1. Type about:config in Firefox address bar and continue on through past the warning dialog.

2. Type "webgl.disabled" (no quotes) into the Filter box then Double click Webgl.disabled entry and turn its value into “True”.

3. Restart Firefox browser, WebGL is now disabled in Firefox 4.

To disable WebGL in Google Chrome you will need to:

1. Rright-click your Google Chrome shortcut or from your Windows menu on your desktop, click ‘properties’ and add “-disable-webgl” to the Target Shortcut box

2. Restart Chrome

As always please keep your systems, Web Browses and their plug-ins, Anti-virus/Antispyware software, and applications (especially Adobe products!!) up to date and fully patched.

And try and be vigilant about security and always ‘on guard’.

More on backups and archiving

“UPDATE!”

After a few weeks of removing loads of nasties from Windows and Mac machines and recovering data from dead or corrupted drives from both types of systems because of malware/viruses and hardware failures, I thought I would republish this.

I must ask you – in this digital age what price will you put on your data?! You family pictures, you financial documents and communications – everything? I don’t ask this lightly. For only a couple of hundred dollars you can KNOW that you will be safe!

People PLEASE HAVE A SYSTEM BACKUP – COMPLETE AND TESTED!!

I have been asked again to explain in more detail with examples of how I personally backup/archive my data. My previous article is here and should be read first.


So here it is in a simple, I hope, form.

I have two external HDDs (actually many but for example this will work) I use Acronis as my primary imaging software. If you use OS X you can use Time Machine, Carbon Copy or Apple’s built in disk image utility. I covered these in the post above.

To create my images I use an external HDD mount, like this.  with drives something like this or this. You can mount the drives in your system if you like or use any other external type of drive. I just like the ease and economy of this set up. It also makes it easy to just take the drives, place them back in the protective bags they come in and put them( rotate) into a safe deposit box.

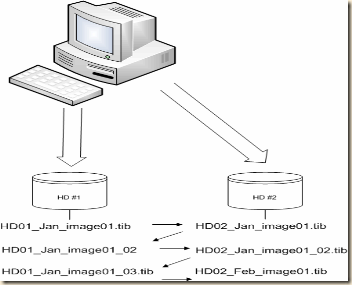
I create a full image of my system on external HD #1 on Jan 1st  – HD01_Jan_image01.tib
On Jan 2nd I create a full image of my system on external HD #2 – HD02_Jan_image01.tib

I now have two images on two separate drives.

At the end of week one for the month I create an incremental backup to external HD #1 – HD01_Jan_image01_02.tib (or whatever Acronis auto names it.)

At the end of week two for the month I create an incremental backup to external HD #2 – HD02_Jan_image01_02.tib

At the end of week three for the month I create an incremental backup to external HD #1 – HD01_Jan_image01_03.tib

On the 1st of the next month I create a new FULL image to HD #2 – HD02_Feb_image01.tib. Once that image is created I can then delete the previous months images ON THAT drive.

On the 2nd of the month I create a full image to HD #1 – HD01_Feb_image01.tib. Once that image is created I can then delete the previous months images ON THAT drive.

This assures me that if my system were to die AND one of my external drives failed I would lose no more that two weeks of data – usually just one week or less!

You should also copy or store one of the external drives in a fire safe or safe deposit box for true disaster recovery!

As with any good backup plan you should regularly test your backups! Either do a full restore (highly recommended) or at least validate and mount your images to insure they are fully readable.

If you wish to, or have to, for compliance issues (corporations) you can archive your monthly images to additional external drives. I do. I have images of machines that are long gone (some over ten years!) and I have been able to retrieve data I needed very easily and quickly. In fact I needed a Photoshop file recently that I was able to retrieve from one of my images of an old Mac G3!!

Archive3

I hope this helps. Please don’t be the person who loses important personal, family or business data because you couldn’t take a little time and effort to set up a backup and recovery plan. The costs and time are insignificant when compared to the cost of loss!

The connection to Microsoft Exchange is unavailable. Outlook must be online or connected to complete – Cant add Outlook accounts…

How I recently fixed one hell of an Outlook 2007 to Exchange 2003 connection problem.

This occurred on brand new Windows 7 Enterprise AND brand new Windows XP workstations while trying to configure the Outlook clients to connect to our Exchange 2003 server.

The actual error is:
"The connection to Microsoft Exchange is unavailable. Outlook must be online or connected to complete – Cant add Outlook accounts.."

Worse still is that this problem did not occur one every new workstation! Windows XP or Windows 7 – only some random ones.

I checked all network/connectivity parameters I could – DNS, LDAP, RPC, TCP/IP etc., and otherwise checked routing and name resolution ad nauseum. And all checked out.
I had this problem a year or so ago but could not find any of my notes! Aggravating to no end. So I swore I would make sure to document my fix when I found one.
So Google here I come….

One of the first things I did then was this:
http://support.microsoft.com/kb/913843/en-us

I checked that the ‘Attendant’ service was running on Exchange; it has been for a few years.

And virtually everything mentioned in every article I could find – 5 days of searching and hundreds of pages!!
Like:
http://social.technet.microsoft.com/Forums/en-US/exchangesvrclients/thread/44a24ec6-33b5-4b66-9fdb-2318b4874fbc

and

http://social.technet.microsoft.com/Forums/en-US/exchangesvrclients/thread/1227b956-c533-4c08-b56d-150ad8486b4c

I also tried importing the Outlook registry keys from machines (both Windows 7 and Windows XP) that do work – still no joy.

I literally went 11 pages deep on Google http://goo.gl/EddW9 and many, many more deep from each of those, looking for a fix!

I read deep somewhere in one post that someone mentioned running ‘Outlook rpcdiag’ – I don’t remember that switch. I checked RPC on the machine(s) and it showed no errors already right..

But since this was a specific ‘Outlook’ switch I though what the hell.
So…
I ran:
"outlook /rpcdiag" from the command line.

It tried to ‘find connections error’ but did not report anything. Damn..
Then it just closed after it could not really start.

Then I started Outlook in Safemode (I was prompted to upon launching Outlook, but it can be run "outlook /safe").

I was then able to add and configure the Exchange account and get connected!!
I waited until it updated the mailbox completely.
Then I restarted Outlook normally and IT WORKS NOW on all of the affected boxes!

I am not sure if all of these steps need to be taken but I now have a plan to follow.

I hope this may help someone, because from most of the posts I read it is a MAJOR issue and MS is not doing much about it! At least I’ll have my notes.

How to create a VPN Connection on MAC OS X 10.5 Leopard

How to create a VPN Connection on MAC OS X 10.5 Leopard

This is a step-by-step guide on how to create a VPN Connection on a MAC OS X 10.5 Leopard System.

I recently had to do this again for some of our remote staff, so I thought I’d post it as a reminder to me and maybe help others who have asked in the past.

1. Go to ‘Apple’ –> ‘System Preferences’

clip_image002

2. Select ‘Network‘ from system preferences

clip_image003

3. In ‘Network‘ system preferences, click the ‘+‘ icon on the bottom left cover of window to make a new VPN Conection.

clip_image005

4. As shown in the image below, a new window appears. Click on the ‘Interface’ menu and see the list of choices and select ‘VPN’.

clip_image007

5. Next, Change the ‘VPN type‘ from ‘L2TP over IPSec’ to  ‘PPTP‘. And then In the ‘Service Name’ field, type in ‘VPN Office’ or ‘Company Name VPN’ or make one up. Once you have done, Click on ‘Create’

clip_image009

6. Next, we need to make a configuration. Select the ‘Confguration’ drop menu and select ‘Add Configuration’

clip_image011

7. A window will pop up, asking to name your new configuration. Type you ‘Company Name VPN’ here and then click ‘create’

clip_image013

8. Next, enter in your company’s ‘Server Address’ example; ‘server.domain.com’ or ‘72.14.213.x’ and ‘Username’, for example ‘administrator’ or ‘LarryHolmes’ or what ever

clip_image015

9. Next, Select the ‘Authentication settings’ button

clip_image017

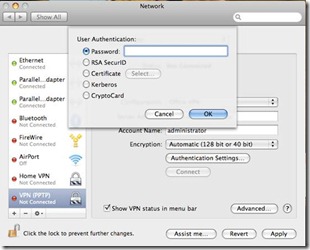
10. Enter in Your ‘password’ and click ‘OK’

clip_image019

11. Next, Click on the ‘Advanced’ Button

clip_image021

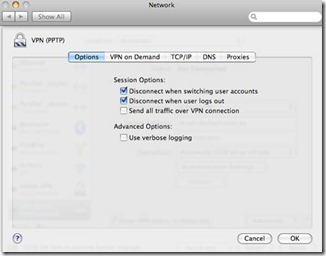
12. Make sure that ‘Send all traffic over VPN Connection’ is unticked. Then Click ‘OK’

clip_image023

14. Once you have done that, click ‘Apply’. And connect to your New Vpn Connection by clicking on ‘Connect’.

There you go…

Consolidating and Cleaning up iTunes library and files

After consolidating, merging and updating a bunch of separate iTunes libraries and directories I was annoyed at how messed up my iTunes library and directories had become. I tried moving and ‘consolidating’ my library as described here for PC here for Mac go here. This method should retain all your playlists and remove many duplicates. There is also an Apple script to help if you are on Mac.

If you are on a Mac you can probably get by with using the move/consolidate technique and some GREAT script/apps located here. Doug’s main site is here  and worth checking out. I can’t say enough about the value of these tools – well worth the low price!

But sadly for me and many others nearly all my music is on (and managed) via Windows machines and *nix storage. So that still left me with loads of duplicates and entries with no actual files (file not found in iTunes). I also had come across loads of other music folders and libraries on old machines – many which had music that I didn’t in my current library but of course loads of duplicates.

So I was off to create a ‘clean’ iTunes library – No duplicates and all files correctly tagged. There are some applications that may do what I need for PC (as I’ll mention at the end) but I wanted to try and do it via freeware tools. [Take note that the following will eliminate your playlist and counts! So if you really need to have your playlist or play counts preserved don’t go further and try one of the paid options!]

Now, on to my adventure….

I deleted the original library. The location of your library files can be found here.

I then installed the latest greatest version of iTunes. After install, I set my directory options [in advanced preferences] to a new clean location on my HDD. I also set the option to ‘import new music to iTunes directory’.

I copied all my various music directories (from all machines and drives – both networked and external] to a temporary location; I ended up with about 7 different folders with loads of iTunes music directories.

I would then used that location to ‘import’ back into iTunes by selecting the ‘File’>Add Folder to Library’ option.

After all the importing was done I could see LOADS of doubles and garbage. So I set off to first remove the actual EXACT file duplicates.

Remember that many songs have the same Title, Artist and description tags (musically speaking) but may actually be different versions – live, acoustic, re-mastered etc., or from different albums such as compilations or soundtracks. So in iTunes you may see many doubles (if you go to File>Show Duplicates) that are really not actual duplicates!

My goal was to first delete the actual files that were exact file duplicates.

To do this I used the freeware tool Duplicate Cleaner download here. This looks for files based on their MD5 hash signature – so the file it finds are EXACTLY the same.

Download and install it and then run it. Select the location of your iTunes music folder and Choose scan.

clip_image002

When the scan is complete you should all your duplicate files.

Then you can highlight the ones you want to mark for deletion. Click on first item then the space bar and use the arrow key to move up or down to highlight next selections and press the space bar to ‘check’ the next and keep going till you have all your doubles or others you want removed highlighted.

clip_image004

Choose your delete or ‘move’ options. You may want to just move the items if you are really concerned about deleting files you might really want or need to keep.

clip_image006

clip_image008

Then I used the tool called iTunes Library Updater from here.

Download and install it.

Then open iTunes and minimize it.

Then open the iTunes Library Updater and run it.

Locate your iTunes music directory, as I mentioned, I put mine to a different location for easy sharing/backup/cleanup.

clip_image010

Select the folder

clip_image012

Here I chose the above options. Then ‘Start’

clip_image014

Then wait till done

clip_image016

Click close, close the application and then close iTunes.

Then reopen and check iTunes.

I actually did the above a few times and it made a HUGE difference in my library!

Real duplicates seem to be gone and my music tags appear to be much more in order too!

As I’ve mentioned, there are many other articles and some tools that are supposed to do all of this.

There are two highly rated applications – TuneUp is one and the other is Rinse, which may even do this even better, but they are not free (both run $39.00 I think). And I haven’t used either of them yet.

Here is Tune Up and over Here is Rinse.

Here is one such article with another tool.

But, I still haven’t found anything that has done as well a job as my above method for FREE.

I hope this helps some. Next time I might spring for the paid apps but I did learn something and maybe you will too! Good luck!